On November 28, I visited one of my favourite parks here in Tokyo, Jindai Botanical Gardens, to shoot the beautiful autumn color that they have as a result of some strategically planted Japanese maple or Kaede trees. While I was shooting the below scene, I realized that a small crowd of photographers had gathered behind me, and they were vying for position to shoot the same scene. This is not uncommon, but it got me thinking that I had found a particular spot where everything works, that had not been obvious to others photographing in the same location, so I figured I’d talk about this a little today.
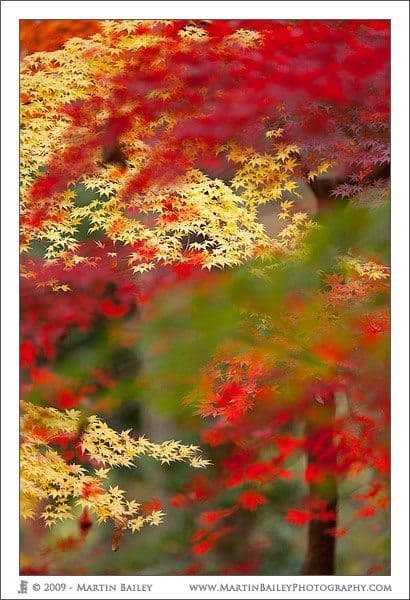
Colour Collaboration
First let’s look at one of the resulting images from this shoot, which is image number 2417. I love this image. It was one of those “hair on the back of my head standing up because I’m making something beautiful here” moments. I have been so busy with other stuff recently, that I didn’t have time to have more than a quick glance through these images on the day that I shot them, but when I came back to the set on Sunday, three weeks later, my hair was standing up again just looking at these.
Anyway, as I say, I was aware at the time I was shooting this, that it was not the obvious angle to shoot these trees from. In fact, I have shot here at this time of the year for three years in a row now, and never noticed this angle before, so it has not been obvious, even to me, until this time. I have shot the yellow tree a lot. It’s my favourite tree here. This year though, it was not as beautiful as it has been for the first two years. I don’t know if they pruned it down, or if it was just more grandiose in previous years, but it just didn’t have the same presence this year. Feeling like I was standing in front of an old friend, I even called out to the tree, announcing that I was back, and thanking it for the great photos from previous years. I only shot a few frames of the tree from the same angle this year though, because it didn’t look at good, and I was not going to make as good a picture as the ones I already have.
As I walked away though, I felt somewhat saddened, and really wanted to make something of the beautiful yellow leaves, so I started to do what I’d spoken about a number of times, and that’s to look back. We can often think of a scene in a certain way, and especially, once you have what you think is the best photograph that the scene can offer, we walk away. I do though often look back at a subject as I move on, just to make sure that I’m not missing something, and this year, I did that for a little bit longer than I might usually do, and I ended up spotting an angle where there were a number of different coloured trees in a line. The moment I saw it, I knew there was a shot there, so I dropped my tripod down with my 300mm F2.8 lens on it, and started to line up a shot. I raised the tripod a little, and then lowered it a little, so that all of the leaves lined up just right.
I was pretty far away, so to really edit out as much of the surrounding as necessary, I also used the 1.4X extender, so this image was shot at a focal length of 420mm. So, in addition to looking, and finding the right angle to get this shot, I had adjusted the height of my camera on the tripod, and the focal length. The next thing I did was rendered the beautiful red, green and orange leaves in the foreground out of focus, by using a very shallow depth-of-field. When using the 1.4X extender with the 300mm F2.8 lens, you lose one stop, so F4 is my widest aperture, and that is what I shot this image at. I would bet a three digit amount that the majority of people that saw me shooting here and tried to shoot the same angle ended up stopping down the aperture, trying to get all of the leaves in the frame sharp. I didn’t shoot anything smaller than F4, because I knew that this look is what I wanted.
Shortly after I finished shooting this scene, I walked along a little further, and placed my tripod down to shoot the wider scene, mainly to show you what I was working with, and as I did, some of the guys that had been queuing behind me for my spot, ran past, obviously having seen something that interested them. I turned to see what it was, and the sun was shining through the larger surrounding trees, just highlighting another orange and red leaved tree maybe 100 meters or so away. My wife looked at me and asked if I wanted to go over, and I said no, and on recalling this realized that there’s another element in the making of this picture. I had shot this scene in the shade, which really helps to control the colours.
I’ve also shot the yellow tree in direct sunlight, and it’s nice, but as I’ve mentioned before, nice sunny days don’t always make for the best photographs. I’d actually prefer to shoot in the shade or on an overcast day and even in the rain, as opposed to bright sunlight. If you go to my online gallery and take a look through my albums, or use the Cooliris viewer to look back through my image collection, you’ll quickly see that there are very few images that include a blue sky. There is the odd one, but really, most of the time a blue sky doesn’t excite me, and even if I’m out on a clear day, I rarely include the sky in the shot if it’s a clear blue one.
So, to recap, I worked the angle, the height from which I shot, the amount of the scene that I include with the focal length, the depth of the focus (depth-of-field) with my aperture, and the quality of the light hitting the leaves was controlled by the time of day of my visit. I should note that the weather forecast for this day was sunny in the morning, and overcast in the afternoon. I arrived after lunch. All of the elements that I’m talking about here are totally adjustable, and very personal to how we as photographers choose to make our images.
To hopefully help to impress on you what sort of a scene I’d carved this image from, below is a photograph of the wider scene. You can see here though that it’s just a regular park, albeit a very beautiful one at this time of year. You can probably appreciate though that the first photograph we looked at my not have been obvious at all, to the many people that come here at this time of year to photograph these trees. The above photo is of the trees to the extreme right of this image.
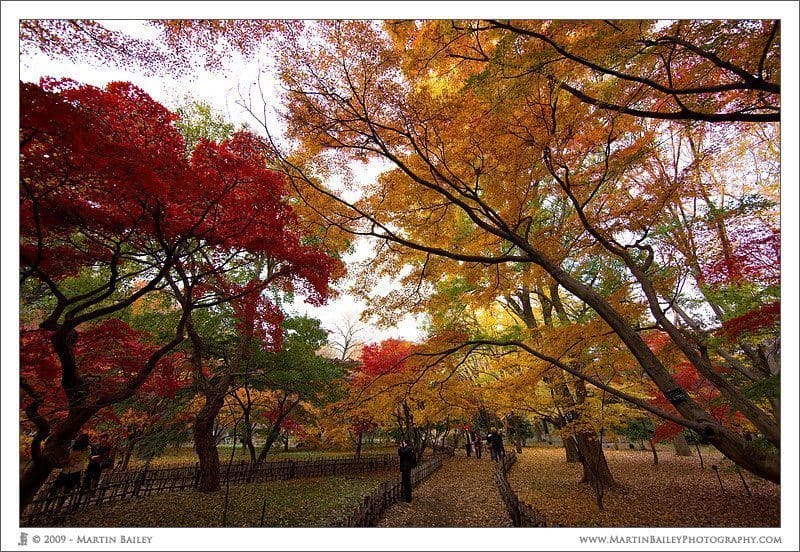
Location
As another example of making an image rather than taking it, let’s look at another photograph that I made this year, to introduce a few more concepts. The image is number 2256. You may recognize this image from earlier episodes, but the point I wanted to make here, is that I ensured that the sea that we can see softly illuminated here looks like that because I checked when the full moon was going to rise at this location, before planning a trip out to this spot. It’s a beautiful place, but to me, there’d be little point in coming here to photograph this Shinto Gate unless the moon was going to light up the sea in this way.
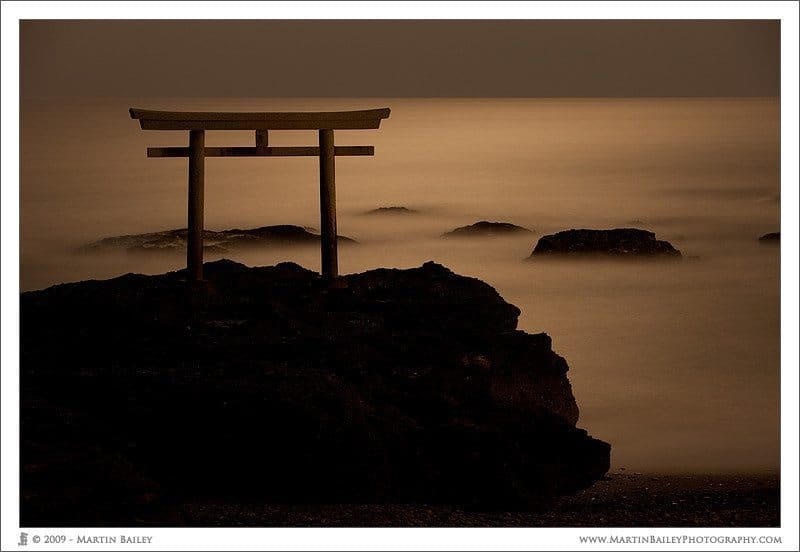
Ooarai Torii (Shinto Gate)
Also, you might remember that I photographed this same gate a few years ago as well, and the images, although OK, were not as nice, in my opinion, as this one. The reason for that is because I now have a much better handle on long exposures. This image was made with a 4 minutes exposure, which really renders that sea so much more beautifully than the 30 second to one minute exposures that I’d used previously. So here, my point is, doing your homework while planning a trip, to give yourself a chance of getting the conditions you are after is important. Also, don’t just consider how you frame and compose your images, but bear in mind the visual effect that the length of the exposure gives you, as well as the depth-of-field etc that are controlled by the aperture.
Finally, I wanted to talk about one other option for making pictures, instead of taking them, and that is post processing. I clearly recall standing on the beach at Hamamatsu with my wife, and she was telling me that I was wasting my time photographing there. Let’s take a look at the image that I did not post to my gallery first, to give you some background.
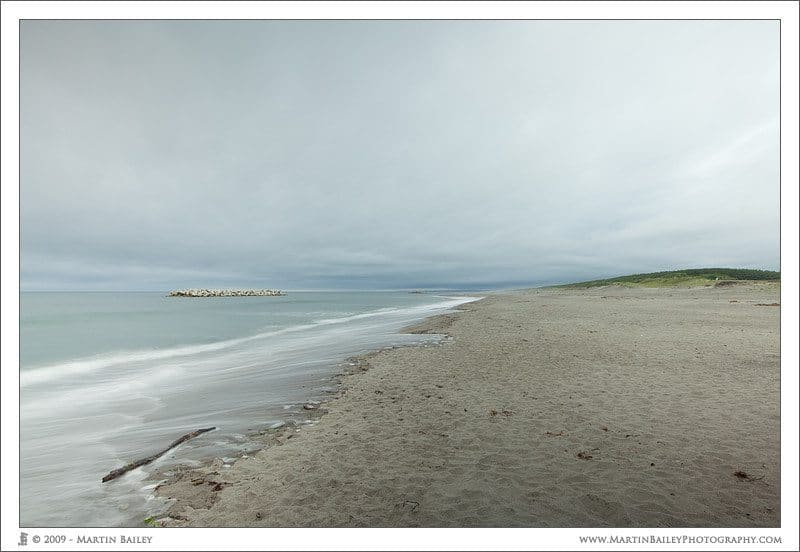
Nakatajima Sakyuu (Original)
Here you can see a pretty drab scene, although you can get an inkling of what I was trying to do, if you notice that I was again using a long exposure, to enable us to see the effect the waves have as they draw back out, around the log in the foreground. I was being persistent here though, as although I was in this area to meet with the company that I had do the die-pressing for my new folios, I had brought all my camera gear, and was determined not to leave the area without at least one photograph to also show for my four hour drive.
Despite the apparent drabness of the scene though, as I shot this, I had a clear picture of what I was going to do with this shot in my mind. I knew that I was going to convert this to black and white, probably in Nik Software’s Silver Effex Pro, as we’ll see shortly. My main objective moved from capturing something immediately beautiful, because it simply wasn’t there, to capturing a base image I could use to make something more special in post processing.
You’ll see that the sky in the original is very pale and featureless, but note that it is not blown out. I do this by default, but if say, I had blown out the sky, because it’s just a large blank patch of white, which I sometimes do with more contrasty scenes if there are more important foreground elements that need to be correctly exposed, then I would not have been able to rescue any detail in the clouds.
Let’s now take a look at the resulting image which is number 2294 (below). The black and white conversion enabled me to add contrast, and make those wave breakers in the sea to become more of a focal point. It’s not easy to see in the Web version, but in a larger print, these concrete formations actually add quite a bit to the shot. Most of all though, using some strategically placed control points in Silver Effex Pro, darkened down certain parts of the sky and beach, and helped to rescue something from what at first glance could easily have been a very uninspiring shot.
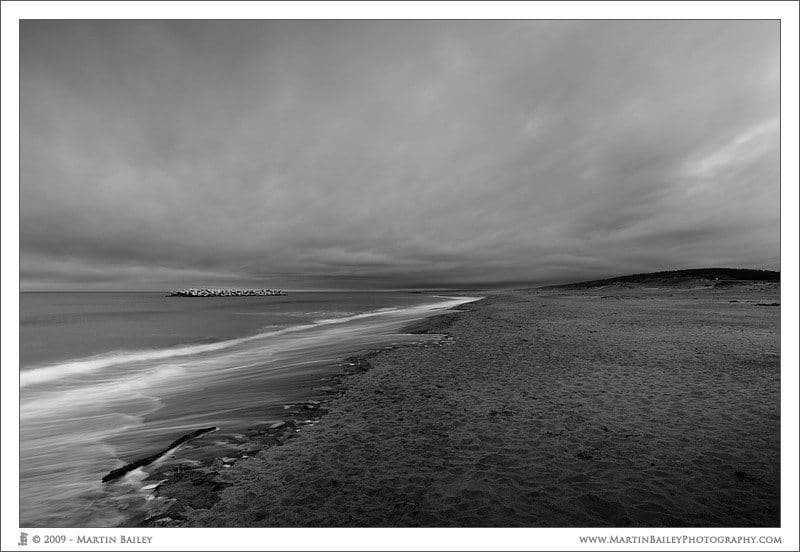
Nakatajima Sakyuu
Again though, I want to stress that ensuring I got the water drawing out in the image, with that long exposure, and ensuring that I captured detail in the sky were critical for the success of this image. I am certainly not saying that you can rescue any old crappy image in post processing. My point is that to make an image, you can also sometimes pre-visualize what you will do in post processing, and make your field work more of a gathering process, than a finishing process. I do like to nail a shot in camera, but sometimes, we have to make the best of the situation, and I think this is a relatively good example of that.
Of course, there are times when you will totally make the shot, by using models, and props, and totally controlling the light. I will soon be sharing the details of a portrait shoot that I did a couple of months ago where I rented a studio and controlled all the light with three strobe until and umbrellas, and even had some volunteer models come along to help me build my portraiture portfolio. These are times when making an image takes on a different meaning, but we’ll get into that at another time.
For now, let’s just remember that all of your compositional tricks, as well as carefully selecting the angle and height from which you shoot, the focal length, the shutter speeds and the depth-of-field are all things that you control, and that can make, or break, a photograph. Keep tabs on everything that affects the results, including the quality of the light, the time of day, and the location of the sun, or the moon, if they are important to you in the realization of the images that you intend to “make”.
Podcast show-notes:
This post was also prompted by a recent blog post by Rick Sammon; “On Making Pictures”: http://rickrawrulessammon.blogspot.com/2009/12/on-making-pictures.html
Music from Music Alley: http://www.musicalley.com/
Audio
Download the Enhanced Podcast M4A files directly.


0 Comments