Last week, a new user on the forums, Chua Kim You, user name redpandafire from Montreal, Canada, revived an old thread from June 2004. I’d posted and article called “Fundamental Advice for Photographer’s Getting Started”. I had to admit, that looking back at this post from over five years ago, there were a lot of things that I would have written differently.
The article itself is a little presumptuous and I would have worded much of it differently now than I did back then, but I as a photographer have also changed a lot over the last five years, and so I decided to sit down and think about how I would write this today, and that is the topic of today’s post and podcast. In fact, this is just part 1. I’m going to release part 2 next week, so stay tuned.
I’m going start afresh today, and just go through what I would probably tell a beginner today. I should say that this is not an article on how to start out as a professional photographer and set up a business etc. It’s more targeted for the total beginner that has just bought a camera, or maybe just made the jump from a compact digital to a digital SLR camera, and wants a kick-start to get them up to speed on the fundamentals. I should also say that it is of course not comprehensive. To cover everything you need to know about photography would require multiple very fat books, not a single Podcast episode. This should be a good primer though, so here with go with my…
Photography Fundamentals for the Beginner (2009)
So, you’ve stumbled across photography, and started to make pictures with either a high-end compact digital or a digital single lens reflex camera, or DSLR. Photography is great fun, and to really put yourself in a position to get started quickly, and learn the craft well, I suggest you take the following points into consideration as you experiment with your new camera.
Left Brain/Right Brain
Firstly, realize that although some people can come at photography from one side or the other, in general, to be a good photographer you’ll need to work at being both an artist and a technician, quite often at the same time. People will tell you that it’s not about the gear, and that’s true to an extent, but don’t interpret this to mean that you don’t need to learn how to use your gear or learn some fundamental technical rules and theories. Some of the technical stuff won’t make sense at first, and that’s OK, but the sooner you plant the seeds, the easier it will be to all fall into place later.
Read the Manual
Some people joke about never reading their manual. Some people boast about this, thinking that they are so cool or intelligent that they don’t need to. Both of these activities won’t help you to learn how to use your camera to its fullest potential. No matter how many times I upgrade my camera bodies, the first thing I do is to sit for an evening and read the manual, with my new camera at my side. When upgrading, there are some paragraphs and chapters that are pretty much a straight copy and paste from the previous manual. In this case, skip over it quickly, but don’t ignore it. As this is a guide for beginners though, I assume this is your first camera, so do read the entire manual for your camera, and for any lenses that you have also bought, if you have a DSLR. When you are done reading the manual, you’ll have a good knowledge of what the various settings are for, and how to change them.
Have Fun!
If you are already getting out, experimenting and having fun, that’s great! If not, by all means continue to read/listen to the rest of this, but take your time and don’t get bogged down in details. There is a huge amount of information out there now. Just looking through our Photography Podcasts will certainly help, but the Internet is literally teeming with information on photography these days. So much so, it really is easy to concentrate so much on studying about it all, and trying to learn every detail that you forget to just get out and shoot. Ideally you’ll be able to strike a balance, where you study some of the time, then get out and shoot and experiment to your heart’s content as well.
Exposure Basics
There are three elements that will influence your camera’s exposure, and these are the aperture, the shutter speed and the ISO. In the film days ISO was set by the film you bought, and so once you had a roll of film in the camera you were pretty much stuck at that ISO, but now with digital cameras you can change it freely, and so it really can be counted as a per/frame exposure setting.
 Aperture – This is the hole inside the lens that controls how much light gets through during the exposure. Apertures are somewhat confusingly rated by small numbers for wide apertures, and large numbers for small apertures. So F2.8 is pretty wide, whereas F32 is pretty small. The aperture size is represented by an f-number and often referred to as an f-stop. Common f-numbers or full f-stops are F1.4, F2, F2.8, F4, F5.6, F8, F11, F16, F22 and F32. With each of the f-number increments, the amount of light that enters the camera to make the image is reduced by half. The weird numbering for f-numbers comes from the fact that they are a ratio of the focal length and the aperture. For example, if you have a 100mm lens with a widest aperture of F2.8, the widest aperture is about 36mm. If we divide 100 by 4, the next full f-stop down, we get a 25mm aperture, which is half the area. Let’s not get too hung up on these calculations for now though. Just note that the larger the number, the smaller the aperture and the less light that gets into the camera.
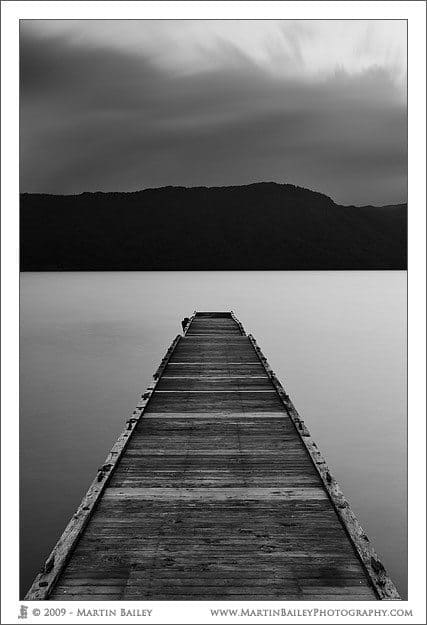
Shutter Speed – This tells the camera how long you want it to allow light into the camera. The longer the shutter speed, the more light enters the camera and the brighter your resulting photograph will become. Also, as the world around us is moving, the length of your shutter speed can drastically change how your image looks. If you photograph a lake with a fast shutter speed of say 1/250th of a second, you will freeze any movement in the water, and be able to see all of the waves on the surface of the lake pretty much as you do just watching it with the naked eye. If however, you do a very long exposure, like in my example image, number 2320 (above right), all of the movement blurs into a smooth flat surface that we can’t actually see with the naked eye. Shutter speeds are also counted in stops, by halving or doubling the amount of time. One stop faster than 1/250 of a second is 1/500 of a second, and one stop slower is 1/125 of a second and so on.
ISO – The ISO rating is the sensitivity of the film or digital sensor to light. Standard ISO are 100 or 200. It used to be that 100 to 400 ISO was the safe range, before you started to get too much noise or grain in your images, but cameras these days are happily shooting very clean images at much higher ISO, so experiment with your camera to see what you can shoot at, and use the entire range as necessary. As with aperture and shutter speed, ISO is also counted in stops, and doubles and halves as you increase or decrease the ISO.
Note too that most cameras these days allow you to select apertures, shutter speeds and ISO ratings in one third increments, so as you change these values you will have two other numbers in between the full values that we looked at here.
Any of the above values will change the exposure. You can also raise one and lower the others to achieve the same exposure. For example, say we start off with the camera set to ISO 100, with an aperture of F5.6 and the shutter speed set to 1/125 of a second. If you change your aperture from F5.6 to F8, you will reduce the amount of light getting in to your camera and therefore reduce the exposure by one stop. To make up for that with the other settings, you could increase the ISO from 100 to 200, or you could increase the shutter speed from 1/125 of a second to 1/60.
Likewise, if you want to have a faster shutter speed to freeze some action, you could increase it by say two stops from 1/125 to 1/500 of a second, and change the ISO and aperture accordingly. You could change both by one stop, moving the ISO to 200 and the aperture to F4, or you could change just the aperture down to F2.8, assuming that your lens goes that wide. This is a little bit complicated, but hopefully will be making some sense. Don’t worry if it isn’t. We may be just sowing seeds here and it will all fall into place at some point, I assure you.
Depth-of-Field
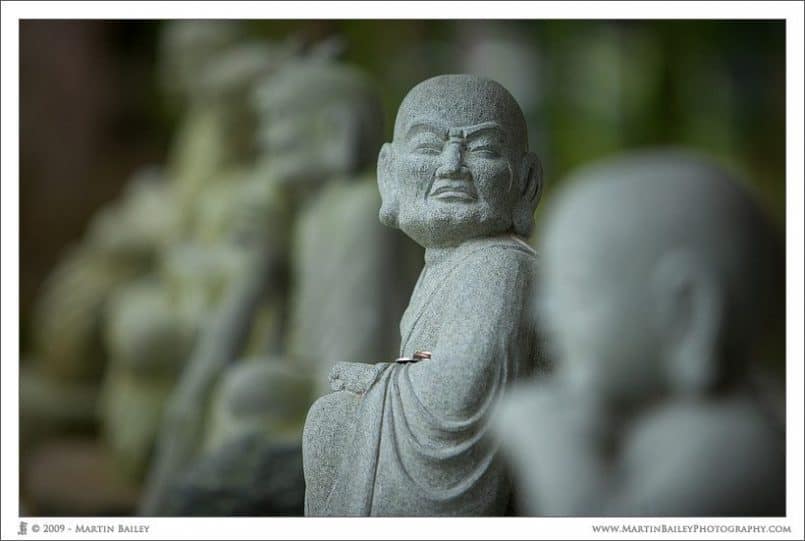
Depth-of-field is the area of the image that is in focus. Let’s look at example image #2289 (below), where we can see the second statue from the right is in sharp focus, but the one to the right in the foreground and the other statues in the background are all blurred. This is because the second statue from the right is inside the depth-of-field, and the others aren’t. This image was shot with a wide aperture of F2.8 and a long focal length of 175mm, using my 70-200mm F2.8 zoom lens.
The depth-of-field is directly affected by the aperture, the distance to subject and the focal length of the lens. We discussed the way a smaller aperture lets in less light above, but also, as we make the aperture smaller, we increase the depth-of-field. If we move further away from the object or focus on something deep in the scene, we also increase the depth-of-field, even without changing the aperture.
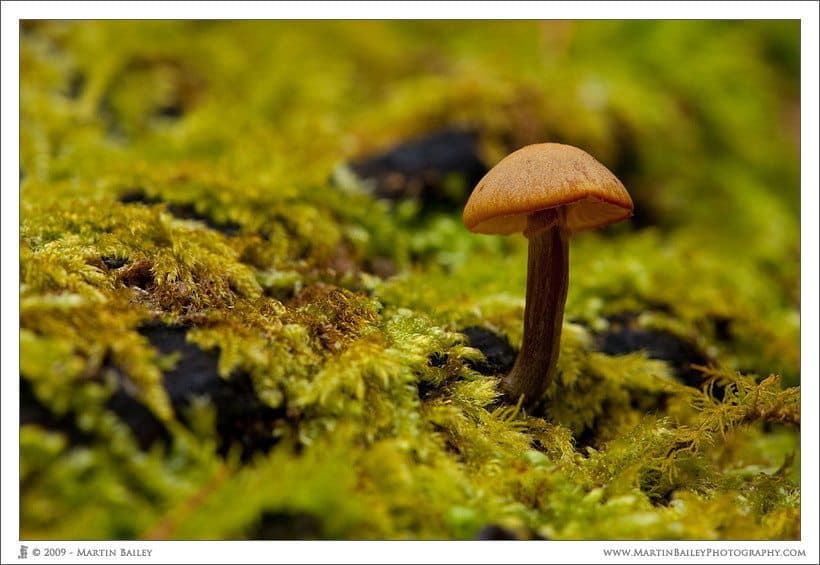
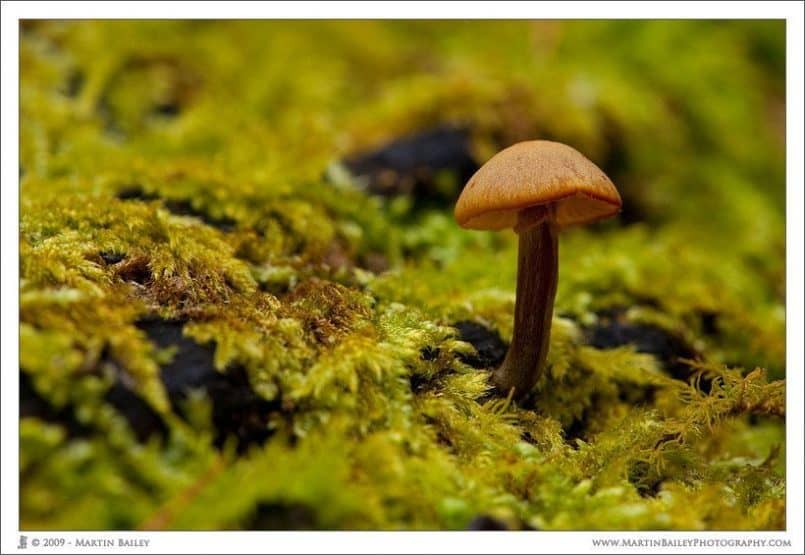
The closer the subject gets, the shallower the depth-of-field, and this is why close-up, or macro photography requires smaller apertures to achieve enough depth-of-field to get even very small subjects, like the mushroom in image number 2395 in focus (below). In fact, even with an aperture of F11, with a 100mm macro lens, the mushroom which was probably around 1cm in depth is not all in focus. The front and back edges of the head of the mushroom is slightly out of the depth-of-field.
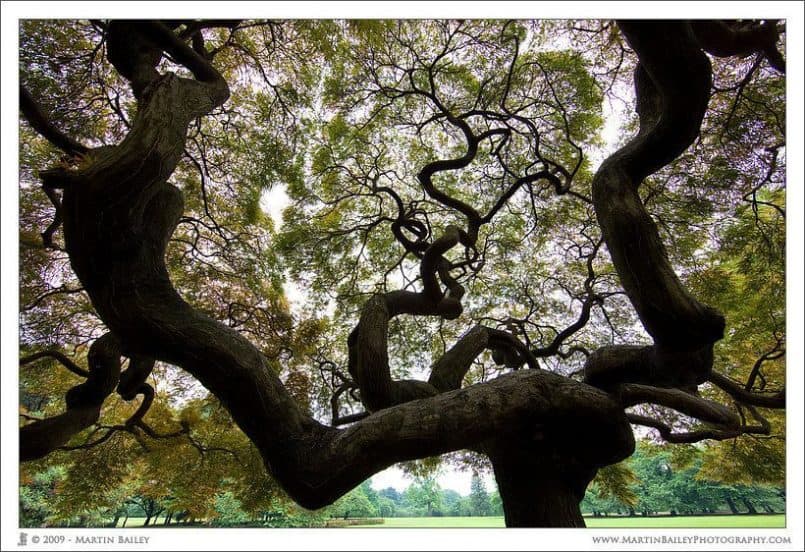
Also, to illustrate how wide angle lenses have deeper depth-of-field, let’s look at image number 2283 (below) which was shot with an ultra wide angle lens, at 14mm. Here I used F8, a wider aperture than the mushroom shot at F11, and yet everything from the tree that we are looking up into in the close foreground, to the distant trees along the bottom of the frame, is in focus.
I personally like to shoot with wide apertures and create lots of creamy bokeh, which is the out of focus areas of an image, whenever possible. As a general rule though, when I shoot landscapes, as with most people, I try to get the entire scene in sharp focus, so I work to get a small aperture. It’s a fine balance though, because if you go too small, past F16 for example, the image starts to become less sharp, even though the depth-of-field increases, so you don’t want to just shoot everything at F32.
If I’m doing flower shots, or portrait work, I generally try to get as little of the image in focus as possible. It takes experience to know how much depth-of-field field any focal length, aperture and focus distance combination will give you, but luckily there are tools to play with too. If you have an iPhone, search for one of the great Depth-of-Field tools like DoF Calc. There is also a great tool that works on Windows called Barnack, that you can play with to see how the focal length, distance to subject and aperture create varying depth-of-field.
Get Out of Program Mode
To control the aperture and depth-of-field, as you become more comfortable using your camera, try to move out of the P or Program mode. The Program mode allows for very little control over the Aperture and Shutter Speed. If you don’t understand how to change the camera’s shooting mode, again, look in your manual.
Most of the time, you’ll want to shoot in either Aperture Priority or Shutter Priority modes. Aperture Priority mode allows you to set the camera’s aperture, and the camera will then set the shutter speed accordingly, by looking at the scene and evaluating with the camera’s meter how much light you need to make an optimal exposure. If the scene is very dark, you’ll have a long shutter speed, if it’s very light you’ll have a short shutter speed. You’ll use aperture priority when you want to control the Depth-of-Field (see above).
If you need to tell the camera how fast you want the shutter speed, and don’t care about the depth-of-field, then you could try Shutter Priority instead. You might use this for example when you are shooting sports or racing cars, when you need to stay above a certain shutter speed to ensure that you freeze the action. Many people find though that selecting the aperture in Aperture Priority, and selecting a high enough ISO to maintain a fast shutter speed give the most control. There is also Manual Mode, in which you pretty much take full control, but that’s a little bit more advanced and probably outside of the scope of this post.
Exposure Compensation
The light meters and computers in our cameras today are incredibly intelligent. They have scenes in their memory that they compare what you have framed, and try to adjust the exposure they select accordingly. But at the end of the day, they are still machines and they make mistakes. To over-ride this, your camera has a feature called Exposure Compensation. This is usually adjusted by the big dial on the back of your camera; but again, refer to your manual to make sure you know where this is.
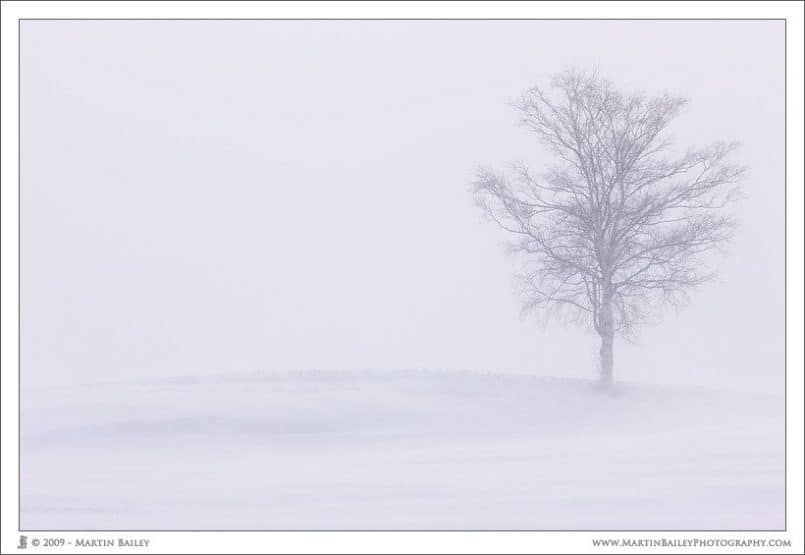
You will need to use exposure compensation when the scene you are photographing is extremely light, or extremely dark. For example, to shoot an image like number 2183, which is basically a pale grey tree in a field of snow with a white sky (below), I would have to use around plus one or plus one and a third of a stop exposure compensation. This is because the camera tries to make everything look like an 18% or mid-tone grey. To compensate for this and make the snow look white, I increase the exposure.
If the scene was very dark, like say a brown bear in a dark cave, I would, from a great distance, probably have to decrease the exposure by around one stop, so that the camera didn’t make the scene too bright, which would ruin the mood of the shot. Unfortunately I don’t yet have an example image to show you here.
Check the Histogram
The last thing to note on exposure before we move on is that these days with the digital revolution, we’ve now got the almighty histogram to rely on. So, reading histograms is a little bit complicated and I don’t want to get into too much detail here, but basically a histogram is a graph that you can display on the back of your camera, and I do suggest that you set your camera so that this is viewed when the image that you just shot is displayed in preview mode on the LCD.
Basically the histogram’s graph maps the darkest tones in your image to the left and the lightest tones of your image to the right. The more tones you have on the dark side the higher the graph gets on the left, and the more tones you have on the highlight side, the higher the right side gets and the closer to the right side it gets. Basically what you want to look out for is that the right side of the histogram doesn’t touch the right side or the right shoulder of the histogram, unless you know why it’s there. Say you have the sun in the shot, and you are going to let that overexpose slightly, so you don’t have to make the rest of the shot too dark. Otherwise you basically want to stop the histogram from hitting the right shoulder.
You also want to turn on the flashing highlight warning if your camera supports that, and again, check the manual to see if this is supported and how to turn it on. You’ll have the histogram and the image both displayed on the LCD, and if there are areas that are blown out, they will be flashing. If you don’t care about these areas that we call specular highlights, then don’t worry about it, but if you think that the area that is flashing should be within the dynamic range of the image and not over-exposed, then you’ll want to use the exposure compensation to reduce the exposure slightly until the flashing highlights stop flashing and until the right side of the histogram stops hitting the right shoulder.
See more information on shooting for highlights in my Dynamic Range post.
Use RAW
One last thing that I want to mention before we finish for this first part, is that I suggest you get used to shooting in RAW mode very early. If you want, do your practicing and experimenting in JPEG mode, but RAW is actually more forgiving if you get the exposure off a little, and the image quality is better, because the camera doesn’t compress the image, losing some of the detail, especially in heavily textured areas. Using RAW does bring a little overhead in post processing, but tools like Lightroom for Windows and the Mac and Aperture for the Mac only make it so easy to work with RAW files, there really is no excuse, especially as hard disk space is also now so cheap. Do yourself a favour, and just get used to shooting in RAW.
Next week we’ll get into some fundamental composition techniques, and a few other areas, so please do stay tuned if you are finding this useful.
Thanks to Chua for reviving that old thread and prompting today’s and next week’s Podcast. It’s been fun to do this, and hopefully many others will find it useful too.
Podcast show-notes:
Depth-of-Field Explained in detail: https://martinbaileyphotography.com/2009/09/09/podcast-132-depth-of-field-explained/
DoF Calc: http://www.apptism.com/apps/dof-calculator
Barnack: http://www.stegmann.dk/mikkel/barnack/
Music from Music Alley: http://www.musicalley.com/
Audio
Download the Enhanced Podcast M4A files directly.


Thank you for this podcast, great stuff.
Thanks Billy! I’m pleased you enjoyed this Podcast! 😀