Today, in the first Q&A episode for a year, I answer a question from a listener about shooting under a grey sky, and I also go into detail on why I use Manual Mode, especially in challenging exposure situations.
The question that I’m going to answer today is from Eric Vogt, from the States.
Eric wrote:
“Thanks for all your teaching and all the time you sacrifice for our hobby. I was at the beach in Oregon this past weekend where the skies were overcast. I was shooting the many pelicans there, but so many photos looked like the one attached here below. How would you approach shooting into an overcast sky?
Would you set exposure compensation to be overexposed a full stop or so? I was able to slowly get very close to these shorebirds, but was disappointed with lighting in the photos. Was it just a foul day for good photos of these birds? I’ve heard so many times that overcast days give great light, but is that just for portraits?”
Thanks very much for the great question Eric. My response is a bit long, as there’s a lot to cover here, but I’m sure you’re not the only person that has trouble with these sort of conditions, so let’s take a look at your shot and see what could have been done. The first thing I want to say is that the pelican itself is very sharp, so congratulations on your technique! I also like how you have not got the pelican dead-center, which is great.
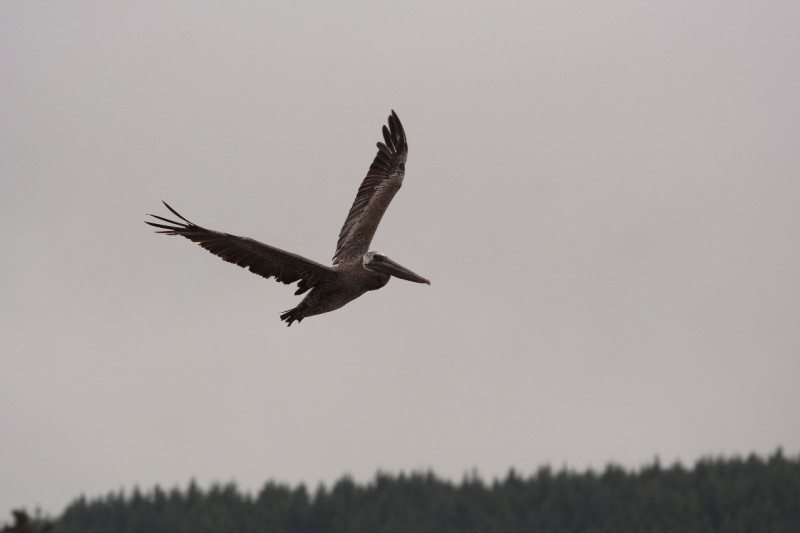
Pelican (original) from Eric Vogt
For sure, an overcast day like this is not the most ideal for shots of birds in flight. We don’t always have the luxury of choosing the shooting conditions though, so I’ll explain what I’d bear in mind if I was shooting in these conditions.
On the exposure, you’re right. Had you used exposure compensation, this would have improved the shot greatly. I’d say you could have gone to around plus one and a third or one and a half stops, depending on how your camera is set up, and you’d have gotten the pelican perfectly exposed, and the sky would still not have been blown out.
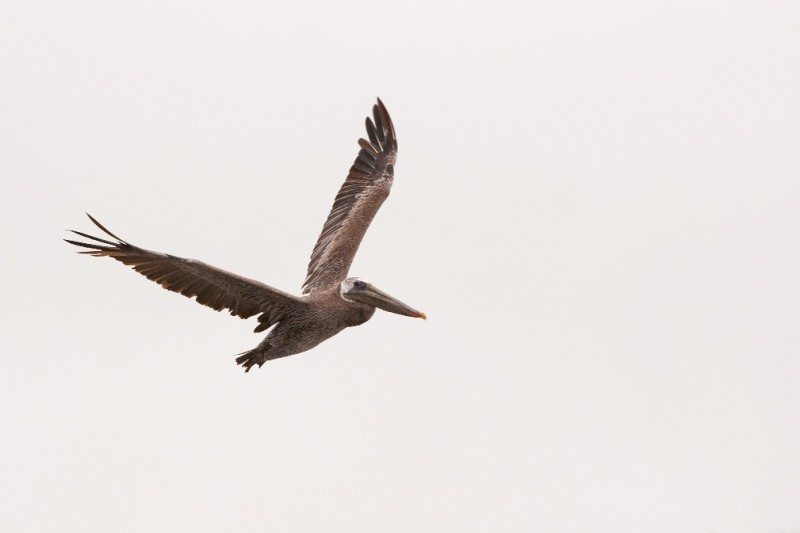
Pelican by Eric Vogt (with +1.33 Exposure added in Lightroom)
We can also see here that I took the image into Lightroom and made a few minor adjustments to see what could have been achieved with exposure compensation. To get to the optimal exposure for this shot, I added 1.33 stops exposure in Lightroom to bring out the details in the pelican. You can also see that the sky is almost white now, which is what Eric probably saw, not quite as grey as in the original. The sky in Eric’s shot is almost a perfect grey card, which is exactly what the camera wants to do to every image you shoot. That is, turn it into an 18% grey.
Overcast skies can be great, and I personally prefer an overcast sky for many subjects, including flowers and landscapes in many situations. For this sort of bird photography though, it does pose a challenge to get nice flight shots. My suggestion if you are to shoot in conditions like this is just to get as close as possible, filling the frame with the bird and reduce the amount of sky around it. Notice also that in my version I cropped the line of trees out as well. I don’t think they add anything to the shot, and we basically want to try to compose to avoid things that don’t add anything, kind of like editing in camera.
I know that there are limitations on how close you can get, either physically, or with your longest lens. I see that Eric shot this with a 200mm focal length, and found out in follow up communication that Eric was using the 70-200mm F4 IS lens, which is a wonderful piece of glass. Eric also tells me that although he had a 1.4X Extender, which is what Canon calls a tele-converter, but he didn’t use it because he wanted to get some shots of some friends childer on the beach. This is a worthy reason to leave off the extender, but quite often, we have to make a decision on which subject to go for. If getting a good shot of the pelican is important to you, then you could drop the extender on for a while, at least until you get your shot, then take it off and go back to shooting the kids. Trying to do more than one thing in photography can often end up in you not getting your shot, or any shot at all.
Realistically though, for bird photography, even with something as big as a pelican, you need something a bit longer, even than 280mm, which is what the 70-200 would reach with the 1.4X extender fitted. Although I should note that Eric was using a Canon Rebel XT, which has a 1.6 crop factor, so Eric was actually shooting at 320mm, and that would become 450mm with a 1.4X Extender, which is pretty good and would have made for a nicely framed image of the pelican.
Ideally though, especially if you are going to shoot smaller birds, it would be nice to get something a little longer. I really enjoyed the 100-400mm lens from Canon for a number of years, especially when I was just starting out. The 100-400mm is a little on the soft side, but you can’t beat it for versatility. You could also consider something like the 150-500mm from Sigma, which would be great for birding, but it is a little dark at F5.0, going to F6.3 as you zoom to towards 500mm. Still, it’s not an incredibly expensive lens for the reach, and probably worth thinking about.
Again, in follow up communication, Eric also mentioned the 300mm f4 with the tele-converter or the 400mm f5.6 prime lenses, which shows that Eric is definitely a discerning photographer when it comes to sharpness. My advice here is that if you can handle the fact that you will miss some shots because of the inability to zoom, then for sure, these prime lenses will give you sharper images. I myself use the 300mm F2.8 sometimes with, and sometimes without the 1.4X extender, and I am getting incredibly sharp bird shots, even hand-held with this combination, but I do miss shots sometimes. I clip the wings tips off, or even just cannot get the bird in the frame as they come closer towards me sometimes.
I do of course use a second body with something like the 70-200mm F2.8 L lens sometimes as well, when I’m shooting big birds like the Red-Crowned cranes that can sometimes fly overhead, requiring a much shorter focal length to fit in the frame. I’m happy with my decisions now, and am enjoying nice sharp images, but I do sometimes miss the versatility of the 100-400mm.
My point here is that for serious bird photography, you really can’t avoid getting a long lens. I also use the 600mm F4 L Lens, and put the 1.4X extender on it when I need that extra reach. I may pick up the Sigma 300-800mm lens too, as I’m hearing a lot of good things about that lens, and the versatility, along with that reach, is something not to be sniffed at. It also has a constant aperture of F5.6, which isn’t that bad for a lens of this focal length. We are talking about a $7,000 to $8,000 lens hear though, and I realize that most people aren’t going to pay this amount for what is essentially a hobby.
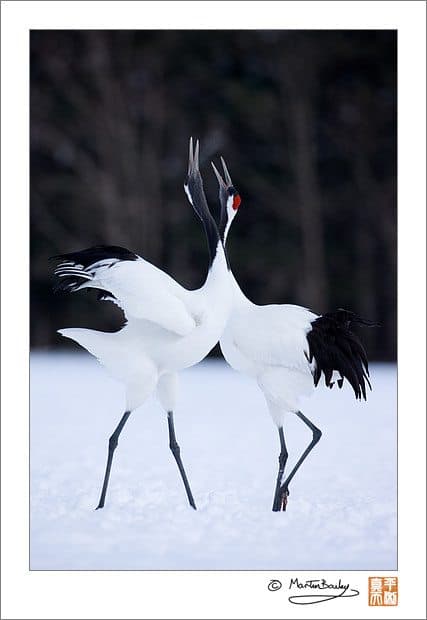
Honking Dance
I’m certainly not saying that Eric needs to buy an $8,000 lens, but had he managed to fill the frame with the pelican, not only would the camera’s meter have gotten a better exposure reading, because of the darker subject filling more of the frame, it would have enabled Eric to get rid of much more of the sky. Again, if something doesn’t add to the shot, try to get rid of it. I should note though, with regards to composition, even when cropping tightly, I would still leave a little room to the right to give the impression that the pelican has some space to fly into. Rules are made to be broken of course, but in general, you want to give our subjects room to move. Putting it right up against the side that it’s moving towards can give a sense of drama, but more often than not, it just looks like bad composition.
With camera’s having more and more pixels each year, you can of course consider cropping the image in post processing, but you don’t want to throw away too many pixels, if you think you might want to print the image pretty large at some point. If you only want to use the image on the Web or view it on the computer screen though, that would be fine.
Anyway, let’s get back to the exposure discussion, as although until now I have been replying to Eric’s question about using Exposure Compensation, another thing that comes up very often is shooting in Manual mode. In Eric’s situation, shooting up at a plain grey sky, Exposure Compensation would have been fine, unless the pelican flew across a much brighter or much darker background. If that’s the case, although this can be very daunting initially, I usually recommend using the cameras Manual mode. Whenever the subject is moving from a background that is sometimes brighter, then other times much darker than the subject, it really helps to not have to think about the background at all, and the only way you can do this is to use Manual mode.
This takes a lot of getting your head around if you haven’t tried this for yourself, but if you keep in mind that your subject’s color and luminosity will not change unless the lighting conditions do, it really doesn’t matter how bright or dark the background is, if you know that you have set your camera set to expose your main subject correctly.
I’ve spoken about this many times before, but the subject comes up quite often in the forums, so let’s look at a few example shots of my own to illustrate what I’m talking about. First, let’s look at image number 2115 (above right). Now, this image would probably have only required around plus 1/3 or so of a stop Exposure compensation, because although the main subject is predominantly white, the top half of the background is very dark, so it would have balanced itself out, only requiring a little bit of compensation. I can’t tell you exactly how much compensation I used, because I shot it in Manual mode, and that doesn’t leave a record of exposure compensation, because it’s not used.
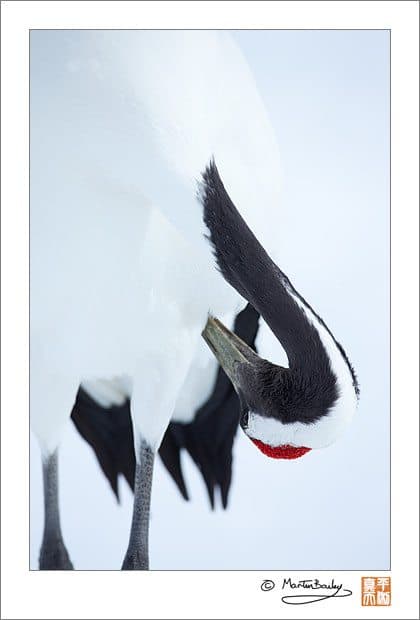
Crane Preening 2009
Imagine though, that after I shot this image, I turned and saw the crane that we see in image number 2126 (right), preening himself, with a totally white background. Using evaluative metering, which now does tend to recognize a snow scene better than it used to, I’d probably need to add around one and a third stops of exposure compensation to tell the camera that this scene is predominantly white, and that I don’t need it to darken it down. Without this compensation, the camera would have tried to make this an 18% grey, which we all know is not the color of snow. I should note that it used to be common to need up to two stops of exposure compensation for bright snow, but the newer meters in evaluative mode do seem to recognize snow scenes better than they used to, and so are a little closer, requiring only one and a third of a stop much of the time now.
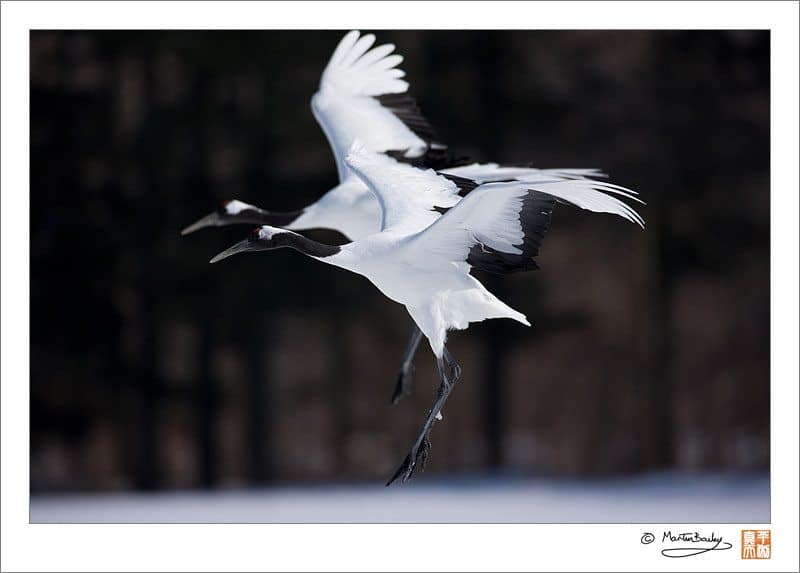
This scene lasted a little while, and I could probably have thought to change the exposure compensation if I was using Aperture Priority, imagine though, as I was buried deep into my viewfinder shooting the preening crane, what if I heard a honking coming from my right, and looked up to see the pair of cranes in image number 2107 (below)? They’d just come into site, and were perfectly in line like this. I then have to think, OK, so now I’m going from a perfectly white scene, to a shot with a very dark background. I’m probably going to have to go from plus one and a third of a stop, to minus one stop, or I’ll over-expose the two birds here. I start to turn the dial, while looking at the caret on the meter scale in the viewfinder, and by the time I’ve done the calculation, and made the change, the birds have landed. It only takes a few seconds, but that’s enough to miss the shot.
I was able to get this shot, in literally the conditions I mentioned here, because I was in Manual mode, and my exposure was set for optimal exposure of the cranes. It did not matter how dark the background was, because I had my exposure set for the cranes, no matter where they were.
Note that this is not the exact order that I really shot these crane images in. Although I shot the first two at F5.6 for 1/640 of a second at ISO 100, the light had changed for the last shot, and I was now at 1/2000 of a second at F4.5. I’m just trying to make a point here. This is certainly a scenario we’re faced with all the time when shooting wildlife like this.
Let’s talk a little about setting the exposure in the first place. Whether starting from scratch or with a hint from a priority mode, you will probably want to set your aperture initially, based on the artistic effect that you are looking for with the depth-of-field. For bird photography that’s usually close to wide open, though you might want to close the aperture down just a tad for larger birds, especially if they are not so far away, like Eric’s pelican. Note that Eric closed down to F5.6, and that’s probably about right, though Eric could also have gotten away with F4 at this range as well.
Once you have decided on your aperture, you can then adjust the shutter speed to something fast enough to avoid camera shake. Eric photographed the pelican at 1/1000 of a second, which will avoid camera shake, showing again that Eric is indeed a discerning photographer. If we think though that he needed to increase the exposure by around one and a third of a stop, he would have need to use a shutter speed of around 1/320 of a second with an aperture he was using, which was F5.6. For a sharp image of a bird in flight, 1/320th of a second might have been a little slow, although pelicans don’t flap their wings that fast, tending to soar more than flap.
Ideally you’re going to want at least 1/500 of a second for birds in flight, but really to a degree, the faster the better. If we want to show some movement in the wings, of course you can go much slower, as I’ve done myself many times, but that does reduce the success rate of your shots, and would require a bit more explanation to do the subject justice.
As you get close to what you think your exposure should be while looking at the caret on the exposure gauge in the viewfinder, you should also check your histogram. I find that with digital most of the time you will want to expose for the highlights, and that means that the right side of the histogram graph will be close to the right side of the histogram box, but not clipping. Clipping means that the histogram is touching the right shoulder of the histogram box. It’s OK to have a little if you know that it’s in a part of the image that you don’t care about, or for specular highlights, but if you severely overexpose any important areas, you may lose detail there, and there’s no way to get it back, even if you are shooting RAW. There are times when you will totally blow out a part of the scene, and there are times when you’ll expose for the shadows, if that is the most important thing to you at the time. I covered this in more detail in Episode 81 of this Podcast. As a general rule though, shoot for the highlights.
Opposite to our previous examples, and more in line with Eric’s questions about the relatively dark pelican, if you are shooting a dark bird against a bright background, you do need to be careful not to let the background become too bright. If you overexpose the background too much, the bright areas start to bleed into the bird or your main subject, making the edges soft and even reduce contrast in the subject itself. Ideally, you’ll want to make sure that the histogram is close to the right shoulder, but not touching it, and be able to see on the LCD that your main subject is well exposed. Unless the shadows contain detail that you really need to show, don’t worry about the left side of the histogram at all.
Whenever possible, I like to use the RGB histogram, as opposed to the standard black and white histogram. This is because you can actually blow out parts of one or two of the Red, Green or Blue channels, without this being indicated in the black and white histogram, as it only represents an average of all the light values.
If as you set your aperture, then your shutter speed you find that your shutter speed is too slow, the next thing to think about is raising that ISO. Eric shot at ISO 100, so to really remove the chance of blurring the bird after reducing the shutter speed to 1/320 of a second, if necessary, he could have used ISO 200 at F5.6 for a shutter speed of 1/640 of a second which may well have been much better to help avoid subject movement during the exposure. Remember that the longer the lens, the more you have to think about camera shake because longer focal lengths magnify the camera movement. The point here is that keeping ISO in mind as your third method to change exposure is very important and can be the difference between getting the shot, and not.
I should say that I don’t want people to think that Manual mode is plane sailing, especially on days with patchy cloud, when it can be difficult to keep up with the constantly changing light. I am forever checking my exposure. You will need to keep your eye on LCD and that histogram, and make sure that the subject is nicely exposed. If the light changes and you start to blow areas of the image out unintentionally, remember that most cameras have a flashing exposure warning, where the parts of the image that are overexposed flash. Exposure warning is often turned on by default, but if it isn’t, look for exposure warning in your camera’s manual, and turn it on.
As you shoot, you can often locate a reference object to check your exposure on while waiting for the action to start again. This might be a mid tone rock or a wall or something. My trick for doing this in snow is to point the camera down to totally fill the frame with the snow and adjusting the exposure so that I’m around one and one third of a stop above zero. Remember that even in Manual mode you still see the exposure indicators in the viewfinder, so you are not alone, and also remember that meters are better these days, so in general you can forget the old two full stops for snow advice if you use evaluative metering. It’s around 1 and 1/3 of a stop now. Just make sure that the caret is where you need it to be and then wait for the action to start again.
So, after all that, let’s quickly get back to the second part of Eric’s question. Yes, overcast days are nice for portraits, because the sky acts as a large soft box, but when your subject is flying and the light is coming from above the only way that will actually help is if there is something underneath the bird to bounce some light back up into the subject. A field of snow like what I had in my earlier example photos is great for this. It’s much easier to get a well exposed bird in flight if there is light being bounced back up at the bird. In general though, for a bird flying in the sky on an overcast day, without a reflective surface below it, if the contrast between the bird and the sky is simply too great, the only remaining option that I’m aware of, is to use something like a Better Beamer flash attachment for this, which would enable you to bounce some flash into the bottom of the bird from a distance. In Eric’s case though, I don’t think the contrast was that great, so although the grey sky was never going to be that exciting, it would not have blown out with one and a third stop of exposure compensation, or by using Manual mode and exposing for the bird.
Note that I haven’t gotten into using the spot meter on your camera today, because not all camera’s have spot metering, and to be honest, if you follow the steps I mentioned to set your exposure, you shouldn’t need spot metering.
Finally, I also suggest shooting in RAW, especially in conditions where exposure is challenging. Not only does RAW give you the ability to more easily change things like White Balance in post processing, it gives you a much wider dynamic range, allowing you to save more detail in the highlights areas that you might blow out, it also enables you to bring out more details from the shadow areas of your subject during post processing. JPEG will throw away much of this detail before it writes the image to your memory card.
Anyway, that was very long to answer fundamentally one question. Granted, I tagged on the Manual mode stuff myself, because it comes up so often. I hope that you have found this episode useful though. I can assure you though, most people that start out on my Workshops thinking that they don’t need Manual mode, usual become converts by the end of the first day’s shooting. In that kind of environment, this is far from photographic snobbery. It’s more like photographic survival, and taking control to get the shots that you might not be able to get otherwise. If are never in situations where you need Manual mode, then don’t worry about this. Beware though. I’ve heard lots of people say that they don’t need Manual mode, when the truth is that they just don’t understand why they need it.
Audio
Subscribe in iTunes for Enhanced Podcasts delivered automatically to your computer.
Download this Podcast in MP3 format (Audio Only).
Download this Podcast in Enhanced Podcast M4A format. This requires Apple iTunes or Quicktime to view/listen.


Martin- thank you for the time you put into this question, and more importantly… thank you for this particular quote, “I’m certainly not saying that Eric needs to buy an $8,000 lens…”
Sincerely, Eric’s Wife
Ha ha!!
I saw a mail on my iPhone saying that there was a comment from Traci Vogt, and I knew this was coming. 😀
What I meant by this is that Eric also needs $2,000 for a tripod with gimbal head and a new camera bag, to go with his new $8,000 lens.
Just kidding, of course. I know the pain and angst that photographer’s put our spouses through, probably not as well as my wife, but I understand to a degree. Believe, you were in my mind when I added that sentence. 😀
Thanks for stopping by Traci.
Regards,
Martin.
Nobody explains the concepts so deep as you do… Thanks a ton Martin…
You are very welcome Sushant! Thanks for stopping by.