
Happy New Year to everyone. That was me all excited about my photographic experience and experiments with the 1Ds Mark III, on my way back to the car from the Tatsusawa Falls. There were a few things that I found interesting on closer inspection of my resulting images, but I’ll get to that a little later. To start from the beginning though, on Jan 3rd, 2008, I went back to the Inawashiro area of Japan, and on the 4th went back to the Tatsusawa Falls again. With the snow too deep to drive to the car park, I’d trudged through the snow for a while to get to the falls, and today we’re going to take a look at the fruits of my labour. Also, I have a statement from our current sponsors, DxO Labs, in reply to our concerns about their choice of DRM solution. I’ll read that out at the end of the Podcast. For now, I’m happy to continue with the sponsorship, so here’s a word from our sponsors.
DxO Optics Pro sets the standard for automatic correction of your digital images. Based on extensive analysis of cameras and lenses, this award-winning software enables photographers to improve hundreds of images very quickly, saving time and providing spectacular results. Version 5 of DxO Optics Pro runs on Mac and Windows. Version5 which has only just been released incorporates a new generation RAW converter providing more details, and less noise artefacts, for a new level of image quality.
I actually decided to head out to the area where the falls are literally on the morning of Thursday, January the 3rd, and called to book a hotel in the area shortly before lunch time. I drove for around 4 hours up to the Inawashiro Lake arriving with around 30 minutes of daylight left, to just capture a few shots of the swans that spend the winter at the lake. I stayed at the lake as I was not sure if it would be possible to get up to the falls through the snow, and also the hotel not far from the falls is about twice as expensive as the one I know near the lake. We’re not going to look at any shots from this short shoot before night fell, but I do want to look quickly at one from early the following morning before breakfast, which is image number 1663. This isn’t a great image, but I wanted to discuss my thinking behind the composition etc.

Swan’s Roost #2
As you can see, I found an area where the sandbank winds its way through the water in an S shape, and also the middle stretch of water makes a similar S shape, both kind of leading our eyes into the shot. There are lots of swans kind of lazing around as they start to warm up a little after the harsh cold of the night, and a few young swans swimming into the scene from the right. The back of the scene helps to give our eyes something to stop on and we can then run along the back of the image looking into the distance. Not a great image as I say, but I quite like the balance and the overall sort of communal feel of the swans in their environment. I cropped about 15% of the top and bottom of the image as it was just more white snow and more grey sky, not really adding anything to the scene, but detracting something if I left them there. I shot this with the 70-200mm lens on the 5D by the way, with an ISO of 400 and a shutter speed of 1/50th of a second at F9.
After around 90 minutes of the shore of the lake, I went back into the hotel for breakfast, and tried to find out if it would be possible to get up to the falls. I received conflicting information from the two guys at the hotel reception. One said I could probably get up there, because I have a four wheel drive car, and the other said I probably couldn’t get up to the falls. Well, that was good enough for me to drive over and take a look for myself. In fact, I’d probably have driven over there anyway. I had planned to shoot the swans in the early morning for a little longer, but the scene wasn’t exciting me at all. I had been hoping for some morning mist, which had not materialized, and so decided to take my chance on the falls.
When I got over there after about a 30 minute drive, I pulled up to a small car park, maybe just big enough to park five cars, but this was still a fair distance from the closer car park, which is about a five minute walk from the falls without the snow. At the end of this further away car park though, there was a clear step of snow where the snow ploughs had obviously ploughed up to, but had gone no further. In this deeper snow I could see car tracks that had gone maybe 20 meters or sixty feet into the snow, and then backed up, back into the car park. My car is pretty high off the ground and four wheel drive, but I decided that I did not want to risk driving up there myself, especially as I had no shovel or anything to dig myself out if I got stuck. So, I shifted some gear around between the two camera bags I had in the trunk, as I was not going to take my 600mm lens with me, and set off to walk up to the falls. I don’t know exactly how far it is from the car park. I estimate about a mile, maybe less, but it felt like about three miles through the thick snow.
I was walking through a small trough made by a number of others that had also make the journey through the snow, but I assume these were Japanese people as the width of the trough told me that it had been made by someone much smaller than me. Many young Japanese are pretty big these days, but the middle aged people are much smaller, and I found myself quickly becoming frustrated at having to walk in a trough no wider than both of my feet put next to each other. I shouldn’t complain as this was much easier going than trudging through fresh snow, but still, I found it made for a tiring walk. Of course, there was still a fair amount of snow to tread down, and the walk up to the falls is slightly up hill. Also, I’m definitely not in as good shape as I used to be, or need to be for this sort of stuff, so despite it being below freezing, I found myself having to stop to catch my breath a few times, and when I finally made it to the falls after about 40 minutes I was so hot that I had started to sweat. I took my down jacket off for a while until I start to feel the chill again, before I set about the task of photographing the falls.
In image 1665, you can see one of my first attempts. Here we can see that I have taken a wider approach to the falls than my shots from spring of 2007. The falls alone did not make for a very captivating subject without the fresh green leaves on that branch that we see just off center here, now bare for the winter. Now the main subject, and indeed my reason for returning at this time was the snow. As I mentioned in my excited message that we heard in the introduction, I’m trying to gather more winter shots for my portfolio. I’m actually thinking of putting a Winter only portfolio together, and actually bought the rights to the music we were played in with for that purpose, but still need more shots.
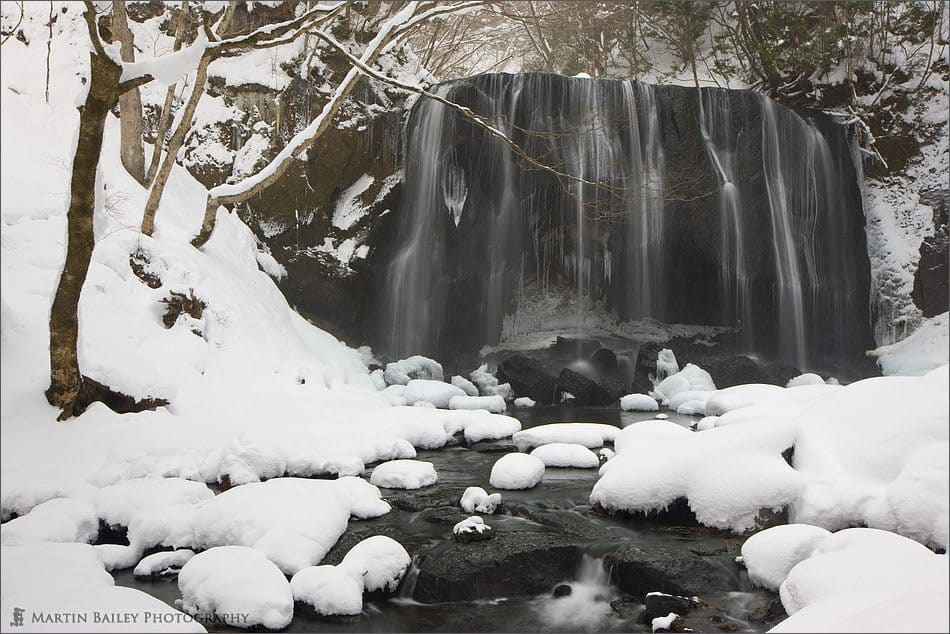
Winter Tatsusawa Falls #2
I was shooting with the 1Ds now, having left the 5D in the car for my trek through the snow. For this image I had selected an aperture of F11 which gives a fair amount of depth-of-field at 35mm, and ISO 100 for 6/10ths of a second. That is plenty long enough to give me that smooth silky feel in the water, and I was of course checking my histogram to ensure that my whites were white, but not blown out. With whites of course, you really want to pay attention that you have them right over on the right shoulder of the histogram but not touching it. I’ve composed the shot obviously with the large tree along the left of the frame, and those two large patches of snow, kind of anchoring each of the bottom corners, with the stream running out of the bottom naturally. I would have liked a solid body of white all the way up the right side, but there are just rocks and trees and stuff over there, so it wasn’t to be.
In the next shot, image number 1666, we can see that I have included both of the falls. The main falls to the right are actually the male, as in masculine falls, and the smaller more slender falls to the left are the female falls. You often find this naming convention used for double falls here in Japan. I’m not sure if that follows in other countries. These falls are actually pretty much at right angles to each other, but the wide end of my 16-35mm lens allows me to get both of them in like this, with very little room either side. I adjusted the vertical positioning so that the blob of snow in the bottom left is kind of pointing out of the frame, in the same direction as the flowing water. This time I’d reduced the ISO to 50, and was shooting still at F11 for 1/8th of a second. You might notice from the EXIF data if you are looking at it on my Web site that for this and the last shot I was working in Aperture Priority mode, and I wanted to just touch on the reason for this. I’d started to five shot bracketed images so that I could maybe try some HDR merges, as I found that the water was quite dark in contrast with the pure white snow. What I noticed though after working like this for some time is the camera was adjusting the exposure by changing the aperture and not the shutter speed, which was not what I wanted. Of course, if the aperture changes the depth of field changes, and so I would not really be able to use the results to merge together in an HDR image.
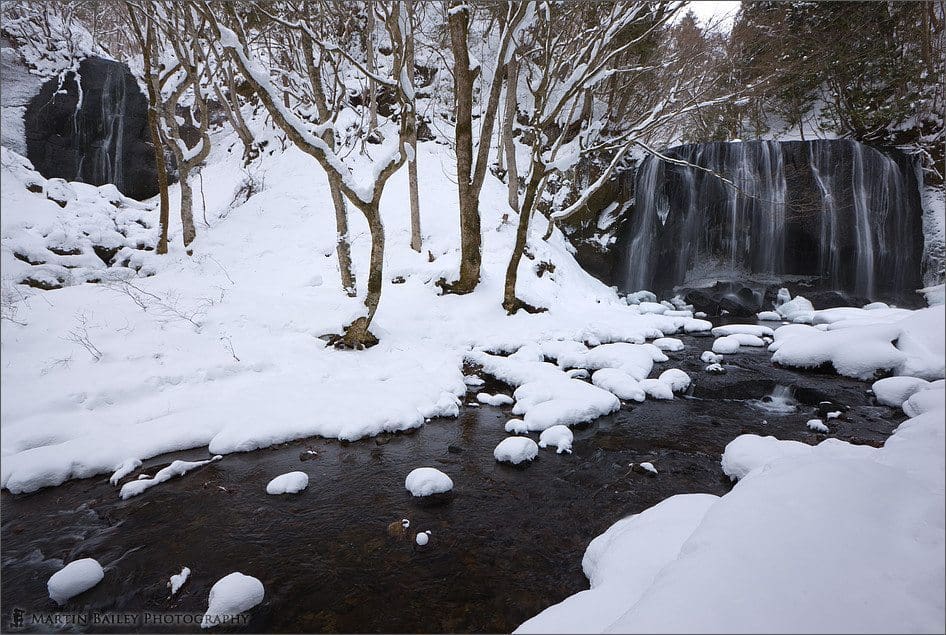
Both Tatsusawa Falls in Winter
I could not think for the life of me though why this would be happening, but found that if I changed from Manual Mode which I use most of the time, to Aperture Priority mode, the brackets worked how I expected, with the shutter speed changing, instead of the aperture. When I got home I looked into this, and it turns out that one of the custom functions I had changed was behind this, although not obvious. I had changed my 1Ds so that in manual mode the Main Dial, which is the one near the shutter button, and the Quick Control Dial on the back of the camera, were switched around. For those that are interested this is Custom Function 4 – 5, Tv/Av setting for Manual exposure. It does state in the manual that when you make this selection the shutter speed will be fixed and the aperture changed when using auto exposure bracketing, but I’d not paid any attention to that when playing with my custom functions.
Anyway, with that explained, I should also say that HDR didn’t help much with the dynamic range, so I didn’t use that in my final selection. I had also mentioned in my excited recording that I had tried using the highlight priority setting to overcome dynamic range issues. Well, it turns out that I was slightly wrong about that too, as we’ll see in a moment. Let’s look at image number 1668. I’ve done a few things during capture here that I want to go into, but to start with, I had used the Hightlight Priority setting on the 1Ds Mark III. What this does as the name states is give priority to the highlights, which in this case is the snow. I saw immediately that the snow stopped blowing out at the same exposure with the Highlight Priority turned on. What I suspected, but couldn’t really tell from the LCD was that this actually caused a lot more grain in the shadows, which is the water and rocks in this shot. The thing is, Highlight Priority doesn’t really increase dynamic range, it just shifts it. What it gives you in the highlights, it robs from the shadows, so you end up with less bits to store your data in the shadows, which results in much less steps in the gradation from black to the dark to mid greys. I still like this shot as it is, with a lot of contrast between the blacks and whites, but I’m going to be more careful when using this feature in future. It will probably work much better when the majority of the shot is lighter shades, rather than a high contrast scene like this.
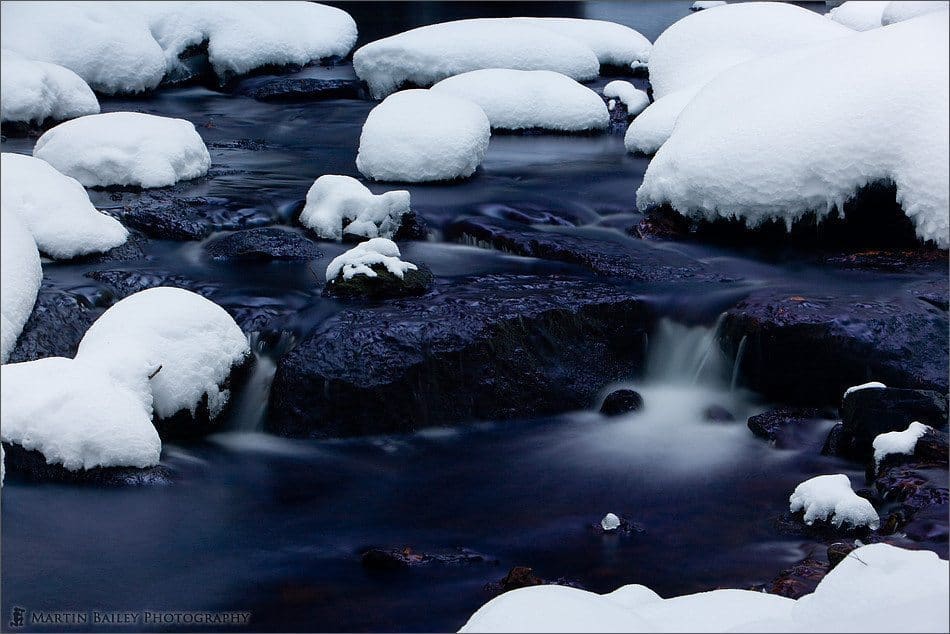
Snow and Stream
The other thing I’ve done here is that I used the Singh-Ray Vari-ND filter. I’ll put a link to a page with the details of this filter into the show-notes, if you are interested, but basically this is a filter that looks a little like a polarizer, but is basically a Neutral Density filter, but as you turn it, it gives you, as the name suggests, variable degrees of neutral density, from 2 to 8 stops of exposure. I’ll probably do a full Podcast on this filter once I have more example images, but here what I’d done was put the filter onto my 70-200mm lens, with a stop-down ring, from 82 to 77mm, as I bought the 82mm Vari-ND so that I could use it with my 16-35mm F2.8 lens, but the 70-200mm F2.8 has a 77mm filter mount, so I need to stop that down with an adapter. Then the cool thing is that having set everything up, and deciding that I wanted about an 8 second exposure, my first shot showed me that my highlights were blowing out, I think it was, so instead of changing the exposure, I simply turned the Vari-ND dialling in more darkness, and reshot the image. I can’t wait to work more with this filter, so that I can talk to you more about it. One down side of this filter is that even though I bought the thin framed version, to reduce vignetting on wide angle lenses, it has significant vignetting at the wide end of the 16-35mm lens, even when I remove the protector filter, using only the Vari-ND, which was pretty disappointing. Apart from that though, I’m very happy with it. I shot this at F11 by the way, and as I said earlier, the Highlight Priority setting forces a minimum ISO of 200, so that is what I was shooting with.
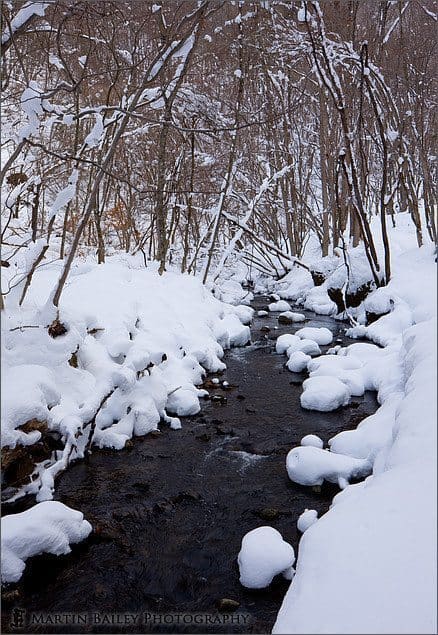
Cold Stream
I spent about 2 and a half hours at the falls, with a significant amount of that wasted because of the aperture changing instead of the shutter speed in my bracketing shots, but still I had a great time, just being out there in the cold, with my camera and the falls, and the snow. I didn’t really realize that I was going slightly uphill to the falls until I started to make my way back, as the going was much easier then. I stopped a number of times to shoot the scenes around me. Let’s look at one last one quickly before we finish, which is image number 1670. Here I had looked back along the stream as I walked along its banks to the right of this image as we look at it. With this patches of snow on the rocks in the river, with the snowy banks, I couldn’t help but shoot a few more shots like this one, which gives you a good idea of the run up to the falls. I shot this at F16 for 1/20th of a second, again at ISO 200. I think I was still using Highlight Priority here. I made my way past what would have been where I’d parked my car had it not been under a few feet of snow, and made my way back down to where I had parked, but decided on the way, in my excitement, to record the message that we were played in with. I just love the sound of trudging through snow, and this has really wet my appetite for the Hokkaido Workshop which is now under three weeks away.
So, that’s almost it for today. I hope you enjoyed joining me back at the Tatsusawa Falls. Before we finish, just a quick update on DxO Labs’ use of Interlok in their software that I reviewed a few weeks ago, and will be giving away as the next grand prize for our Assignment winners. As I mentioned in the intro, DxO Labs have gotten back to me on the concerns raised about their use of a product called Interlok to prevent piracy of their software and to enforce the time limit on the demo version of their software. Here’s what DxO have to say.
Thanks to Martin for providing DxO Labs with an opportunity to briefly comment on the ‘Interlok’ issue: We’ve used Interlock to manage and protect the license of DxO products for some time now. One thing we would not be able to do without Interlok or a similar solution is to provide a time-limited fully functional demo version. Certainly the use of Interlok is not something new nor is it something “hidden” with version 5 of the product. Rather than devising our own licensing software (which is clearly not DxO Labs’ core competency), we have always worked with solutions coming from companies specialized in this field. Based on the feedback we have received from Martin, his audience and others, we are reviewing how we could make the use of Interlok more obvious to the user prior to installation. After more than three and a half years of selling DxO products to a vast worldwide audience, we are yet to have confirmation of a single case where a user lost any data due to Interlok/DxO software. Were we to have such a confirmation, we would extend the guaranties as documented in the user license agreement.
In terms of the future: we’re always reviewing possible scenarios/changes to our licensing technologies. A change, if selected, would have to make sense and bring increased benefits. In that respect – the opinion of our user base / potential user base and opinion leaders is something that we always listen to very carefully.
You know, I’m still not entirely happy about the situation, but I can definitely understand DxO’s reasoning, and I applaud their openness, and willing to work with me on these concerns. Let’s just proceed with the sponsorship, and get that prize out to the person with the most accumulated votes at the end of the Long Exposures assignment currently in progress. And with that, all that remains to be said is thanks for listening, and you have a great week, whatever you’re doing — Bye-bye.
Show Notes
Find details of the Singh-Ray Vari-ND filter here: http://www.singh-ray.com/shop/vari-nd-variable-neutral-density-filter/
 Subscribe in iTunes for Enhanced Podcasts delivered automatically to your computer.
Download this Podcast in MP3 format (Audio Only).
Download this Podcast in Enhanced Podcast M4A format. This requires Apple iTunes or Quicktime to view/listen.

Posted on behalf of Martin by Michael Rammell, a Wedding Photographer based in Berkshire, England. Michael also has a long-standing passion for Nature & Landscape photography. To catch up with Michael, visit his Web site, and follow him on the following social networking services.


0 Comments