
For the last month or so I’ve been saying I’ll do an episode on the equipment other than the main stuff, like bodies and lenses etc. that I’d hate to be without. I thought I’d better get that out, so I spent a few hours this weekend photographing all but one of the things I’m going to talk about and uploaded them to my Web site. Today we’ll go through and talk about 11 things that I use quite a lot, if not all the time, in my photography. I’ll try and interweave a few tips as we go along too, but the main tip for each is probably going to be using the item or similar equipment yourself if you think it might help you out.
As with last week we’re going to look at 12 images today to talk about the 11 items, so I’m not going to spend too much time on each one. Let’s first look at image number 1407 in which we can see the first two items. On the right is the Angle Finder C from Canon. This does exactly what you’d expect. It allows you to view the image through the lens at an angle. It rotates 360 degrees, so you can look into it from literally any angle, though it’s a little bit awkward to view from the bottom of the camera if you use a battery grip like I do. I use this most for low angle work, such as macro photography when the camera, is low to the ground. The Angle Finder also has a switch on the side as we can see in the photo that switches its magnification from 1.25X to 2.5X. This is really helpful when fine tuning the focus for macro shots, as it really zooms in on the subject. Of course, the most important part of the shot is not always in the center, but when it is, this really helps. Also, the barrel of the finder rotates to focus the angle finder itself, which I forget every so often and having rotated it slightly while handling or fitting it to the camera, and then I wonder for a moment why everything is blurred. I also use this sometimes even when I’m standing up or sitting, but want the camera to be lower than my eye level. It just helps to keep from straining the old back as I might while stooping if I didn’t use the angle finder.

Angle Finder C + Spirit Level
The other thing in this first photo that I wanted to mention is the spirit level. This fits into my flashes shoe on top of the camera, and is literally just a spirit level to make sure that the camera is horizontal, or vertical, depending on whether I’m shooting in either portrait or landscape positions. The clear plastic level contains two spirit levels for this, and can be fitted to the camera in two ways too, to suit your needs. In the next image, number 1408, you can see the level sitting in the flash shoe of my Canon EOS 5D.
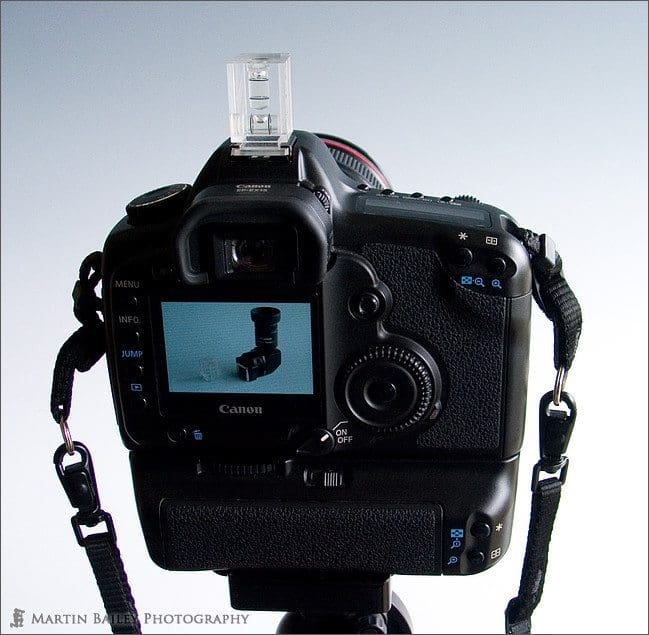
Spirit Level on 5D
The next thing I wanted to talk about but have not taken a photo of is the Focusing Screen Ee-D. Canon makes interchangeable focusing screens for many of their film cameras, and for the 1D, 1Ds and the 5D DSLRs. The one I bought gives me a grid inside across the scene when I look through the viewfinder, and like the spirit level, this gives me a visible indicator of whether or not the camera is level or my verticals and horizontals are actually vertical or horizontal. Of course, sometimes a scene or subject looks more natural off level, but when I want things straight, this and the spirit level help.
As usual, most things I use come into my workflow for a reason, and the next one I bought after dropping my memory case on a snowy beach in Hokkaido and having to go back in a taxi with Japanese photographer Yoshiaki Kobayashi to look for it by torch light. I thought it would have been so much easier to find in the dark if it was a bright colour, so when I saw the yellow case in image number 1417, I thought it would be a good addition to my kit. These are Gepe Card Safe Extreme memory cases. You can see from the grey one on the left that they fit many different types of memory in the same case. I’ll put a link to the Web site for many of the things we’ll look at today, so you can check if this company has something to suite you too. I not only went for this case for the bright colour, but also for the fact that they are incredibly strong, and also waterproof. If I was to drop this into the sea while shooting eagles from a boat for example, it would not only be waterproof, but it would float, so I could hopefully fish it back out without losing the images saved in the cards. Of course, there’s nothing better than being careful so as not to drop the case, but in the cold, and with the excitement of the moment sometimes, things can slip our minds, and out of our hands. One piece of advice related to memory card holders is that when I’ve filled a card, but before I’ve made at least one backup, I put the card back in the case with the front label facing down. This way if I get carried away shooting and come to change the card again later I can easily see which cards are full and which I can use. I also usually write my name and email address and sometimes phone number on the back of my cards. I actually found a card case a few years ago full of memory which I handed in at the police station, but never found out if the owner got the cards back. If they’d had an email address or phone number I could have contacted the owner and sent them the cards back myself directly, and I’d hope that someone finding mine, if they understood the pain of losing these things, would do me the same favour.
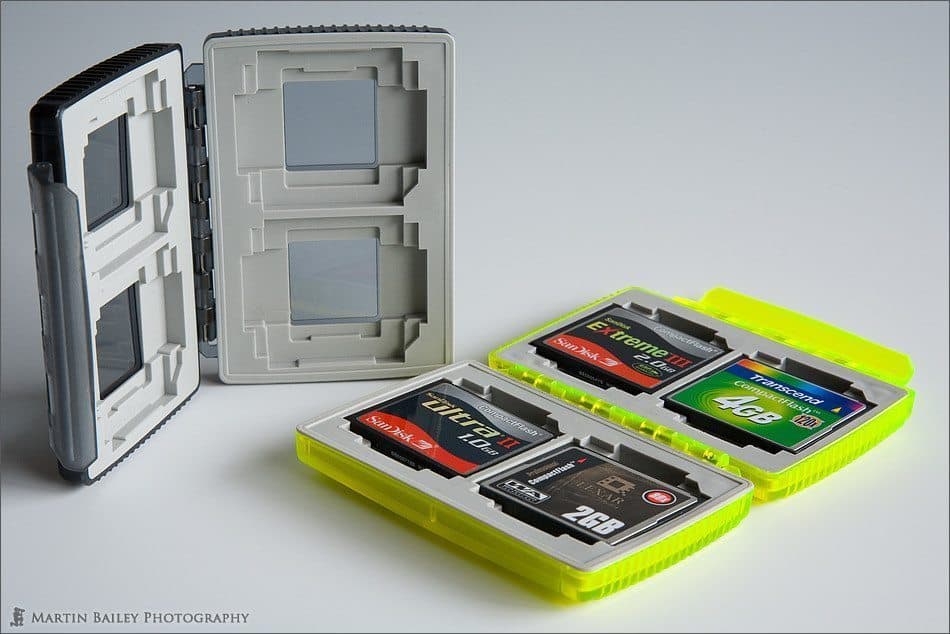
Gepe Card Safe Extreme
In image number 1418, we can see my filter removers. A few times I’ve found I could not remove my filters in the field, and either wasted time trying until I could, or had to leave them on until I got home. Fortunately, I’ve never gotten one stuck that stops me from getting a shot, but if I was to get a polarizer or ND filter stuck on a lens it would increase my shutter speed and possibly I’d lose shots. For this, I found these light plastic filter removers, and drop them into the front pocket of my camera bag whenever I go out. You basically just have to grip the front of the lens with one and the filter with the other grip, and turn this in opposite directions. I’ve only had to use them twice, but they are quick and easy to use, saving me time, and possibly shots. One tip would be though, that filters usually won’t budge when you apply too much pressure in just two or three places. When filters get stuck, people tend to wrap their hands around the filter and apply a lot of force while trying to rotate the filter. This causes the filter to become temporarily misshaped, making it wider in some places than other, making it even more difficult to rotate. You’ll finder that holding it evenly with four or all five fingers and turning lightly will often get it off much quicker than putting all your strength into it. Still, when that doesn’t work, these come in handy.
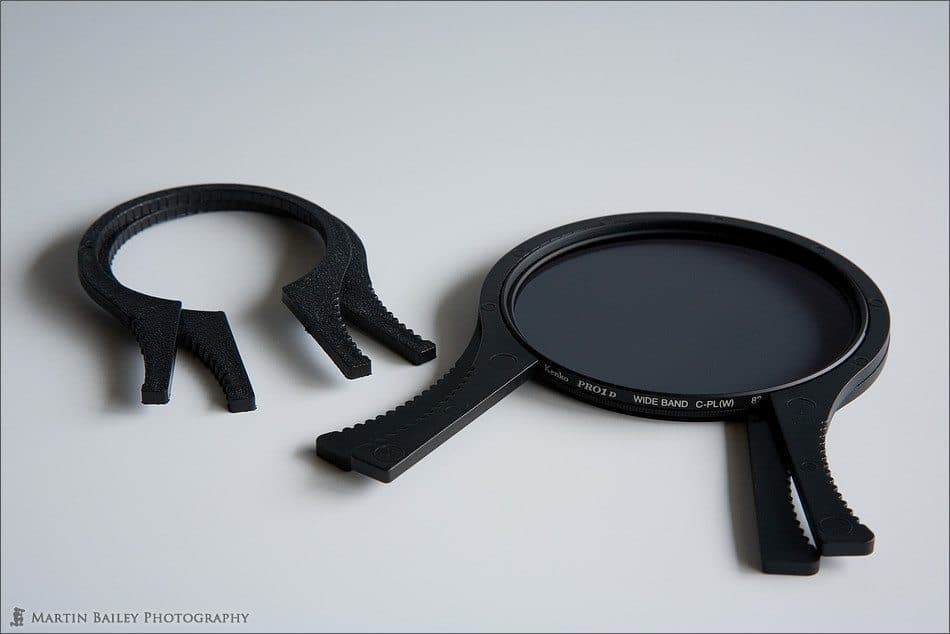
Filter Removers
The next gadget I’d hate to be without is the STO-FEN Omni Bounce diffuser that we can see in image number 1416. I know that some people don’t like these very much, and I know that there are other solutions to diffuse flash light, but I personally find the Omni Bounce diffuser to be fine for most of the flash work I do, and it’s nice and light. This really helps to remove the harsh shadows that direct flash light can cause. Of course, you can bounce the light to soften it, but I actually bounce the light with this diffuser attached, which I also find gives a nice soft light. But when the ceiling is too high or none-existent, you can point your flash straight at the subject with this diffuser attached and still get nice soft light. It doesn’t work well in portrait mode though, if there’s a wall or something too close to your subject, as you’ll still get a shadow on the opposite side of the subject than to the flash.
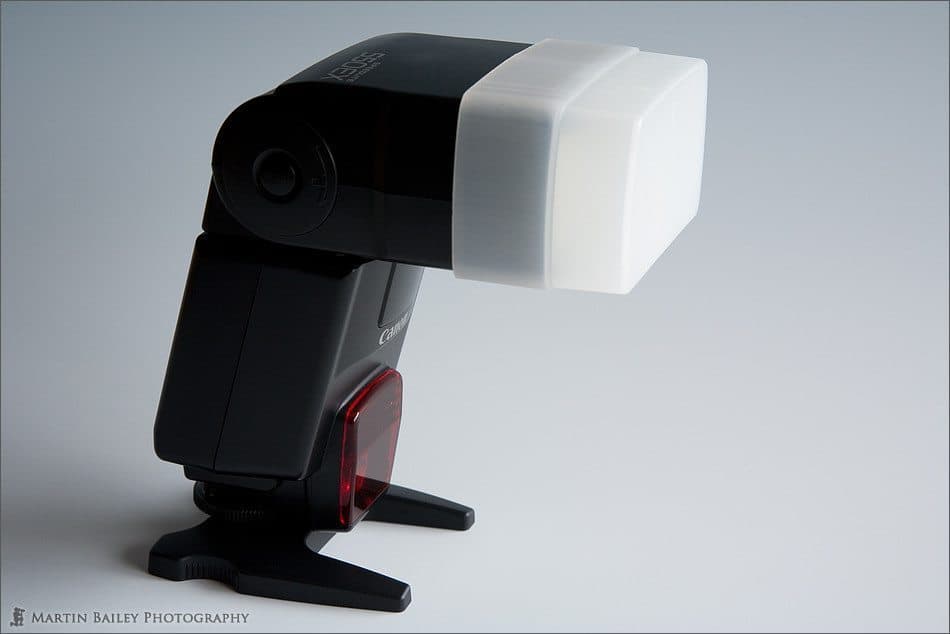
STO-FEN Omni Bounce
In image number 1415 we can see the next item that usually makes it into my bag when I’m going to be out shooting landscapes, and that a compass. Especially when you’re trying to get into position for a sun or moonrise, it’s necessary to know where the sun or moon is actually going to peep over the horizon. If you use a tool to find out the exact location, a compass can really help to get yourself in the right position and set up for the moment.
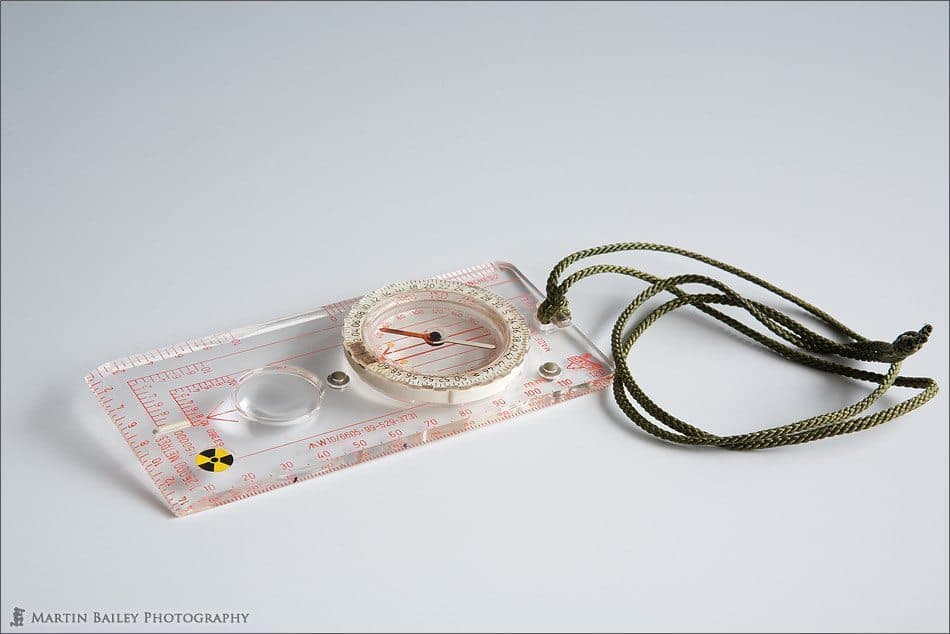
Compass
The next thing I’d say no one can be without is a good big blower, like the one we can see in image number 1413. This is actually the one that I leave at home, and use for blowing the dust of the front and rear elements of my lenses before trips, but I also have a small one that I carry with me on trips that I use for this. The main reason I use this big one is to blow the dust off my camera’s sensor. I find that holding the camera upside down and blowing the dust from inside the camera and then selecting “Sensor Cleaning” from the camera’s menu and again, holiding the camera upside down and giving the sensor a really good blow with this, keeps most dust away. Sometimes it gets a bit stubborn, so I take my camera to the service center for a more thorough clean. This is only every so often though. I think it’s been more than a year since I had my 5D’s sensor cleaned. I know that there are lots of other ways to clean the sensor yourself, but I just haven’t found it that necessary yet.
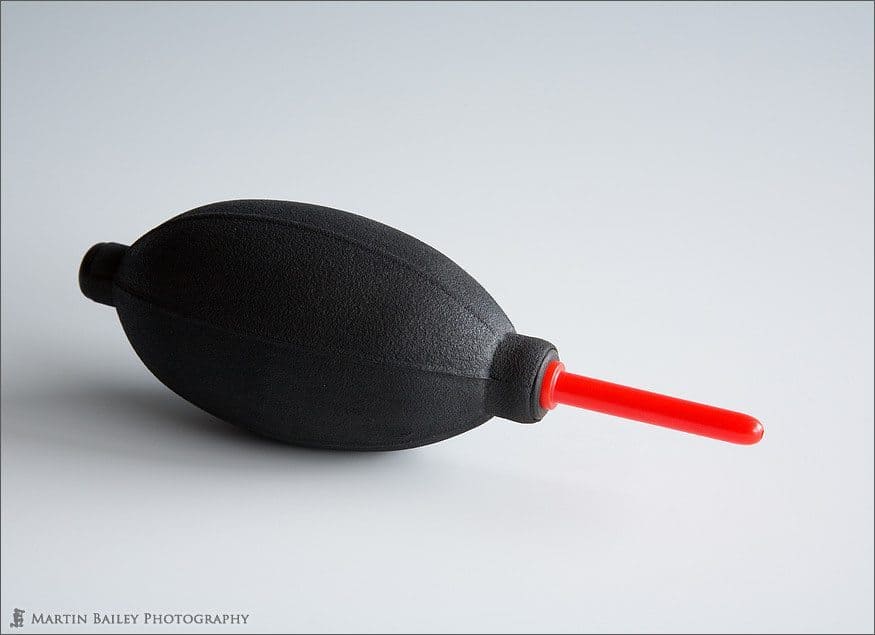
Blower

Wimberley Plamp
In image number 1414 we can see one of my Wimberley Plamps. Plamp stands for Plant Clamp I believe, and basically that’s what I use it for most of the time. When shooting flowers close-up on breezy days, they can sway around quite a lot, making it difficult to get your shot. If you clamp the Plamp to your tripod leg and then grab the stalk of the plant with the grip that is blue in my shot here, though the colours vary, then you can keep the flower or plant still while you shoot it. You can of course hold other things with the Plamp. I actually carry two around with me when shooting flowers, so I can use one to hold the plant if it’s breezy, and the other to hold a reflector in position, or a piece of semi-transparent white plastic over the subject to cut out some of the light to either increase or level out the contrast between the flower and the surroundings. I’m sure there are lots of other ways in which to use the Plamp, but these are just a few of the ways I use mine.
Let’s move on to image number 1412, in which you can see Really Right Stuff Focusing Rail. I mentioned both the Plamp and this in one of my Macro episodes, but just to recap, as I’d really not like to be without either of these tools, when shooting macro at life-size or higher magnification, to get a little bit closer, or further away, or even for moving slightly to the left or right, it can be a real pain to actually start moving your camera on the tripod itself. With focusing rings you can move back and forwards by rotating the screws at the front and back, or for left and right movement, slacken the quick release and slide the top rail around, then retighten the quick release. More importantly I’d say, is that the forward and back movement is so precise, that it helps to fine tune focusing, especially when using a lens like the 65mm 1-5X magnification lens, which doesn’t have any focusing mechanism. If you want more details on this lens though, please listen to episode 43, in which I talked about shooting in life-size are larger. I’ll put a link to the Really Right Stuff Web site page where you can see the focusing rails into the show notes as well. You have to click on the B150-B Package link to the right though to see this particular model. This is to allow you to use the rails with lenses on tripod ring mounts. If you would use the rail by mounting your camera directly rather than the lens, then you would not need the rail that allows you to move left to right.
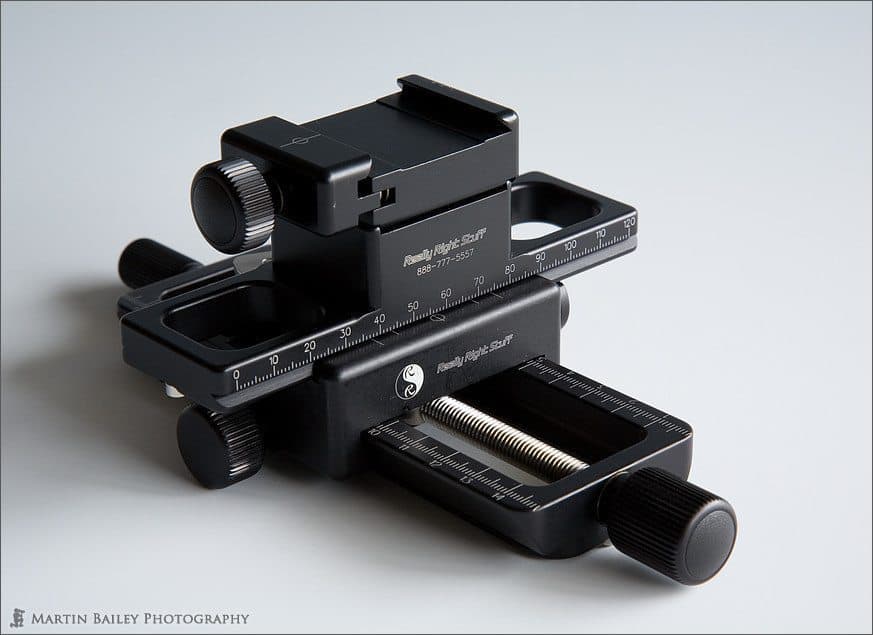
Really Right Stuff Focusing Rail
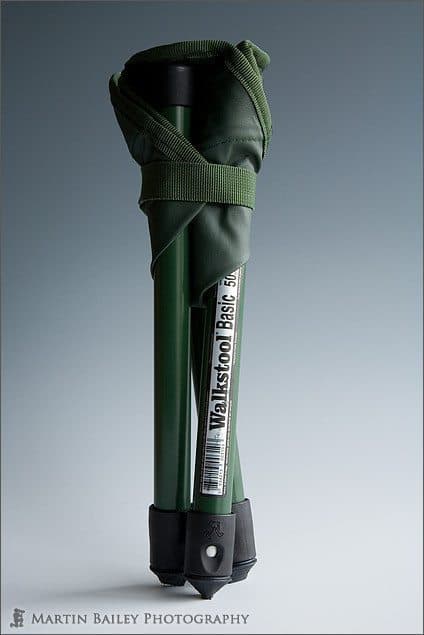
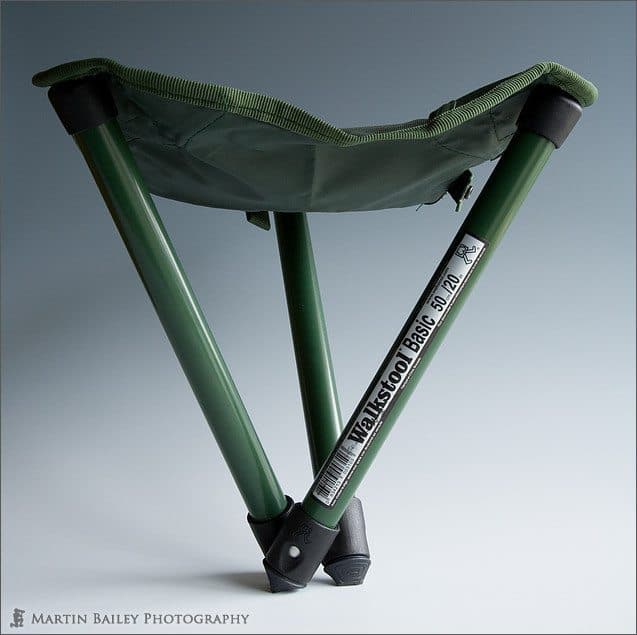
Walkstool Closed
Finally, one of the newest additions to my kit is a Walkstool, that we’ll look at in the next three photos. First, in image number 1411, we can see my Walkstool in its fully wrapped up state. Having tried a few for height, I decided on the Walkstool Basic 50cm / 20 inch model. This is actually the second to shortest of the models available right now. There are a fair few taller ones as well, but as you might imagine, the taller they get the heavier they get. The one I have is 65 grams, or 23 ounces. The other important thing is though, that I’m not carrying this thing around with me to give me something to sit down and eat lunch on. It’s basically to allow me to get down low for macro or other low-level work, without starting to get all uncomfortable when shooting in that position for a long time.
Walkstool Low Level
The 50cm stool I found was perfect for medium height shooting, and the wonder of this stool, as we can see in image number 1410, you can actually just undo the strap and open the stool up and use it without extending the legs, for an even lower support of 30 cm or 12 inches. If you are not familiar with these stools, you might be thinking right now that they may not support your weight, if like me you’re carry a pound or to excess baggage, but unless you are a Sumo Wrestler in your prime, even these smaller Walkstools should be fine. The one I use supports up to 150kg or 330lbs, so I can have a few more pints of Guinness yet before I have to worry about this.
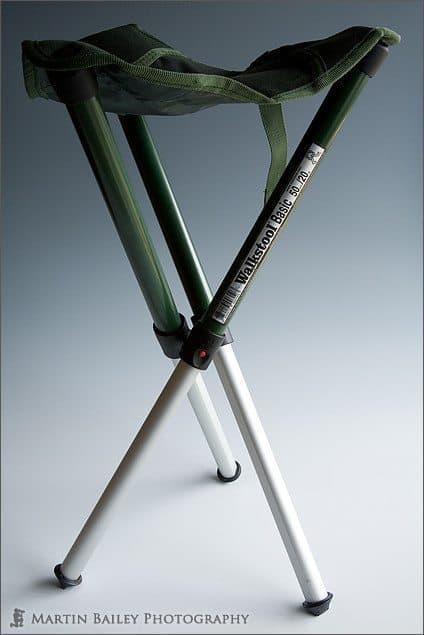
Walkstool Fully Extended
In the last of the three images, number, we can see the Walkstool fully extended. Although I would not suggest sitting on the Standard model for a whole day, they’re definitely great for an hour or so while waiting for some action to unfurl, or while shooting some macro shots. They are even remarkably comfortable when using for a reasonable length of time without the legs extended as in the last shot. If you really want a comfortable sit though, as opposed to the Basic model, they also do a Comfort model, which has a larger sitting area. This would probably have been better for me when you consider the size of my jacksie, but as the comfort increases, so does the weight, so I decided to give weight preference over comfort. As it is, I can just attach this Walkstool to the back of my rucksack style camera bag, and forget about it until I need it.
So that’s almost it. I haven’t talked about my WhiBal today, which is a type of grey card that you shoot to either set your custom white balance while shooting or to set the White Balance later in post processing. I’d like to say that this is because I’ve covered this in other Podcasts, but, if I admit to myself and to you that the real reason is because I simply forgot to take a photo of it, I’d better just say that this is still one item that I use pretty regularly, especially when the light is a little challenging. I will add a link to the WhiBal Web site to the show notes in case you are interested.
There are probably a few other things that I’ve forgotten to mention, and as usual, if you have something that you just can’t live without, please do come by the forum at martinbaileyphotography.com and let us know about it. There is actually one other item that I’m seriously thinking about adding to my kit right now, and that is a pair of knee pads. Now, I know I’m going to look really silly walking around parks with knee pads on and will probably end up putting them on only when necessary, but when you weigh as much as I do, kneeling down on gravel or uneven surfaces can pretty soon become a painful deal. Ginichi, a photography store in Ginza here in Tokyo has started to stock a pair of quick release knee pads that I have my eye on, and will probably be picking up soon. I gave up trying to look cool while out photographing a long while ago, and would much prefer to get a few extra low angle shots now. I usually get the shot anyway, but find that I stand up, while grimacing with pain, a little sooner than I would if my knees weren’t being mashed up by the uneven surface.
So, just a couple of pieces of housekeeping before we finish. Firstly, remember that the Simplicity Assignment is now closed and I’ve turned on the voting system. Please do come by to the mbpgalleries.com Web site and take a look at the album half way down the top page, and please do take a moment to register if you are not already a member and vote for your favourite image. There are some really amazing shots in there, and I’m really looking forward to see what you guys choose. Thanks again to all those that took part. I’ve also noticed that some people that took part have not registered on the martinbaileyphotography.com Web site in addition to the mbpgalleries.com Web site. Whether you are registering just to vote or to upload your entry, please do also sign up at the main martinbaileyphotography.com Web site with the same user name and email address so that I can keep tabs on who’s who when I eventually get around to linking these two sites. Voting will continue until the end of Sunday the 29th of April when we’ll find out who the winner of an original print of one of my photos is, and more importantly, who will take the annual grand prize based on all of the accumulated votes, which this year is going to be an amazing Lowepro Stealth Reporter D650 AW camera bag.
One other thing is a few weeks ago I requested people to mail me if you know of any good lens review or lens comparison sites. Thanks very much to all those that have mailed, but if you have time, please do check the Podcasts forum at my Web site before mailing me. I’ve received quite a fair amount of mail with the same Web site that is already in the main post, so it would save me a little time if you could check first. If it’s a toss-up between mailing and not mailing though, just go ahead and send me the details and I’ll check myself. Anyway, with that, I’ll sign-off for today. Thanks for listening, and have a great week, whatever you have planned. Bye-bye.
Show Notes
Gepe Card Safe Memory Card case: http://www.gepecardsafe.com/eng/index.asp?mainID=50
STO-FEN Omni Bounce: http://www.stofen.com/
Wimberley’s Plamp can be seen here: http://www.tripodhead.com/products/plamp-main.cfm
To see the same Really Right Stuff focusing rail that I have, click on “B150-B Package” on this page: http://www.reallyrightstuff.com/specialty/index.html
Here’s a link to the Walkstool Web site: http://www.walkstool.com
And last but not least, here’s a link to the WhiBal Web site: http://www.whibal.com/products/whibal/index.html
The music in this episode is from the PodShow Podsafe Music Network at http://music.podshow.com/
 Subscribe in iTunes for Enhanced Podcasts delivered automatically to your computer.
Download this Podcast in MP3 format (Audio Only).
Download this Podcast in Enhanced Podcast M4A format. This requires Apple iTunes or Quicktime to view/listen.

Posted on behalf of Martin by Michael Rammell, a Wedding Photographer based in Berkshire, England. Michael also has a long-standing passion for Nature & Landscape photography. To catch up with Michael, visit his Web site, and follow him on the following social networking services.


0 Comments