
Nothing gives me more pleasure, apart from the actual shooting of photographs, than to print out and hold a good quality print. With computers and digital cameras getting cheaper by the year, and software to support our digital workflows getting better and easier to use, many people, including myself are not actually holding a physical print of our work. Rather the digital images are captured and stored in digital form, and viewed on our computer screens or TVs, and never make it into a physical, tangible object. Today I’m going to talk about some prints I’ve recently made with Adobe Lightroom Beta 4 and some benefits of this excellent addition to my digital workflow, and just ponder over my feelings about fine art prints. I’m also going to talk a little about a possible new medium that I’m thinking about, and would like to call for your feedback on.
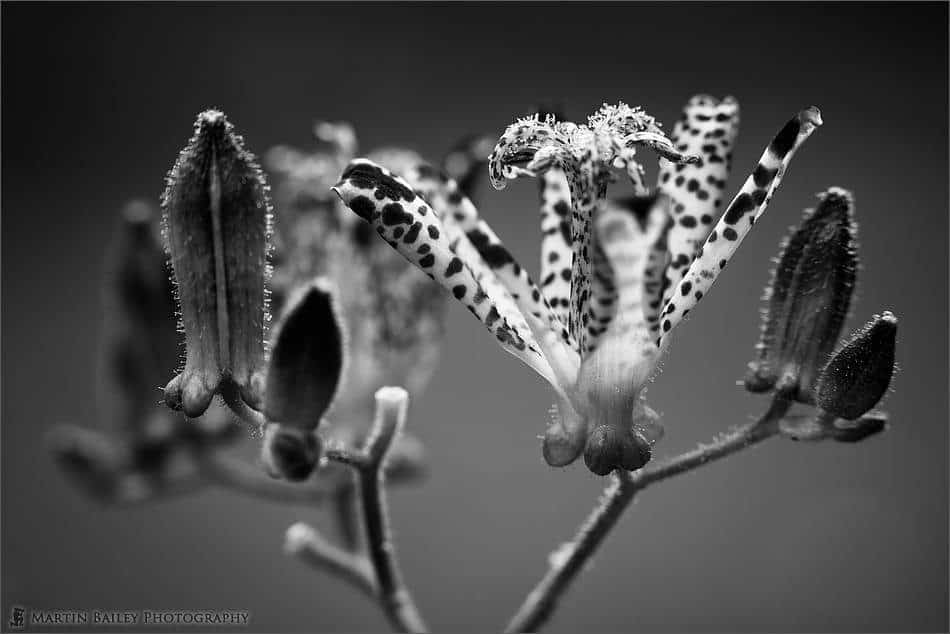
Recently I shot an image while walking in a local park on a Sunday afternoon. I don’t really want to focus on the image so much today, but let’s take a look at it to help me explain. It’s image number 1151. If you’re new to this Podcast, you can listen to Episode 0 to find out the various ways to view my images, including by using this number. I wasn’t all that thrilled with the image when I shot it. The flower which is by the way a “Hairy Toad Lilly” is quite a pretty flower, with white petals and reddish purple blotches of colour. This was a 1 second exposure at F5.6, with a tarmac path in the background and some trees behind that. At this focussing distance with my 100mm Macro and a 25mm extension tube, the background is thrown completely out of focus, so it was not distracting, but it was not interesting in any way either. I usually try to include some other foliage and sometimes other flowers to add blotches of colour in my macro shots, but the angle I needed to shoot from didn’t allow for this on this occasion. I started thinking that the uninteresting background, and even the colour of the flower itself was adding nothing to the shot might look better in black and white, so I decided to try the “Grey Scale Mixer” in Lightroom. As I moved the sliders around the image just came to life. It’s incredibly easy to get great effects by adjusting the red, yellow, green, cyan blue and magenta sliders. When I’d got something I liked, I also tried changing the white balance of the shot with the slider. Of course, because the image was now greyscale, it did not make the image look warmer or cooler, but because the underlying image would have looked much warmer if it wasn’t grey scale, this had a huge effect on how the black and white image looked. If you’ve not tried this in your black and white conversions, I suggest you give it a try.
Anyway, once I’d created this really quite pleasing black and white image, I started to think that I’d like to print it out on Epson Professional Fine Art papers. I’d brought and tried the UltraSmooth Fine Art Paper a few months ago, and fell in love with it. I also bought the somewhat more textured Velvet Fine Art Paper last weekend, and decided to print this and a few other images out on both to really just see how they looked and to also compare the two papers. I’d been meaning for some time to add these papers as an option for the prints of my images that you can buy directly from my Web site, but I’d not gotten around to it as I’d not found the time to really print out any more than a few images and was not confident to add this option. The paper is also considerably more expensive than regular high quality Epson or Pictorico papers that I have made available some time ago. Although the standard papers that I already offer prints on do provide incredibly good results, having printed out a number of images on these Epson Professional Fine Art Papers, I found that the results are just unbelievable. They’re beautiful. The latitude or dynamic range is excellent and the matte finish stops any surface reflection that can get in the way when viewing glossy prints. The weight of these papers too just reeks of quality. When holding a 13×19” print I can really tell that I’m holding a work of art. An object of beauty and quality! Before I move on I do just want to plug the fact that you can buy these prints from my gallery by hitting the large “Buying Options” button above the images when viewed at full size. You just need to select the paper from the pull-down and fill out a few more options then add to the cart. Remember also that members of the Web site get an additional 10% discount, so make sure you’re logged on to get this membership benefit.
After all that, I really got to thinking about how little I print these days. As I said earlier, I really do enjoy printing out my images and holding a physical copy in my hand. If we shoot negative film, the main method to view prints is to get a little envelope of prints back from the store, or go into the darkroom and make our own prints, but we would hold a print in our hand, and possibly pass it or them around the table for all to see. This is slightly different if you shoot slide film as I did for around 10 years, as what comes back from the store is a box of mounted slides. Of course, to view these slides I would get my projector and screen out and spend hours looking through them, but still, I would select the best shots and have prints made from them, again to hold and often to frame or store in addition to the slides. Although the number of prints I ended up with would probably be less than a person shooting negatives, I would eventually end up with physical prints to hold and admire.
Around five years ago when good quality scanners gave us the ability to scan slide film at a reasonable cost, I selected my best images, and spent a fair amount of time scanning them in to my PC and processing them. I already had a compact digital camera at that time, and around that time I bought my first digital SLR. So from five years ago, my photography workflow became completely digital. When I compare the number of analogue photos I shot in my first six years in Japan from 1991 to 1997, to the number of images I’ve shot in the last six years here, which are mostly digital, I’m probably talking around 30 or 40 times more. But when I look at the number of physical prints I have made in the same 6 year period, it’s really just a tiny fraction, despite the fact probably not even 1/40th, in fact, probably not even 100th the amount of prints. And this is also in spite of the fact that I can now produce prints so much more easily than before, and at my own pace. Of course, the reason for this is because I no longer need the print to view the image from a negative, although I always had an additional cost to create prints from my slides. Now though, I simply transfer the image files from my media to the PC and I can view them in moments on my computer screen. The quality of the images on the screen is excellent and I can view slideshows etc. much more easily than I could even flick through a stack of prints. So it is not surprising that I am not printing as much as in the past.
But, having sat in my living room over the last few days holding these 13×19”, luxuriously heavy 100% cotton rag, archival, museum quality prints, I must admit that I really feel I should be printing much more. After all, this was the way to view the end product of our art for more than a century until the advent of digital imagery. It would be such a shame to let this crucial part of the art of photography die out, especially now that digital photography has made it so much easier to get to this point.
Of course, the quality of printers has become so much better than 5 or 6 years ago too, and as I mentioned, I did my recent printing from Adobe Lightroom Beta 4. This has made printing so much simpler than printing from Photoshop. Photoshop is easy to get the results I want with, but Lightroom has just made it so much better. Here’s why. My favourite setting when printing is to add a 10% border around the image, effectively printing the image at 80% in the middle of the paper. To do this in Photoshop, I have to height for the size I would like to print the image at in millimetres, into the size field when preparing to print. If the aspect ratio of the image is almost the same as the paper I’m going to print to, I have to check that the image is not going to be too wide say, if I have cropped the photo across the top and/or bottom. If it is going to be too wide, I have to then input the width I want to print too instead. As I have lots of different paper sizes, I have to keep an Excel spreadsheet of all the sizes in millimetres to enable me to quickly input them. This saves me from having to recalculate each time, but it’s still a bit of a pain to look them up each time.
Since I’m now using the Lightroom beta in the core of my digital workflow, I thought I’d give printing module a try, to see if it’s as good as the others. I’ve found that it is indeed as good as the other modules I’ve played with so far. Lightroom is really all about making the digital workflow as fast and easy as it can be, at the same time as providing powerful tools. Well it really has made my printing, or more specifically, the setting up of a print job much faster than it has been until now. The thing is, I can now set up templates for various paper sizes and borders, so I now have a list of all my paper sizes and border settings in my Template Browser on the left that I just select, and Lightroom automatically sizes my selected photo to fit the longest edge. It also remembers the paper sizes and all other settings, including the printer/paper profiles I select.
Actually this is another very useful feature I should briefly mention. To select the profile for my printer/paper combination, I just click select it from the Profile pull-down in the Print Job Settings section on the right. This is “Managed by Printer” by default, but if you select “Other” from the bottom of the pull-down list, you get a list of all printer profiles installed on your computer, to add them to the pull-down, and from then on, it’s literally just one click to select that profile in future. Lightroom remembers the last selection if changed too so if you don’t change your paper, again, there’s nothing to do. It might better to create a new template for each different paper for real one-click printing, but as the profile selection is right above the print button, for one extra click, I can keep the number of templates in my list down, so I’m not quite sure yet which I’ll go with. Either way, Lightroom has once again made my workflow so much simpler, which is an age where time really is of the essence, every minute or hour I can save on stuff like this is very much appreciate.
So that’s about it for the main topic of my current views on the hard copy, and I was hoping I could get your feedback on an idea I’m currently working on, which will allow you to download and print out your own Hard Copy, or view what I’m calling a Soft Hard Copy of the Martin Bailey Photography Podcast’s transcripts. Over the last year or so since starting this Podcast, I’ve been requested to publish the transcript so that people can follow along with the audio. As the transcripts are really much more of, again, a tangible form of the Podcast, I’ve been reluctant to publish them for free on my Web site. Right now I’m thinking of releasing the transcripts for the Podcasts in PDF form as a supplement to the audio files. I believe especially for technical Podcasts, like the MTF Chart one last week and many of the other more technical episodes, it would help to understand the subject if you could follow along with the text either on screen or with a printed copy. Each PDF would essentially be a standalone document, an essay of around 5 to 10 A4 pages including the images I discuss where applicable and any Web links and notes etc.
The thing is this is going to mean some financial and substantial time investments on my part to both set up a system to manage subscriptions and downloads, and to actually create the last 63 episode’s documents and continue to create them for each new episode that is released, so I’m asking for your feedback before I proceed.
I’m thinking that each document would cost around $3.99 each, with volume discounts, probably around $17.50 for any five documents or $29.99 for any ten documents. The documents you choose to download would be up to you and probably linked to your Martin Bailey Photography Web site account. You could either pay for an download individual Episodes’ PDF, or buy 5 or 10 credits, which would allow you to just select the PDFs you want, until you run out of credits. If you decide you want to download more, you simply pay for an extra download, or packages of 5 or 10 credits, and download away until you hit your new limit. There’d probably also be a Platinum subscription, or something like that for $149 that would allow you to download all documents to date, but I’ve not figured out the logistics of this one yet.
For now, I am hoping that I could get your feedback on whether or not you would find such a supplement useful to the point that you’d pay for the documents. Of course, the audio files will remain totally free. I’m only talking about the PDF transcription, and there’s absolutely no obligation to buy anything based on your feedback if I proceed with the plan. I’m just interested in to hear if you think the transcripts would be worth paying a nominal fee for. I’ve created a post in the forum at martinbaileyphotography.com to gather your feedback and votes on a few possible options. I’ll put a link to the post and poll in the show notes, so if you have a minute, please swing by and let me know what you think. Again, there is no obligation to buy anything, even if you think it’s a great idea. Thanks in advance for your time!
Please remember that the latest photography assignment on “Sound!” is currently in progress, so check out the related episode and forum post on that if you are interested in getting involved. It’s a tough one, but hopefully you’ll come up with some great work as usual.
And that’s about it for this week. Have a great week, whether you’re out shooting, or whatever you do. Bye bye.
Show Notes
Music from Music Alley: www.musicalley.com/
Subscribe in iTunes for Enhanced Podcasts delivered automatically to your computer.
Download this Podcast in MP3 format (Audio Only).
Download this Podcast in Enhanced Podcast M4A format. This requires Apple iTunes or Quicktime to view/listen.


0 Comments