
OK, so this really is going to be the last part in this Macro Photography series for now, although as I said before, I’ll probably follow up with more later as I gain experience in this complex subject. In the first part we touched on some macro terminology and basic problems and solutions. In part II, we discussed going larger than life size and the difficulties it imposes on us. If you haven’t already listened to these, you might want to go back to at least part II before listening to todays episode as what I’ll say is in direct relation to that. If you aren’t familiar with life-size shooting or what life-size or 1:1 means, or other terms like minimum focusing distance and working distance, I suggest to step back to part I which is episode 42 and brush up on some of these terms and some other basic macro techniques as well.
There are also download and subscription options at the end of the post.
OK, so I’d say that at least a small number of listeners were probably scared away by all the technical details and plain scariness of larger than life-size macro photography by the end of part II. Hopefully not, but some may have even cancelled their iTunes subscriptions and are now feeling all nice and cozy listening to some Photography Podcast for the Faint-Hearted. For you masochistic die-hards that are still tunes in though, welcome to the inner circle. Let’s talk about how to get some of the difficulties we’ve talked about in recent weeks. I warn you though, the path is windy and uneven. There are only a certain number of solutions to a lot of problems. Some problems such as incredibly shallow depth-of-field are governed by the laws of physics and simply cannot be overcome. We can just make the most of what we have and turn them into a positive thing as much as possible.
So, as I said last week, there are various methods to shoot at larger magnifications than life-size, but I chose the Canon MP-E 65mm F2.8 1-5x lens, which will go as the name says, up to 5 times magnification. The first issue I found with with larger than life-size photography is focusing. The marketing material and the manual for the MP-E 65mm lens states clearly that due to the difficulties in focusing this lens, they recommend using a focusing rail. In image number 1021 you will see a closer view of the Really Right Stuff Focusing Rail than the shot of my gear from last weeks episode that we’ll look at again later too. The first few months that I owned this lens I didn’t have a focusing rail and without one you have to move either the tripod closer or further away from the lens or move the camera on the tripod. I have collars on my macro lenses fitted with Wimberley Arca-Swiss compatible lens plates. So what that allowed me to do was to loosen the fastening nut and slide the lens, and therefore the camera back and forth in the quick shoe. But when we’re talking at less than a millimeter depth-of-field for anything less than life-size with this lens, this is hit-and-miss at best, and if you are crouching or kneeling down on a hard or uneven surface, it can soon become a painful experience too.
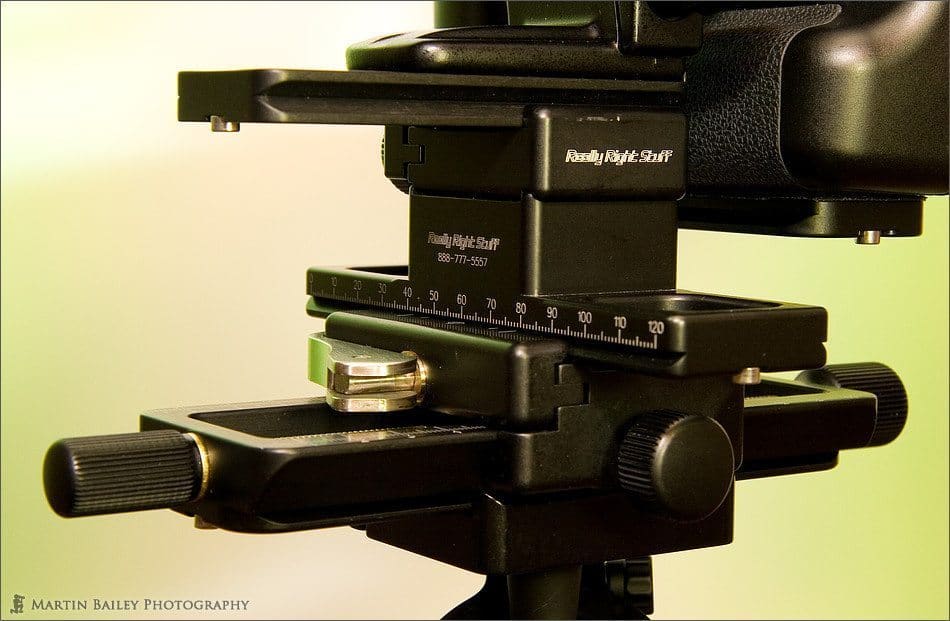
Really Right Stuff Focusing Rail
I spent a lot of time trying to find a focusing rail that would allow me to attach the camera to the rail using the lens collar with the plates, and the only one I found that does that is the “B150-B Package for collared macro lenses” from Really Right Stuff. If you would attach your camera to this focusing rail directly, you would only really need the B150-B Macro Focusing Rail, but the advantage the full package has over this is that you can also move the camera side to side as well as back and forth, for compositional changes. I’ll put a link to the Really Right Stuff focusing rails in the show notes.
Once you have the camera mounted on a focusing rail, you just turn one of the nuts on the front or back to move the camera back and forth on the rail. This allow for incredibly accurate focusing. If you want to zoom in or out a little by increasing or decreasing the magnification, you can do this to a certain extent without moving the camera, just refocusing with the focusing rail. It soon goes quite a way out of focus though, so I find that the best thing to do when changing magnification is to change it to roughly where you think you want to be, then slide the whole rail in the quick shoe on the tripod head. There are balance problems if you move it to far either way in the tripod head, but basically the whole bottom of the 15cm focusing rail is an Arca-Swiss plate, so you have a lot of room to maneuver. Once you have the composition close again, you can start to turn the focusing plate nuts to fine tune.
The two parts of the focusing plate are connected by a quick release shoe, so to move the camera sideways, you just move the lever to the center position, slide it around, and re-tighten the lever. If you have the quick release lever only half undone, the camera won’t slide out of the focusing rail thanks to the stopper screws protruding from the bottom of each side of the plate. One other advantage to this system is that if you undo the quick release lever fully you can remove the camera with the top part of the focusing rail fully for when you are walking from location to location. If you leave the whole thing connected while walking around it can be quite cumbersome and probably puts a fair amount of stress on some of the components.
One other aspect of shooting with such a shallow depth-of-field, is paralleling your subject. To illustrate what I mean, let’s take a look at image number 986. This was in some respects just a practice shot, but I kind of like it. I have a potted geranium plant on the balcony of my Tokyo apartment, and was photographing it for the Rainy Days assignment a few weeks ago. I did not yet have the focusing rail, but the focusing rail won’t really help with paralleling. If you take a look at this shot, which by the way was made again at F8 with four times magnification for 1 second at ISO 400, you’ll see that only the parts of the shot in sharp focus are the red starfish shaped stamen, a part of the petal just right of center in the top, and the tip of the green leaf on the right side of the image. My goal here was to get the stamen and the tip of the leaf in focus. Again, the sharp drop off in focus was going to be drastic and if the leaf tip had not been in focus it might have been distracting, especially with less interesting parts of the image sharp.
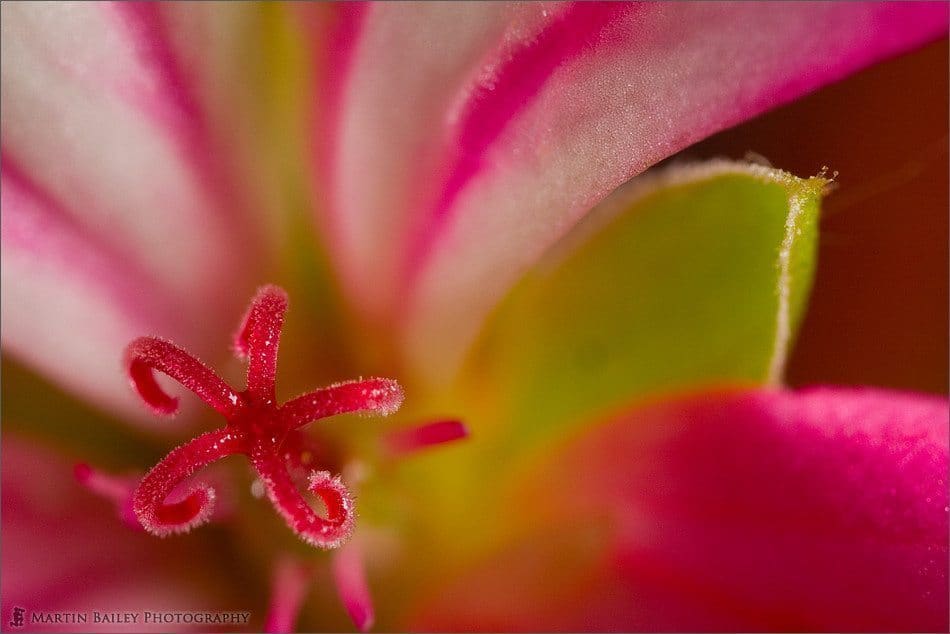
Geranium @ 4X
The thing that was working for me here is that as the plant was potted, I simply picked it up, put some newspaper on a counter in my kitchen, and stood my tripod with one leg extended to the floor, and two other legs contracted and opened up wide so as to go either side of the subject. Then once I got the composition just about right, I could fine tune the position of the subject by not only moving the plant pot back and forth and side to side, but also by rotating it. This was still incredibly tricky as I really had not used this lens very much yet, but after a lot of trial and error, both of different compositions and then this, I got a few shots that I liked. By the way, the rest of the flower had rain on the petals, and that is why I was shooting it for the Rainy Days assignment.
So basically, I had the freedom here to move the subject to get the parts of the image that I want to focus on parallel. If you are in the field though, you really have to just keep on moving the position of your tripod, carefully checking the focus, maybe also using the depth-of-field preview button on your camera to ensure that the subjects you want are in focus. Let’s look at image number 964 to see an example of possibly how not to do this. In this image I had three flowers, and I did not parallel them. I like the image as it is, because it keeps the focus on just the one flower head initially, but then the others are in focus enough to grab your attention for a while. These subjects were shot at around 20 centimeters, perhaps a little more, with my 100mm lens not the 65mm, so this is obviously not life-size or larger. Because of the distance to the subjects though, I was going to need a wide aperture to throw the surroundings out of focus, so I left the lens wide open at F2.8. This gave me a shutter speed of 1/320th of a second at ISO 100 as it was a bright spring morning. I also compensated the exposure by minus 1 stop to stop the whites in the blue flowers from overexposing. The thing I regretted with this shot is that I didn’t try to parallel any more than this. I did shoot some shots with a smaller aperture for a deeper depth-of-field, in which all three flowers are in focus, but in that shot, much of the rest of the scene is also in focus and therefore quite distracting. I don’t know if it would even have been possible to parallel all three of these flowers as I suspect they may not all be on sitting in a line, and if I could have only gotten two of them in focus, I’d prefer just the one like this. Basically though, I regret this shot because I didn’t have time to try any more and so I’ll never know if I could parallel the flowers and if that would have made for a better image. So in this case, we can probably take this as an example of how not to do it, even if, like me, you like this particular shot as it is. We learn by our mistakes.
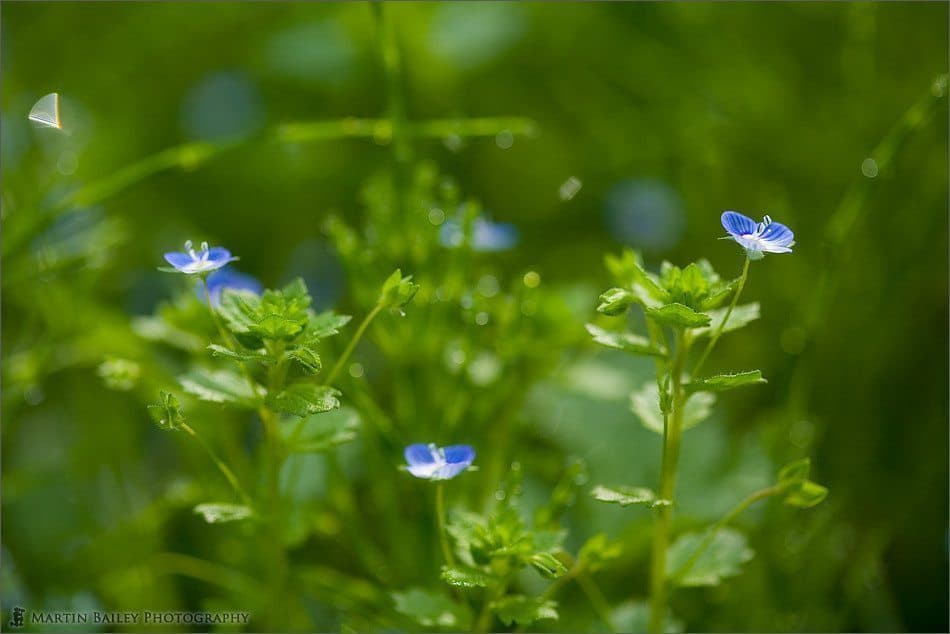
Common Field Speedwell
In the next shot, number 963, although I did parallel the two flowers and consciously placed them with the water droplets on the bottom right all at a similar distance from the camera, I had selected an aperture of F22 to get much more of the scene in focus. The shutter speed was half a second again at ISO 100. I felt that there was so many objects of interest in this shot that I’d go with the deep depth-of-field, but to be honest I’m not all that fond of macro images like this. It’s nice to see the details but I prefer a shallow depth-of-field to make the main subject stand out and increase the dreamy effect. Still, if you don’t mind shots like this, increasing depth-of-field takes the pressure off for precise paralleling like in the shot of the geranium we looked at earlier.
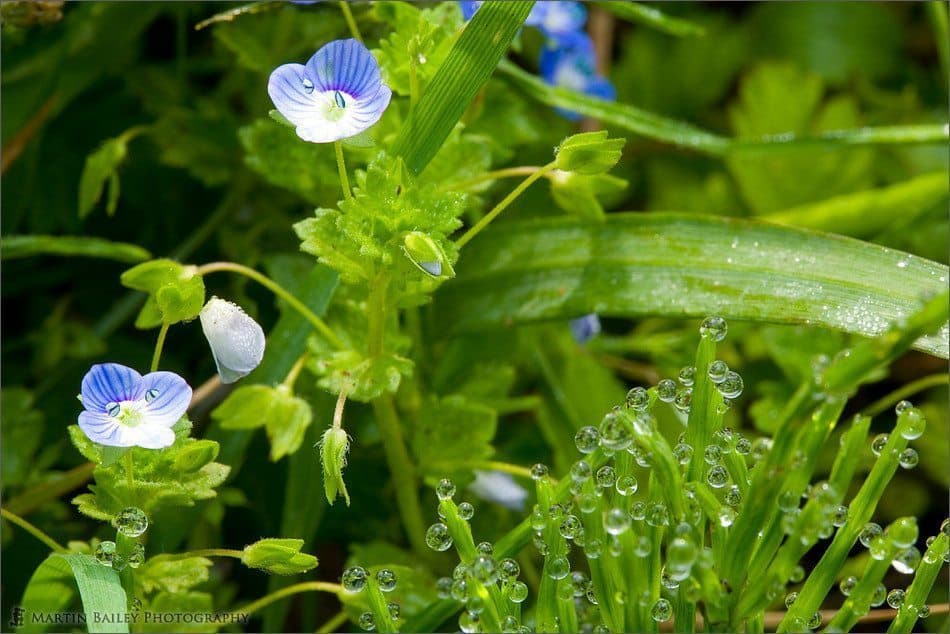
Dewey Common Field Speedwell
Having learned by my possible mistake with the Common Field Speedwell, the blue flowers we looked at earlier, I do pay more attention to getting my subjects parallel now. This is much easier too when you are alone and aren’t keeping someone waiting. I must admit that although I prefer to be with my better half when I’m out and about, when shooting macro or any subject that I need to take time with, being alone is a definite advantage.
The next shot was taken during a slow few hours in a park near my apartment last weekend which was June 17th, 2006. Let’s take a look at image number 1024. On the way into the park I noticed this group of flowers but was going to shoot them with my 100mm macro, so I kept them in mind and went into the park, as I wanted to practice using the 65mm lens with the focusing rail. On the way out of the park I returned to the same spot and found the same group and spend plenty of time shooting them, holding them steady with the Wimberley Plamp that I’ve mentioned in the past. This shot too was made at F2.8, at 1/125th of a second at ISO 200. You can see how I’ve paralleled this shot, focusing on the front part of the yellow centers of the two flowers. For more visual confirmation at this size, you can see the sharp white petals around one third into both flowers. Again, I’ve used a wide aperture to throw the rest of this image out of focus. This reduces the other elements of the image apart from the unopened bud in the foreground to blotches of colour, enough to grab your attention enough to recognize that they are other buds or flowers, but not so much as to distract from the main subjects.
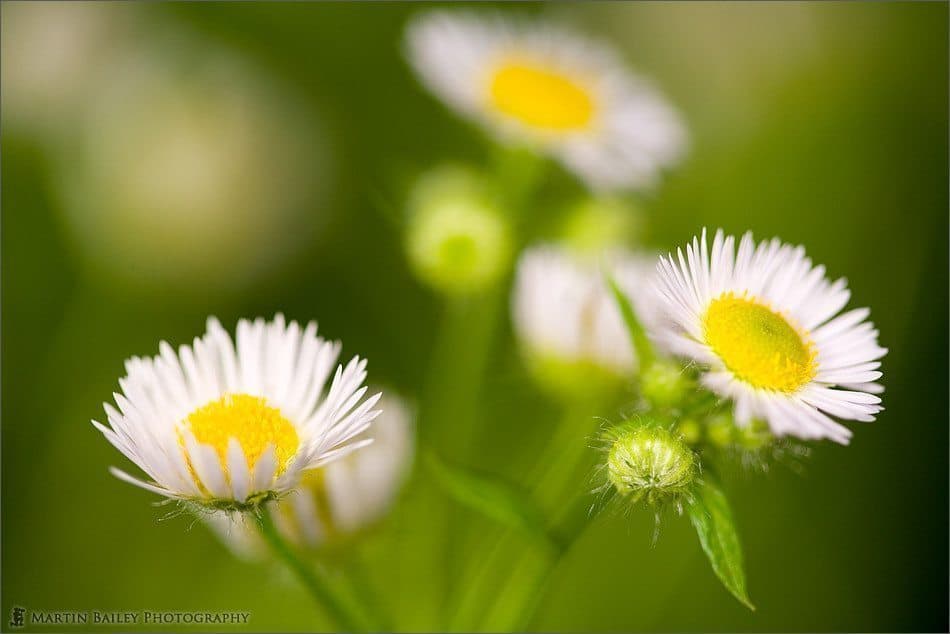
Himejo-on (Erigeron annuus)
One other major issue when shooting macro outside, especially at larger magnifications than life-size, is that even the slightest breeze causes subject blur in your images. I said that I had used the Canon Macro Twin-Lite MT-24EX flash unit to light the first shot in part II but I also used it for this shot too. Take a look at image number 1022 from part II again. The MT-24EX can be seen in the attached to the flash shoe of my 5D in the shot of the gear earlier, with the actual flash heads attached to an adapter on the front of the lens. You can also use the Canon Macro Ring-Lite MR-14EX with this lens. Using the twin-lite or ring-lite allows you to get a fast enough shutter speed to illuminate blur caused by subject movement. It also could not be easier as all you have to do is attach the twin-lite, angle the flash heads to point at your subject, and set the camera to manual. I usually find that I set the flash exposure compensation to around -2/3 as I did with the first and last shots for today. Once you’ve done this, the camera gives one burst of flash when you press the shutter if using mirror up to get an accurate meter reading, then when you finally release the shutter the flash fires again for the exposure. I usually set between 100th of a second and 250th of a second, depending on how much breeze there is. 1/200th of a second is a good place to start.
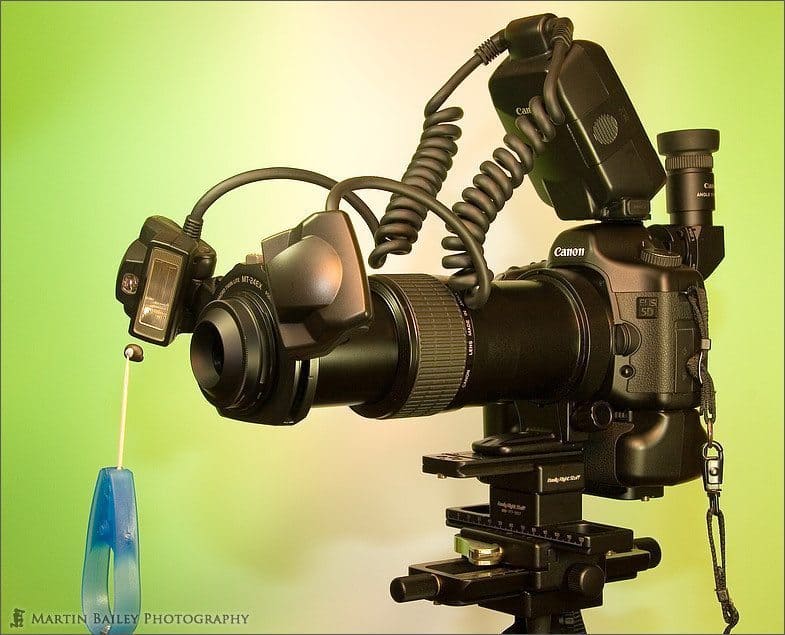
Canon EOS 5D with Macro Gear
The thing you will find it though the faster the shutter speed the more your exposure will depend on light from the flash, and the background will fall into total darkness. Sometimes I prefer a totally dark background as it removes any distractions totally, as with the top left of the first shot we looked at last week. Sometimes though I use a second flash unit to illuminate the background, and this is what I did in this last shot of the daisies. Although there’s a dark patch at the far right of this image, the background is fairly well lit and the image overall looks like it was shot on a nice bright day in full sunlight. The reality is that this was shot in twilight after the sun had dropped below the horizon and there was very little available light left. A few minutes after shooting this image I spent about 10 minutes packing my gear into my backpack before starting the ten minute walk home, but it was pretty much totally dark by the time I got back to my apartment.
I only own one more flash unit and that is the 550EX. Both the MT-24EX Twin-Lite and the 550EX have built in wireless transmitters and the 550EX can be set up as a slave to the Twin-Lite and also the Ring-Lite allowing 550EX to be fired wireless as long as it’s receiver is in the line of site of the Twin-Lite. You just need to ensure that both the Twin-Lite and the 550EX are set up to use the same channel. By default they should both be set to use channel 1 and there’s no need to change this. The two flash tubes on the Twin-Lite or Ring-Lite are called A and B, and when a slave is setup it automatically becomes C. Once the Twin-Lite can see the slave, which can of course be a 580EX as well as the 550EX that I have, when you press the RATIO button on the Twin-Lite you will toggle through the off state, just the RATIO of light between A and B, which allows you to make one flash tube stronger than the other or turn either off all together, and also will toggle to A, B and C. Once C is displayed you can control the slaves flash exposure compensation from the Twin-Lite by using the plus and minus buttons to raise and lower the compensation. This is especially useful if you have set the slave down somewhere to illuminate the background. The manual states that you can place the slave anywhere within 80 degrees of the master, or the Twin-Lite or Ring-Lite and up to 3 meters away outdoors, or 5 meters away indoors. You need to turn the head of the 550 or 580EX so that the front of the body of the flash with the receiver on it is facing the Twin-Lite. If you press the pilot button to test the flash, you it will also fire the slave once setup.
One other feature of the Twin-Lite that I really like, especially when shooting with the 65mm lens with it’s inherently small apertures that make the finder quite dark, is that if you quickly half press the shutter button twice, kind of like a double-click on a computer, the flash tubes will illuminate enough to through light on your subject to enable you to see better for focusing.
Without the Twin-Lite at least, I’d say photography outdoors with the MP-E 65mm lens can be very troublesome in all but the most sheltered areas, simply due to the slightest breeze causing your subject to become blurred. If you recall from last week, the effective apertures are a lot smaller than the aperture number displayed on the camera, so getting enough light into the camera without using flash can be difficult. If you have a standard flash like the 550 or 580EX, I advise you to get used to using it as a slave to light the background as I did in the daisy shot we looked at earlier to stop it from falling into darkness. The one problem that I’m still seeing even with this technique though, is that if the background is relatively far away from the subject, the slave doesn’t reach it easily, and it still falls dark. In most conditions to now, I’ve also not been able to actually take the flash and place it closer to the background with the flash itself out of site, though this is an option.
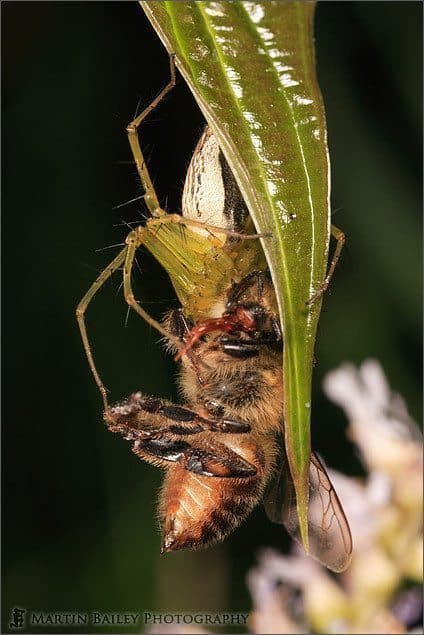
Spider Eats Wasp (with Flash)
A few days ago I actually had a few hours in a local nature research institute, and there was no wind for much of the time, though a breeze got up every so often. During a calm spell I was lucky to get a couple of shots of a spider eating a wasp hanging from a leaf. One of them without using flash and the other with both the twin-lite and the 550EX trying to light the background. Let’s take a look first at the flash lit shot, number 1034. This was shot at F16 for 1/200th of a second at ISO200, and as I say, using the twin-lite and the 550EX as a slave pointed at the greenery in the background. You can see though that the background, which was probably around 2.5 meters or 10 feet away, was hardly lit by the slave flash, even though I’d added two stops of exposure compensation for the slave.

Spider Eats Wasp (No Flash)
Now take a look at the second shot, which is number 1033, shot at F11 for 1/8th of a second at ISO 400. Of course I was using a tripod so this slow shutter speed was not going to cause camera shake, but of the three or so exposures that I made, only this one was acceptably sharp, due to the subject itself moving. You can see in this shot though that the greenery in the background has been well exposed and the shot has lost that harsh feel that the flash light gave it. I much prefer the natural soft look of this image, though that white flower in the background is annoying. As you know lenses focus with the aperture wide open, so you have to use the depth of field preview button to stop down enough to see. With this lens though the depth of field is so shallow, I don’t think I had any idea that the flower was there until I looked at the preview on the camera. By this time though, a park attended was walking towards me tapping his watch as it was 5 o’clock, kicking out time. The next time I use this setup I’m going to try to use the depth of field preview a little more to avoid this sort of thing. If I remember correctly, when you press the depth of field preview button when using the twin-lite it fires some stroboscopic modeling light onto the subject to allow you to see at small apertures. Don’t quote me on this though as I’ve not checked this right now.
Back to the dark backgrounds though, there is one other thing that I try to do when using the twin-lite to avoid getting the dark background, and that is to fill as much of the frame as possible with stuff that’s close to the camera. Let’s look at one last macro shot for today also from this recent trip to the nature research institute, which is image number 1025. In this shot, made with the 100mm macro at F4 for 1/160th of a second at ISO 200, you can see that I was lucky enough to find this bug, which I have not ID’d yet, walking on a bright yellow leaf. As the leaf was going to fill the entire frame I did not use a slave, just the twin-lite with the heads positions to throw light into the shot even from both sides and the result is this pretty wacky out of this world image. With the shallow depth of field F4 was going to give me at this distance I just focused on the eyes and to see what I got, and I was quite pleased with the results. Note too here that I was hand-holding for this shot, which is an added bonus of using the twin-lite. I actually this week shot a few other shots down to double life size while hand-holding, so it might not be quite as difficult to do this, at least down to these magnifications, as I initially though. I’m still sure this would not be possible at much more than double life size though. I’ll update you later if I find out otherwise.
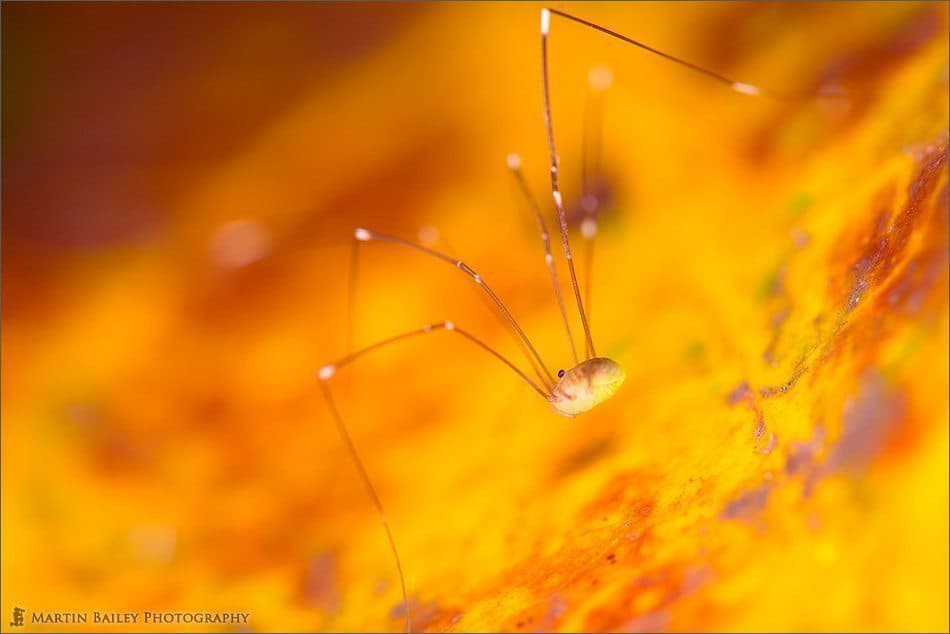
Walking on the Sun
Of course, even in macro photography other lighting techniques are still valid to a certain extent. Reflectors will help to light the background if you don’t have a second flash, but I don’t think this will work well in less than bright sunny conditions when there’s plenty of light to reflect. Also note that Nikon do make a very similar system of flashes for Macro photography, and in fact I really like the Nikon Close-up Speedlight as it allows multiple flash heads to be attached to the ring. I’m not sure how much more useful this would be than the two that Canon have on the Twin-Lite, but I do like the innovative design. Sorry to all the Nikon users or users of other systems for that matter for not covering your gear well, but I know that you the level of users listening to this Podcast have the wherewithal to port any maker specific information to your own system so that you can still make it useful.
One last thing I want to point out before closing is if you go look at the front of the lens on the image of the equipment we looked at earlier you’ll see a weird attachment that looks a little like a chameleon’s eye. This is the hood for this lens. As it is expected that most of the work with this lens will be done employing the twin-lite flash unit we just looked at, as the subject can only be focused on very close to the front of the lens, light from the flash heads can enter the lens quite easily. This hood is designed to cover as much of the front of the lens as possible to keep out any stray light from the flash.
So that’s about it for macro photography for now. Some of you will have found this last three episodes heavy going but I hope it has been of some use, if not a valuable introduction to some basic and some more advanced macro photography gear and techniques. I also hope that it will encourage some of you that are not yet exploring the whole new world that opens up to you once you get yourself a true life-size or higher magnification macro lens, and enable yourself to see this amazing macrocosm.
One piece of housekeeping before we close is that the Rainy Days assignment voting is now turned on. Thanks very much to those of you that have already voted. If you have not yet voted, please do. There are again some excellent entries to choose from. Right now there’s a small black “Vote” button above the photo when viewed full size, and you will be able to change your vote after you’ve voted until voting end. I originally announced that voting would be possible until the end of Sunday the 9th of July, but I need to bring this in by a few days to the end of Thursday the 6th of July as I have some plans for the following week and will not be able to complete the next episode and announce in time if I wait until the 9th. Sorry for the inconvenience.
Anyway, that’s it for this week. Have a great week what ever you’re doing. Bye bye.
Show Notes
Music from Music Alley: www.musicalley.com/
Subscribe in iTunes for Enhanced Podcasts delivered automatically to your computer.
Download this Podcast in MP3 format (Audio Only).
Download this Podcast in Enhanced Podcast M4A format. This requires Apple iTunes or Quicktime to view/listen.


0 Comments