
Welcome to episode 36 of the Martin Bailey Photography Podcast. I was recently asked by a listener to do a Podcast on filters. In recent years, digital photography has done away with the necessity for some filters, such as daylight filters, warmup filters etc. as most colour correction is now taken care of, and I must say, much more easily, by the White Balance feature on our cameras. There are still certain filters that I still use today, and some that I am now shying away from in favour of Photoshop. Listen on for details, along with some real-world examples, as usual…
In my film SLR days, which started really back in 1991, I used the A system filter system from Cokin. The A system holder and filters are quite small and are only compatible with lenses of a filter diameter up to 62mm. In my film days I didn’t own any lenses with a filter size larger than 58mm, so it was fine for me back then. On moving to a Digital SLR some five years ago and buying my first 77mm lens, I bought into the P series, with a holder and a number of filters. The P system is good up to 82mm lenses, and apart from my 600mm F4 lens, that does not accept screw in filters, I don’t own anything winder than 77mm, so this still does me fine. I’m doubt though that the P system would work well with ultra wide focal lengths, say at 16mm now that I have a full-sized sensor camera. I might find some serious vignetting there now, so if you’re about to buy into a system and use wide angle lenses with 35mm film or sensors, you’d be wise to check this out fully first. The Cokin Web site does state that in 35mm terms, for focal lengths as wide as 28mm the P System is OK. For up to 20mm the Z-Pro system is recommended, and for 14mm the X-Pro System is recommended. There is actually a little contradiction between the information on the cokin.com and the cokin.co.uk sites. The co.uk site says that for shorter focal lengths 20-24 or 28mm as well as for wide angle zooms (24-50mm / 28-85mm or 35-135mm the P system is strongly recommended. I suggest taking your camera with a few different lenses to the store and asking to try numerous manufacturers filter systems before buying if possible.
In addition to the holder you need an adapter ring for each filter size of the lenses you want to use the system with. You only need to buy one filter for use with all your lenses as long as it’s in the range of the system you choose. Reading from the Cokin Web site, the A system has adapter rings from 36 to 62mm. The P System goes from 48 to 82mm. The next size up is the Z-Pro series, which goes from 49mm to 96mm and then there’s the X-Pro series that ranges from 62 to 112mm, and there are a few other options for each system. You can find a chart on the Cokin web site. I’ll drop the Web site links into the show notes.
The range of filters from Cokin is pretty extensive, and I’m sure there are other manufacturers that make similar products. Although I do use circular screw in filters from other manufacturers that I’ll get to later, I’ve never used a square drop-in filter system from another manufacturer, and as I don’t like to tell you stuff I don’t have first hand experience with, I’m not going to search around the Web and provide second hand information to you on other manufacturers products. If any of you do use another system that you can vouch for, please post comments and links to the manufacturer’s Web site to the forum at martinbaileyphotography.com. I’m sure it will help other listeners to get a more all-round, un-biased view of what is available.
Cokin do filters for different applications, such as those that produce stars and other special effects, and I’ve experimented with some of these too, but the type of filters I continue to use today are Graduated Grey, and Solid Neutral Density filters. Graduated filters are what they say. The grey part of the filter that will cut down the light that gets to the film or sensor without modifying its colour gets gradually weaker around the center of the filter until it becomes totally transparent. The other type, the solid type has uniform grey density across it’s surface, and so will reduce your exposure by a certain number of stops across the entire image, and not just part of it as do the gradual neutral density filters.
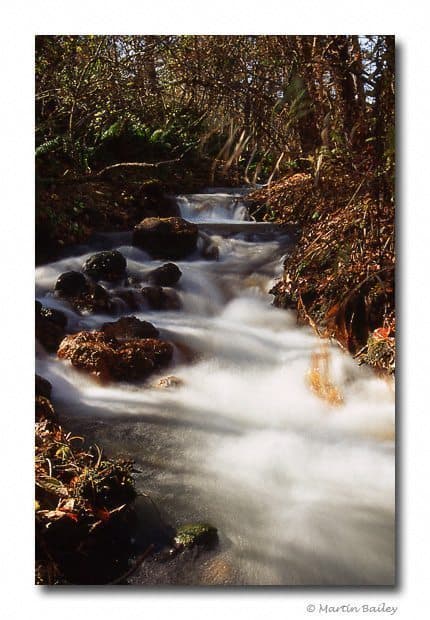
Flowing Stream
Firstly, let’s look at a very old photo of mine, shot way back in 1993, which is image number 26. You can see here that the water has a flowing feel to it caused by the long exposure. You can also see that apart from the shadow areas of the shot, it’s a relatively bright day, so even stopping the lenses aperture down to say F22 may well not give you a slow enough shutter speed to obtain this flowing effect in the water. Now I have no idea what settings I shot this image at. EXIF data attached to every image is a luxury of the digital age, and I was not very good at documenting my shooting data in my film days. I would image though looking at detail in the trees in the distance that I was shooting at around F16 or F22. Although my Web site states that I used the new P series ND4, or Cokin P153 filter, for this shot, it was actually using my old A Series Neutral Grey ND4 filter. ND stands for Neutral Density, and 4 is the opacity of the filter. An ND4 filter will cost you two stops of exposure. So you will either need to make your open up your aperture by two stops to keep the same exposure, or make your shutter speed slower by two stops. Of course, you could do one stop of each or any other combinations of thirds or half stops and obtain the same exposure too. But the main reason I use an ND filter is to enable me to make a longer exposure.
As I say, I don’t have the shooting data for this particular shot, but I’d estimate that I was using around F16 for half a second. If I had not used the ND4 filter my shutter speed would have been an eighth of a second at the same aperture. That’s basically just halving half a second to one quarter for one stop, then halving that again to one eighth for the second stop that this filter costs me. Now one eighth of a second would probably not be enough to make this water look like flowing silk, and so the only way to get this shot would be to stop down to a very small aperture.
Sometimes stopping down to a very small aperture may not be possible. For example, one shot that I’m planning right now, sparked by the Contrasting Colour assignment, is shooting a set of traffic lights when all three lights are illuminated. I’ve uploaded my attempt, which is number 984, to my example photos album, but I’m now waiting for a rainy evening so that I can get more reflections hopefully adding enough interest to the shot to make it worthy of my main albums.
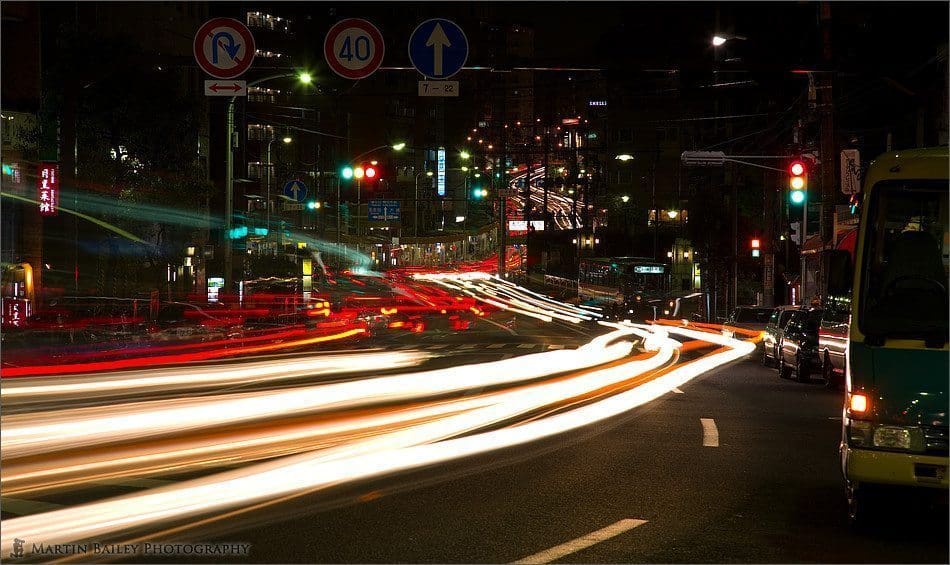
Three Coloured Traffic Lights
Anyway, I went out with my camera a week or so ago, and shot this image. I always have a small notepad with me and in it noted the times of the light changes. I found that the amber or yellow light was illuminated for about 4 seconds, which means I needed to get the last 4 second of the green light, then the first 4 seconds of the red light. So to achieve an even exposure for all three I would need an exposure of 12 or 13 seconds. If I stopped down to F16 without a filter, I was getting a meter reading of around 3.2 seconds at night, which wasn’t long enough. Remember though I had planned this and I had taken a Circular Kenko PRO1 Digital ND8(W) filter to increase the time needed for the exposure. ND8 filters will cost us 3 stops of exposure, so the 3.2 seconds I was getting at F16 would increase to 25 seconds. To halve this to 13 seconds, which is what I needed to get equal exposure of all three traffic lights, I opened up the aperture by one stop to F11 and set the shutter speed to 13 seconds in manual mode. I timed when the lights would change and then tripped the shutter 4 seconds before the green went off and the amber or yellow light was illuminated. Eight seconds into the exposure and the amber light went out and the red light came on for the last four seconds before the shutter closed again. I’d then got a shot with all three lights in the same shot with equal exposure.
This would not have been possible without a neutral density filter. Even stopping down my lenses aperture to F22, it’s smallest aperture, without the ND filter would have only given me an eight second or so exposure, which was still not enough. By the way, I was using ISO 50 for the shot, so lowering the ISO any more was not an option. I needed at least two less stops to make this shot.
Now this is quite a strange plan that I had, but my point is that creative thinking puts us in situations that we cannot get around without physically reducing the amount of light that hits our camera’s sensor or film, and that’s where neutral density filters come in.
Going back to the P System filters from Cokin; something I should note is that the filter holder takes up to three filters. Let’s look at an example, which is image number 62 that I shot some four years ago with my trusty old EOS D30. For this shot I doubled up a Graduated Grey G2 ND8 filter, the Cokin P121 that reduces the light by four stops, and a Gradual Grey G2 ND2 P121L filter. The L in the code P121L stands for light. This filter only reduces the light entering the camera by one stop. There is also a P121M which stands for Medium, and this is rated at ND4 so reducing light by two stops, but I don’t own one of these filters. Anyway, together the P121 ND8 and the P121L ND2 gave me four stops less light, and I needed it because Mount Fuji in the background here was so bright that without balancing the exposure, that is, say if I’d exposed for Mount Fuji and the sky, the please boat and the red Shinto Shrine gate in the foreground very, very dark.
Also note that the good thing about a using gradual filters is that you can turn the holder to any angle. In this particular image I had the filters tilted so that the gradual line from grey to full transparency ran along the diagonal line of the tree from top right to about a third of the way up from the bottom left corner. I haven’t touched this photo in Photoshop other than playing with the tone curves a little, so you can probably appreciate that the graduation is not visible if lined up correctly when shooting. Also note that to see the effect of the filter more easily, it helps to press your camera’s depth-of-field preview button to stop down the aperture.
So moving on to two more images and I’m going to talk about the only other type of filter that I really use nowadays, and that’s the old faithful polarizer, or PL filter. You can get PL filters for the Cokin system, but I always use a circular polarizer that screws straight into my filter thread on the front of my lenses. The draw back of this is that you need to buy a PL filter for each filter size. As the last PL filter I bought was one of the Kenko PRO1 Digital range, this set me back around US$130 for one filter. If you are on a tight budget it might be worth considering buying just the one PL filter for a system like Cokin, or you could buy one PL filter for your largest lens then buy step-down rings for your smaller filters sizes. The problem here is that the PL filter might end up wider than your lens hood, making it impossible to use both together. Note that you can buy a lens hood to fit on the holder in the Cokin system, but I’ve never bought this either.
Anyway, first, let’s look at image number 154. This is a shot of the Kushiro Marsh made in August 2003 during my first trip to Hokkaido, the island at the northern most point of Japan that I visited in February this year and spoke about in depth in episodes 25 to 28 of this Podcast. Now before we talk about this shot, I want you to try to open two windows and in the second look at shot number 185. Also, as I explain about the shots to make my point, note that the first image was taken just 31 seconds after the second.

Kushiro Marsh
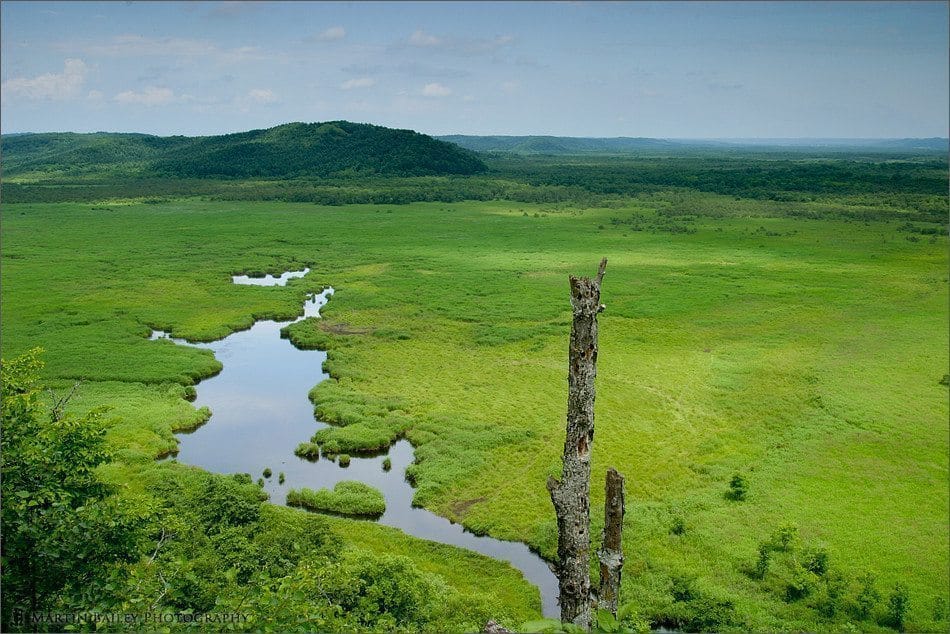
Kushiro Marsh
If you are viewing the images on my Web site on the Podcast page, just right-click the two images and select to open them in a new browser window. If you are viewing in iTunes, you should be able to just click the little right arrow above the thumbnail them click the next image to open a new viewer window. Now that you can see both images next to each other, you should be able to notice a number of things. The most striking will be that the water in the first image, number 154 is dark, and in the second image, number 185 it is bright. Another difference, though not as noticeable, is that the sky is darker in the image with the darker water. Another big difference is that the greens and the tree stump in the foreground of the image with darker water and bluer sky are much more vivid. The image with lighter water actually has a deeper, perhaps more saturated green area and the tree stump is much darker, so I’m not really sure which I prefer in this respect.
There is actually one difference in the shooting information, and that is that the first shot with darker water was shot at 1/10 of a second, and the second shot with bright water was made at 1/13 of a second. This will possibly help the brighter greens and tree stump to become a little brighter, but the main reason, and this is the reason that I am showing these two images today, is that although for both shots I had a circular polarizer filter attached to the front of my lens, for the first shot I adjusted the polarizer filter for maximum effect. In the second image I turned the filter around 90 degrees so that it was giving the minimum effect. As you turn a PL filter on your lens you can see the difference in the effect, so I want to say that just dropping a PL filter on your lens and shooting will not give you the effect you require, unless you are lucky enough to stop screwing it on at exactly the spot. This is something that also came up in the forum in the last week, but when using a Polarizer remember that the effect is strongest when you point it at something at a 90 degree angle to the sun. The sun was almost directly overhead when I shot these two images, so conditions were not ideal, but under the right conditions you should be able to see a clear sky turn do a very dark blue while rotating the filter. In fact, you can easily overdue the PL effect on days with a very clear sky, as the sky can be rendered very deep blue indeed. In these conditions it’s wise to not go for the strongest effect possible.
There has also been a discussion in the forum recently about this, started by Landon, one of the major contributors on the site. Landon mentioned when adjusting the effect of the filter, make sure you turn the polarizer in the same direction that it screws on to your lens. This is basically to stop it from becoming loose and possibly falling off while you rotate it. Landon also suggests using gaffer tape to tape the polarizer to the front of the lens, also to stop it rotating and falling off, especially in high vibration situations like when sitting on a helicopter. Landon assures us that gaffer tape can be removed very easily after shooting without leaving any stick mess on your lens. Great tips Landon! Thanks very much as usual. The ensuing discussion is quite interesting too, so I’ll drop a link to this discussion into the show notes.
So, I mentioned in the introduction that there are some filters that I’m now shying away from in favour of Photoshop. Basically, I’m finding more and more that I don’t carry my Cokin gradual grey filters around with me. When I think I might need them I still carry them, but now find that I’m shooting with them to prove a point to myself. I shoot a scene in the traditional way using the grad filters, and then I shoot two shots without the filters, one exposing for bright areas, then one exposing for the shadows, and then merge them in Photoshop to emulate the results of using gradual grey filters. More and more I find that I’m using the Photoshop merge rather than the gradual grey filters.
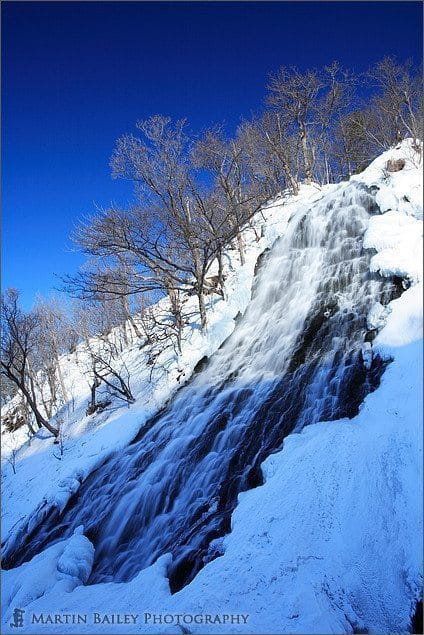
Oshinkoshin Falls
Take a look at the last image for today, number 935. I briefly mentioned this in episode 28 too, but this shot of the Oshin Koshin Falls in Hokkaido is actually two shots merged to emulate a gradual grey filter.
The challenge here is that the bottom of the falls was in shadow heavy as the sun had not yet rose high enough in the sky to light the whole area. This does of course have the benefit of a much more saturation blue sky, and before you say it, that dark blue sky is natural, caused by the contrast between the sky and the bright snow and the angle of the sun, and not overdone PL. I wasn’t using a PL here because I didn’t want to reduce the sparkle in the water. Remember that if I use a PL I will make water transparent, though probably only to a certain extent for a waterfall.
Anyway, what I did here was make a number of different exposures, including a few with a gradual neutral density filter, and I aligned it across the top of the frame to reduce the contrast between the top of the falls and the sky, and the lower, heavily shadowed area of the falls. These shots came out OK, but again I decided to go with a Photoshop shop merge.
Both shots used for the merge were at ISO 100 at F20 shot with the 16-35mm F2.8 lens. The top of this image had a shutter speed of 1/13 of a second. The bottom image was shot at 1/6 of a second. I copied the image with a blown out top, but brighter shadow area that I used for the bottom of the new image to the clipboard in Photoshop and then pasted it over the second image and converted it to a mask. I then painted over the bottom part or the shadow area until I had revealed all of the brighter shadow areas that I wanted yet still had created an image that still had a visible shadow across the bottom. There was only one stop more brightness in the bottom shadowed area compared to a straight shot, as I didn’t want to over do it. I do have a shot with the bottom much brighter, but decided to go with these two as I didn’t want to deny the fact that there was ever a shadow there. Also the texture of the light would have been considerably different in the original shadow area.
I’m not going to go into lots of details about exactly what to select in Photoshop to use this technique, because I use a Japanese version of Photoshop, and it takes too a while to figure out what the precise translations of all the menu item and button names are. If you need more help with masks, take a listen to episode 85 of Chris Marquardt’s Digital Photography Tips from the Top Floor. In this episode Chris gives some great examples of how to use Layer Masks.
There are of course also protector filters, or UV filters that are colourless, and can be used on your lens pretty much all the time. There’s not real artistic and few technical implications with regards to these filters. The debate goes on as to whether or not to buy the best protector filter you can, especially if you are going to put it on the front of some expensive glass. I personally do try to pick up the best quality filters I can and pretty much consistently now use the Kenko PRO1 Digital Series, as they have special coating to reduce ghosting etc. but some say there’s no real difference. Of course, going for the cheapest you can get has it’s advantages as well, no only financially, but as these are sometimes a throw away items, so it really does come down to personal taste. One last thing, there are problems with vignetting when fitting two filters to some wide angle lenses, especially when using a 35mm film or full-size sensor camera, so you may have to remove the protector or UV filter when you want to use a polarizer or other filter. I’ll post a link to a topic on this in the forum in to the show notes too.
So, I hope that has been of some help. I have only touched on my own uses of filters, and not tried to be comprehensive and cover all possibilities. To recap, I’ve totally stopped using my old warm up filters etc. now depending on White Balance. Although I was reluctant initially to do very much in Photoshop, including merging two images, I’m slowly coming around to this idea and employing this technique more and more in my work. I really now only use two types of physical filter, and that the solid neutral density and polarizer filters.
Once again, today’s episode is going to be a few days late. I’m still pretty busy, and finding it difficult to prepare for each week’s episode in time to swing back to my old schedule of releasing on Monday or Tuesday. I am going to try my best to get next Monday’s episode out on time though, as it will be the next episode in which I announce the winner of the Contrasting Colours Photography assignment. Thanks very much to all of you that have voted for one of the images in the assignment album at mbpgalleries.com. If you haven’t already voted, remember voting is still open until the end of Sunday the 14th or May. The vote button is visible above each image when viewed at full size having clicked the thumbnail. You can only vote for one image per assignment, but you can change your vote as many times as you want until the voting closes on the 14th.
I’m also happy to say that it looks like I’m not going to have to exercise the right I gave myself to override the vote. Looking at the votes so far, it seems that you guys have exactly the right idea about what I was hoping for with this assignment.
One last thing that I’d like to mention too is that I am now considering accumulating votes from this and future assignment for a yearly Grand Prize. Maybe I can get some sponsor to give a prize or two, and if not, I might spring for something that people want more than one of my original prints for a prize. This way people that aren’t lucky enough to take first prize, but that consistently do great work and gain a steady flow of votes throughout the year, will also have a chance of winning the grand prize. It will also be an incentive for members to participate in the assignment every month. The member’s that have participated to the first assignment are pretty much all saying that they thoroughly enjoyed shooting for the assignment and that it made them think in totally different ways. The traffic lights shot that I made and discussed earlier was planned purely through thinking about colours, and starting to think it would be cool to get all three traffic lights in the same shot. Remember, that one of my personal goals and one of the rules of the assignment is that no cloning in of objects in Photoshop is allowed, so I couldn’t simply shot the same traffic lights three times and clone all the lights into one image.
Anyway, before I go off on a tangent again, please come along and vote by May 14th if you haven’t already. And also listen out for next weeks episode, to hear the winner of the Contrasting Colours assignment and also I’ll give details of the next assignment so that you can start shooting for that too.
One more thing before we finish. On request from a listener, I’ve created a Podcast “Light” page, for people that use small form factor computers such as Pocket PCs. The page will load a shorter toolbar at the top and less sections before the Podcast archive table. Also, only the latest 4 episodes will be displayed in the index by default, not 12 as in the main page. Also, if you jump to the full size images from this page the filmstrip will not be displayed below the full size image, so again, less images to download. If you use a small form factor computer to view the page, please try it out. There’s a link near the top of the current Podcast page, and also I’ll put a link in today’s show notes.
Finally, thank very much to all of those that have completed the Listeners Survery, and I’d like to mention that we’re still short of around 80 survey completions. I can’t start advertising for a sponsor until we make the numbers, so please click on the Listeners Survery icon on the top page of martinbaileyphotography.com, or the larger image of the guy with the headphones on on the Podcasts page. I’ll also put a link in the show notes to a forum post in which I give more details. It only takes five minutes and will really help me out if you could spare time to complete this survey.
So have a great rest of the week, and a great weekend. Bye bye.
Show Notes
Music from Music Alley: http://www.musicalley.com/
Subscribe in iTunes for Enhanced Podcasts delivered automatically to your computer.
Download this Podcast in MP3 format (Audio Only).
Download this Podcast in Enhanced Podcast M4A format. This requires Apple iTunes or Quicktime to view/listen.


0 Comments