
Visit Library for MBP Pro eBooks |
I’ve just released an update for our MBP Fine Art Border Tools plugin for Adobe Photoshop, so I wanted to spend a little time today to explain the great new features that are now available. The update is version 1.5.1 so if you already own FAB Tools and don’t see these options, please check the Adobe Plugin Manager and update the plugin if necessary. All of the new features are in the Add Text module, where you can add text to your resized and framed image. Two of these new features were based on suggestions I received from a listener so I’d like to give a shout-out to Roger Jones from the UK and thank Roger for the suggestions and for using FAB Tools!
Also, please note that I’ve just released a 24-minute video to explain these new features, so I’ll embed that here as it will probably be easier to understand these features if you follow along in real-time. Then I’ll go on to explain again below, for those of you that just want to listen, or for Patron members that prefer to read.
Second Text Line (from V1.5)
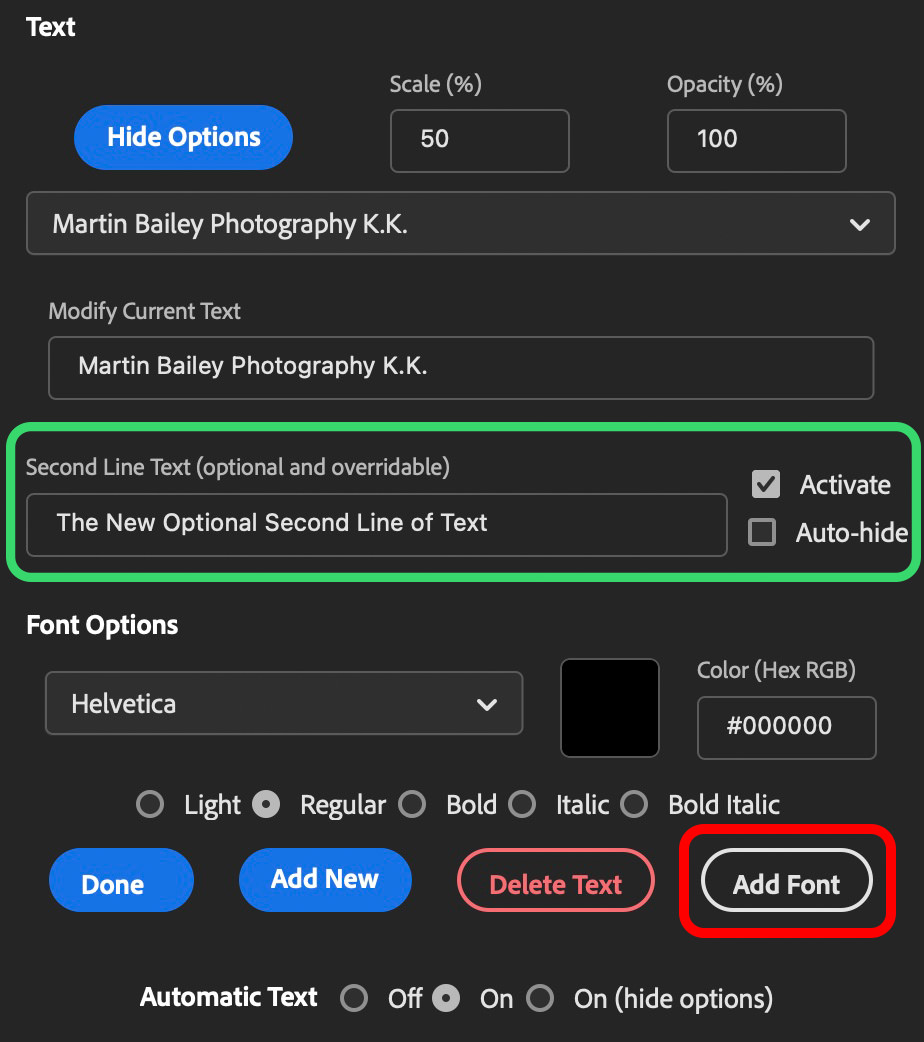
From version 1.5 which was released a few days ago in the Adobe Exchange Marketplace, there are now more text customization options than ever! First of all, you can now add a second line of text that you manually enter for your Text Watermark.
All you have to do to use the second line of text is to select the Second Line Text field (inside the green box in this screenshot) and type in your text. This second line will also appear for any text watermarks that you have already configured and can be used just as though you were creating the watermark afresh. When you tab away from the text field your text is automatically saved along with your first line and other options, such as font, font style, and font color.
Once saved, if you don’t need to embed your second line in your watermark, you can either delete the text or uncheck the Activate check box to the right of the Second Line Text field. If you want to change your text regularly, leave the Auto-hide checkbox unchecked, and the field will remain on the screen when the other options are hidden.
Add Custom Fonts
Another new feature in version 1.5 is the ability to add any font that you have installed on your system to the Font pulldown for use in the Text Watermarks. To get started just click on the Add Font button that can be seen after clicking on Show Options in the Add Text module. If you haven’t added a Text Watermark yet, you need to add at least one before these options are visible.
After clicking the Add Font button, you will see six text fields, that you can see in the below screenshot. The first is for the font name, and the following five fields are for the various styles that you commonly find in a font. The name can be anything you want, but so that you can recognize the font, using the Font Name is recommended. For the remaining Postscript name fields, you can use the font file name without the extension, or get the font style name from the Font Book under Applications on a Mac or from the system Font viewer on Windows.
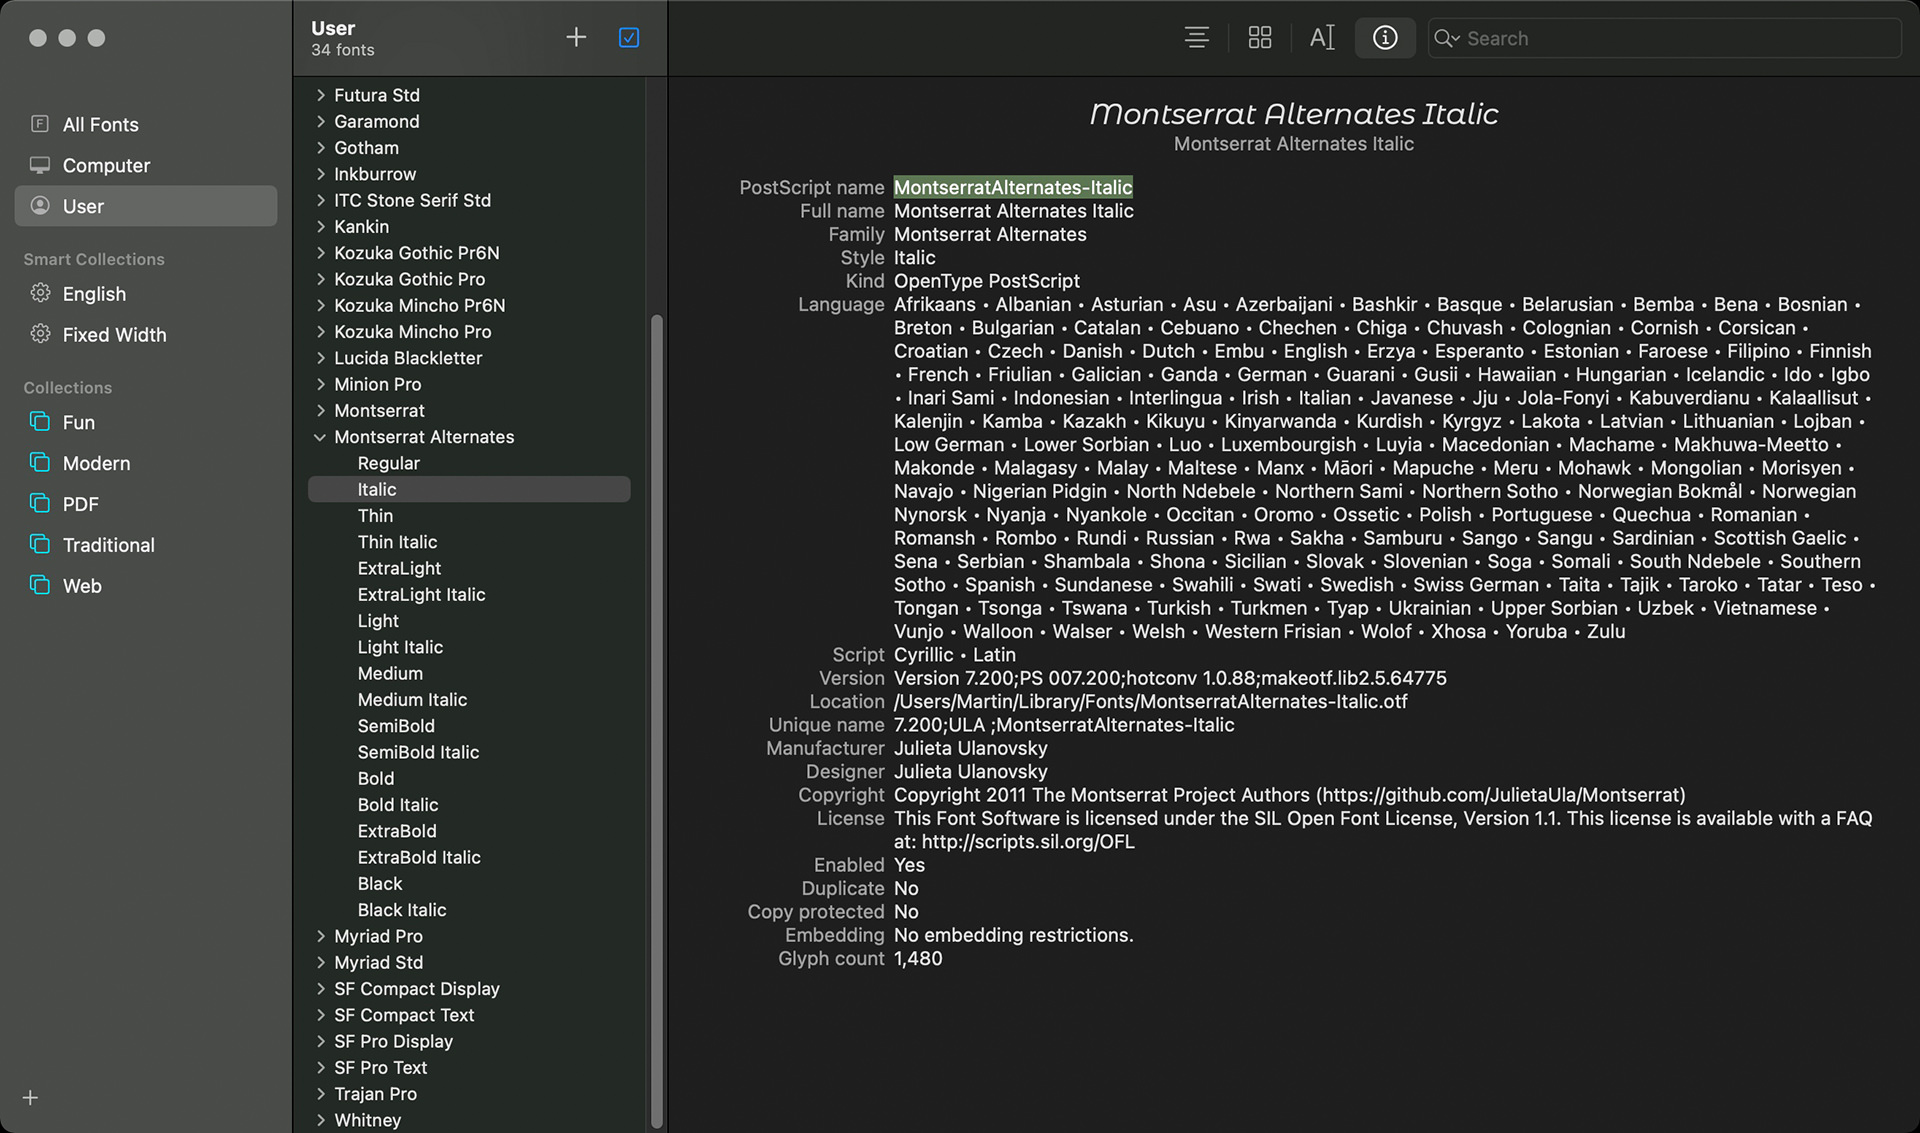
These names have to match the actual font names or your custom font will not work. After entering the style names, click the Store Font button, and check the preview to see that the font is working. If you have added more than one font style, also check that the style changes in the preview when selected.
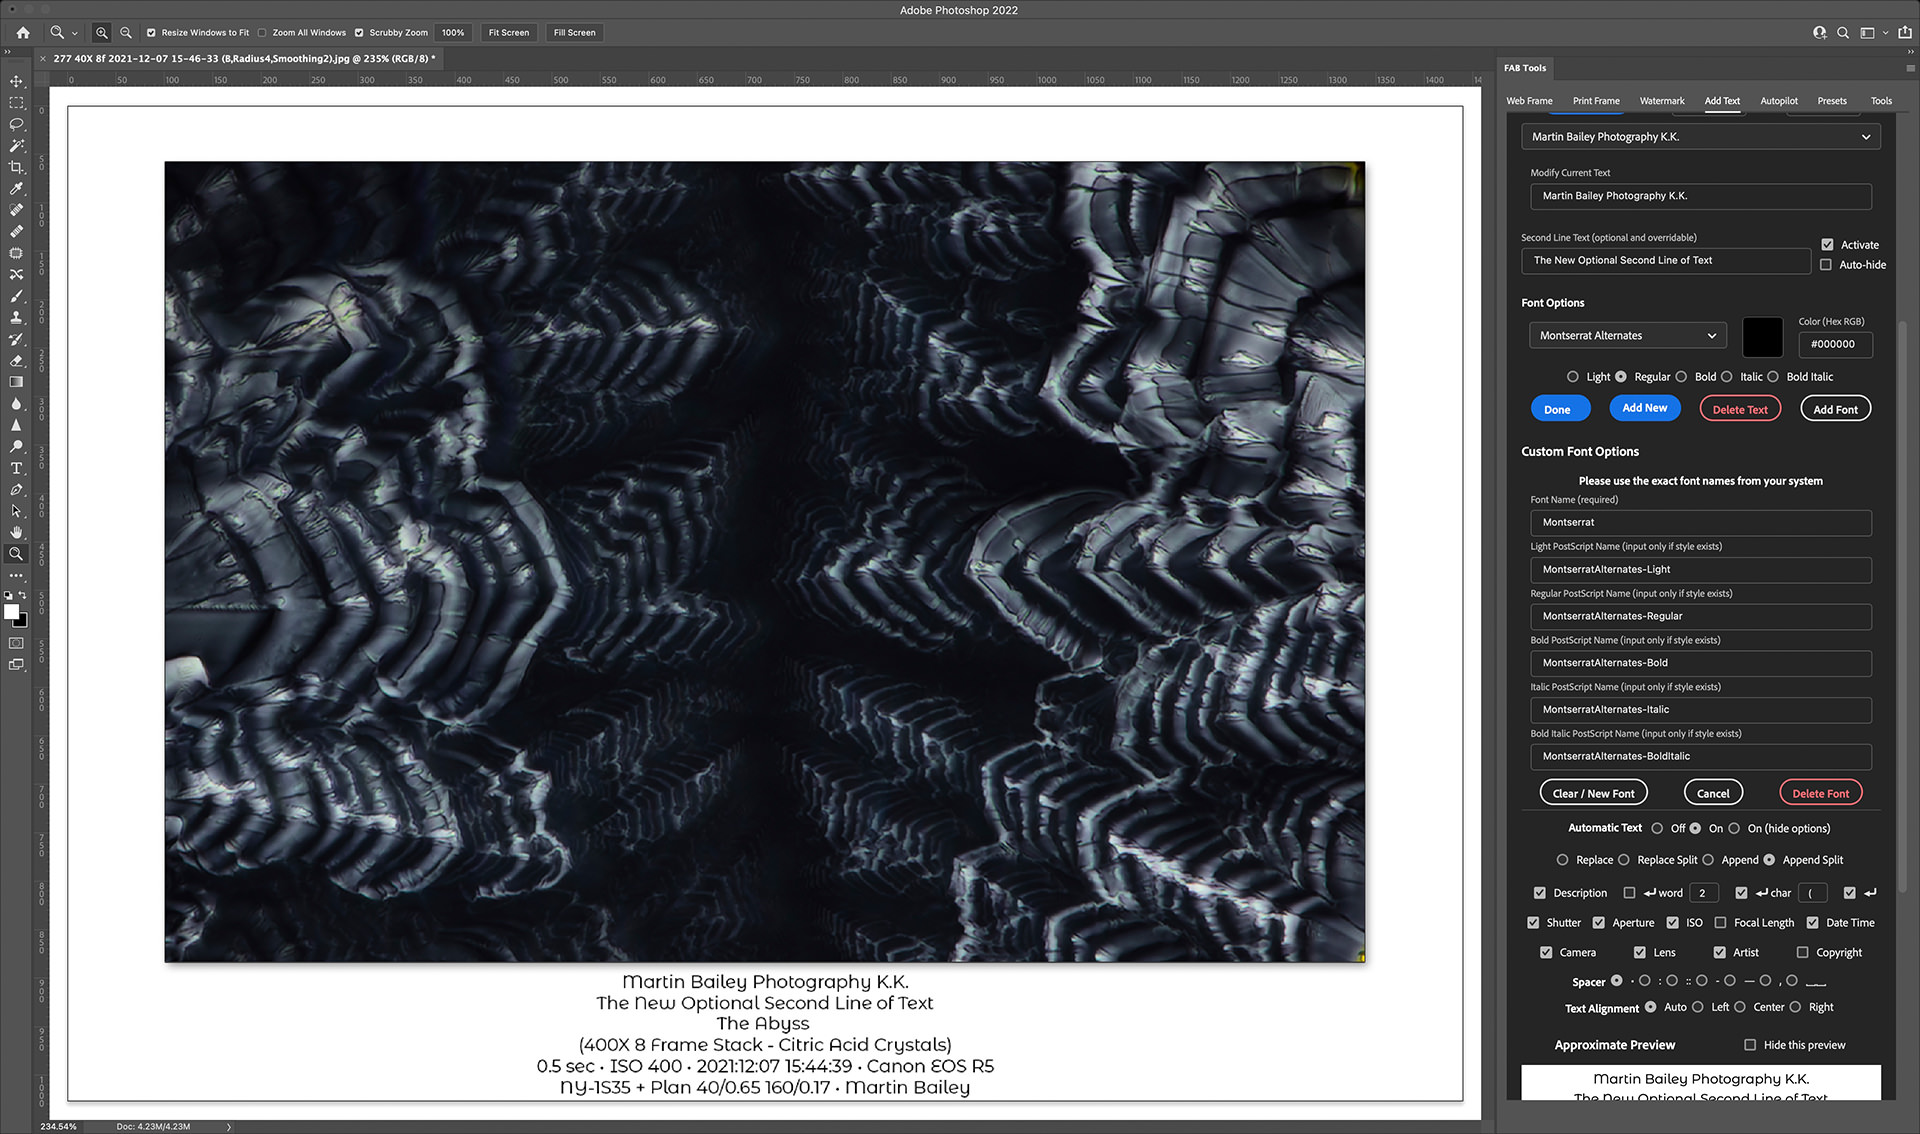
You can add different styles to the five provided, for example, you might add an Extra Light font style instead of Light, or Extra Bold instead of bold, but note that the style will only be displayed by the available style radio button with the default names. Once you have added a custom font, you can press the Edit Font button that will be displayed when a Custom Font is selected and reopen the font text fields to check or change what you added. There is no limit to the number of fonts that you add.
Note too that the fonts are added to the MBPCustomFonts.txt file that you can find along with the other preference files that are stored. To see your Custom Fonts file and potentially make a backup, go to the Tools module and click on the Show Settings Folder Path button, then copy the path to the clipboard, and paste that path into the dialog that appears when you select the Finder > Go > Go to Folder option on a Mac, or paste the path into the Explorer path field in Windows.
Description Text Wrapping Options
Version 1.5 also introduced two new Description Text wrapping options. The Description text is automatically extracted from your image if you added a description, either in the File Information > Description field in Photoshop, or in another application, like Capture One Pro or Lightroom. If you add a Description in Photoshop, note that you must save and close then reopen the file before MBP FAB Tools will be able to read the Description from the image file.
The first of the two new wrapping options is to return after the number of words entered into the first of the two optional fields. Your description will automatically be wrapped after the number of words entered. The second new wrapping option is to wrap when FAB Tools finds a specific character or character string in your Description. By default, this is an opening parenthesis bracket. As you can see in the example screenshot above, I wrapped the description after the two words “The Abyss” by including the remaining Description inside parenthesis. I’ve not limited the character wrap to the first instance of a character, so you could theoretically wrap line after line by including the wrap character multiple times.
Safe Text Scaling
The last major update in this release is the Safe Text Scaling option. As it is now possible to build text watermarks that can potentially overflow the space provided in the border surrounding your resized image, I’ve added the Safe Text Scaling option and turned it on by default, and this will essentially prevent your text from overflowing the border and being cut off.
The cool thing about this is if you do work with multi-line text watermarks, and are happy for them to fill the border space vertically, you can now just set a larger Scale percentage than necessary, and allow the Safe Text Scaling option to resize your text to fit the border automatically. So, for example, instead of trying to find the percentage required to fill the border, which might be say 32%, you can now just specify a 50% border, and leave the rest to FAB Tools. Needless to say, it works with landscape or portrait orientation images, as well as square and panorama images.
If you want to know whether Safe Text Scaling is kicking in, look below the three options under the Text Anchor Target section in the Add Text module while adding a text-based watermark. You’ll see a green message quickly flash onto the screen saying “Text Auto-Scaled!” To actually be on the Add Text screen if you are adding a Watermark during the resizing process, select Apply Web or Print Border from the hamburger menu in the top right of the FAB Tools plugin panel.
OK, so we’ll start to wrap it up there for this week. If you don’t yet own a copy of the MBP Fine Art Border Tools and would like to, you can jump directly to the product page on the Adobe Exchange Marketplace with the short-link https://mbp.ac/fabtmp and you can get to our product page for further details with the link under the Shop menu at the top of this website.
To finish, I’d quickly like to say a huge thank you to Richard, Jim, David, and Kandice, our new patrons. Thank you, alongside the other patrons for your support of the Martin Bailey Photography Podcast.
Show Notes
Adobe Exchange Short link: https://mbp.ac/fabtmp
FAB Tools Product Page: https://mbp.ac/mbpfabt
Subscribe in iTunes to get Podcasts delivered automatically to your computer.
Download this Podcast as an MP3 with Chapters.
Visit this page for help on how to view the images in MP3 files.

0 Comments