It’s been two years since I explained my image management strategy as a traveling photographer, and I’m finding myself explaining what’s changed a lot in email conversations, so today, I’m going to walk through this with you again, and update you on the changes I’ve made.
First of all, allow me to explain the problems that I’m overcoming with my workflow, so that this all makes sense as we work through my thinking.
Problems to Overcome
One question I get asked about a lot, and why I often send people to this post, is how do I move smoothly between computers when I get back from a trip. People tend to make the process of getting images from a trip back into their main library a very painful process.
The good news is, if you build your workflow around the premise that you will travel, you don’t have to do anything special. I’ll go into details shortly, but basically I have to click one button when I get home after a trip, to initiate a backup of my images, and I’m done. In fact, I have to click that same button whenever I go to my desktop computer, so nothing changes. I literally transition between my laptop and desktop computer with zero effort, as I’ll explain.
Another problem people often come up against, is keeping track of what is backed up to where. I’ve found that it’s very important to decide which hard disk contains your working data, and which hard disks are just a backup. If you work on images in separate locations it soon becomes a real pain to keep them synchronized, so we build this into our strategy.
Finally, I think it’s vitally important that we have a multiple backups of our precious photos at home, as well as a copy in the cloud. Having everything under one roof could be a recipe for disaster, if indeed, disaster should strike. Should something catastrophic happen to your house or business premises containing all of your local backups, having the ability to contact someone to receive a backup of all your data could be the only possible way to rebuild your image library, as you rebuild your life.
Same Strategy, Different Software
One other major change over the last few years, is that I’m now using Phase One’s Capture One Pro as my raw processing and image management software. The details regarding what I did in Lightroom are still in the original post, so you can certainly still reference that post for details, and as you’ll see, most of what we’ll cover doesn’t really change depending on the software you are using in your workflow.
Move Catalog Drive Rather Than Synching Computers
The cornerstone of our digital workflow is our image catalog, or now that I’m using Capture One Pro, catalogs, in the plural. I have more than one now unfortunately. But, I’ve found that keeping track of multiple catalogs and keeping them backed up has not been a problem.
The important thing is that I keep my catalog on an external hard drive, and this needs to be relatively fast. A USB 3.0 hard drive generally won’t cut it. I’ve actually changed my hard drive twice since my fist post. I used a Drobo Mini over Thunderbolt, and then 4TB Western Digital Thunderbolt drive a long time, but as I bought a new MacBook Pro with USB-C ports at the end of last year, I picked up a Sandisk Extreme 900 portable SSD drive, and have been very happy with it. These are expensive drives though, currently retailing at $787 on B&H.
These external SSD drives over USB-C 3.1 Gen2 are incredibly fast though, and remove any and all stress related to running your image catalog and images on an external drive. The Western Digital thunderbolt drives were fast too, but nowhere near as fast as these SSD drives. The Extreme 900 comes with both a USB-C to USB-C cable and a USB 3.0 Type-A to USB-C cable, so I can plug it straight into either my new MacBook Pro or my older iMac. The speed is actually pretty respectable over USB 3.0 on my iMac as well. The problem with other USB 3.0 drives is that the 2.5 inch hard drives are slow, but that isn’t the case with SSD.
The downside, is that the largest available volume at this point in time is 1.92TB, so I had to rethink a few things. I can just about fit my Finals and current year of images on this drive, although it will be tight. I’ll explain this in more detail shortly, but the important thing to note here, is that I have all of the work that is important to work on at the current time on this drive, and I run my Capture One Pro catalogs from this drive. When I move computers, I simply unplug the drive from one, and plug it into the other. When I reopen Capture One, I’m taken right back to the location that I left off when I closed the catalog on the other computer.
Catalog Strategy
When I moved to Capture One, I found that it couldn’t handle all of my images in a single catalog, so I split my images into multiple catalogs. Each year of images has its own catalog, except for the first six years, from 2000 to 2005, because I didn’t have that much work, and so I was able to fit this all into a single catalog.
So, I currently have one catalog called 2000-2005, and separate catalogs for each year from 2006 onwards. These year catalogs contain every image that I shot for each year. I do all of my initial editing and image rating in these catalogs, until I have finalized my selection. Once I have finalized my selection, I copy my images to another catalog, called Finals. This catalog contains a separate folder for each year. I also copy the physical images to a Finals folder with one subfolder for each year. I’ll cover this in more detail later.
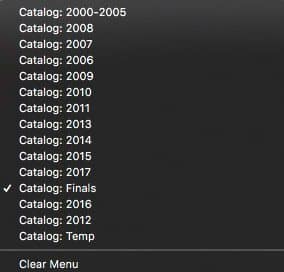
Although I wasn’t happy about having to split up my catalog initially, in practice, it hasn’t been that bad. You can easily get to each catalog from a pull down in Capture One Pro (right) and I have all of the photos that are worth a hoot in my Finals catalog anyway, so most of the time I tend to flick between my Finals and the current year catalogs.
Master and Backup Copies
As I mentioned, I learned from experience that it’s really better to avoid having multiple copies of folders and catalogs that you work on, so it’s really important to decide where you are going to put your catalogs and folders of images, and decide which on is the master, and which ones are just for backup purposes.
If you work on a copy of your image library on one computer, and then work on a different copy of your image library on another computer, at some point you are going to wonder which copy is the most recent, and you’ll have forgotten. Even when using software such as ChronoSynch that we’ll look at later, which has the ability to synchronize the latest files between locations, there will come a point when you have two copies of the same file that have both been worked on, and when you select one copy, you throw away what you did to the earlier copy, or you keep both copies and that’s avoidable, so I prefer not to.
My Master and Backup Copy Strategy
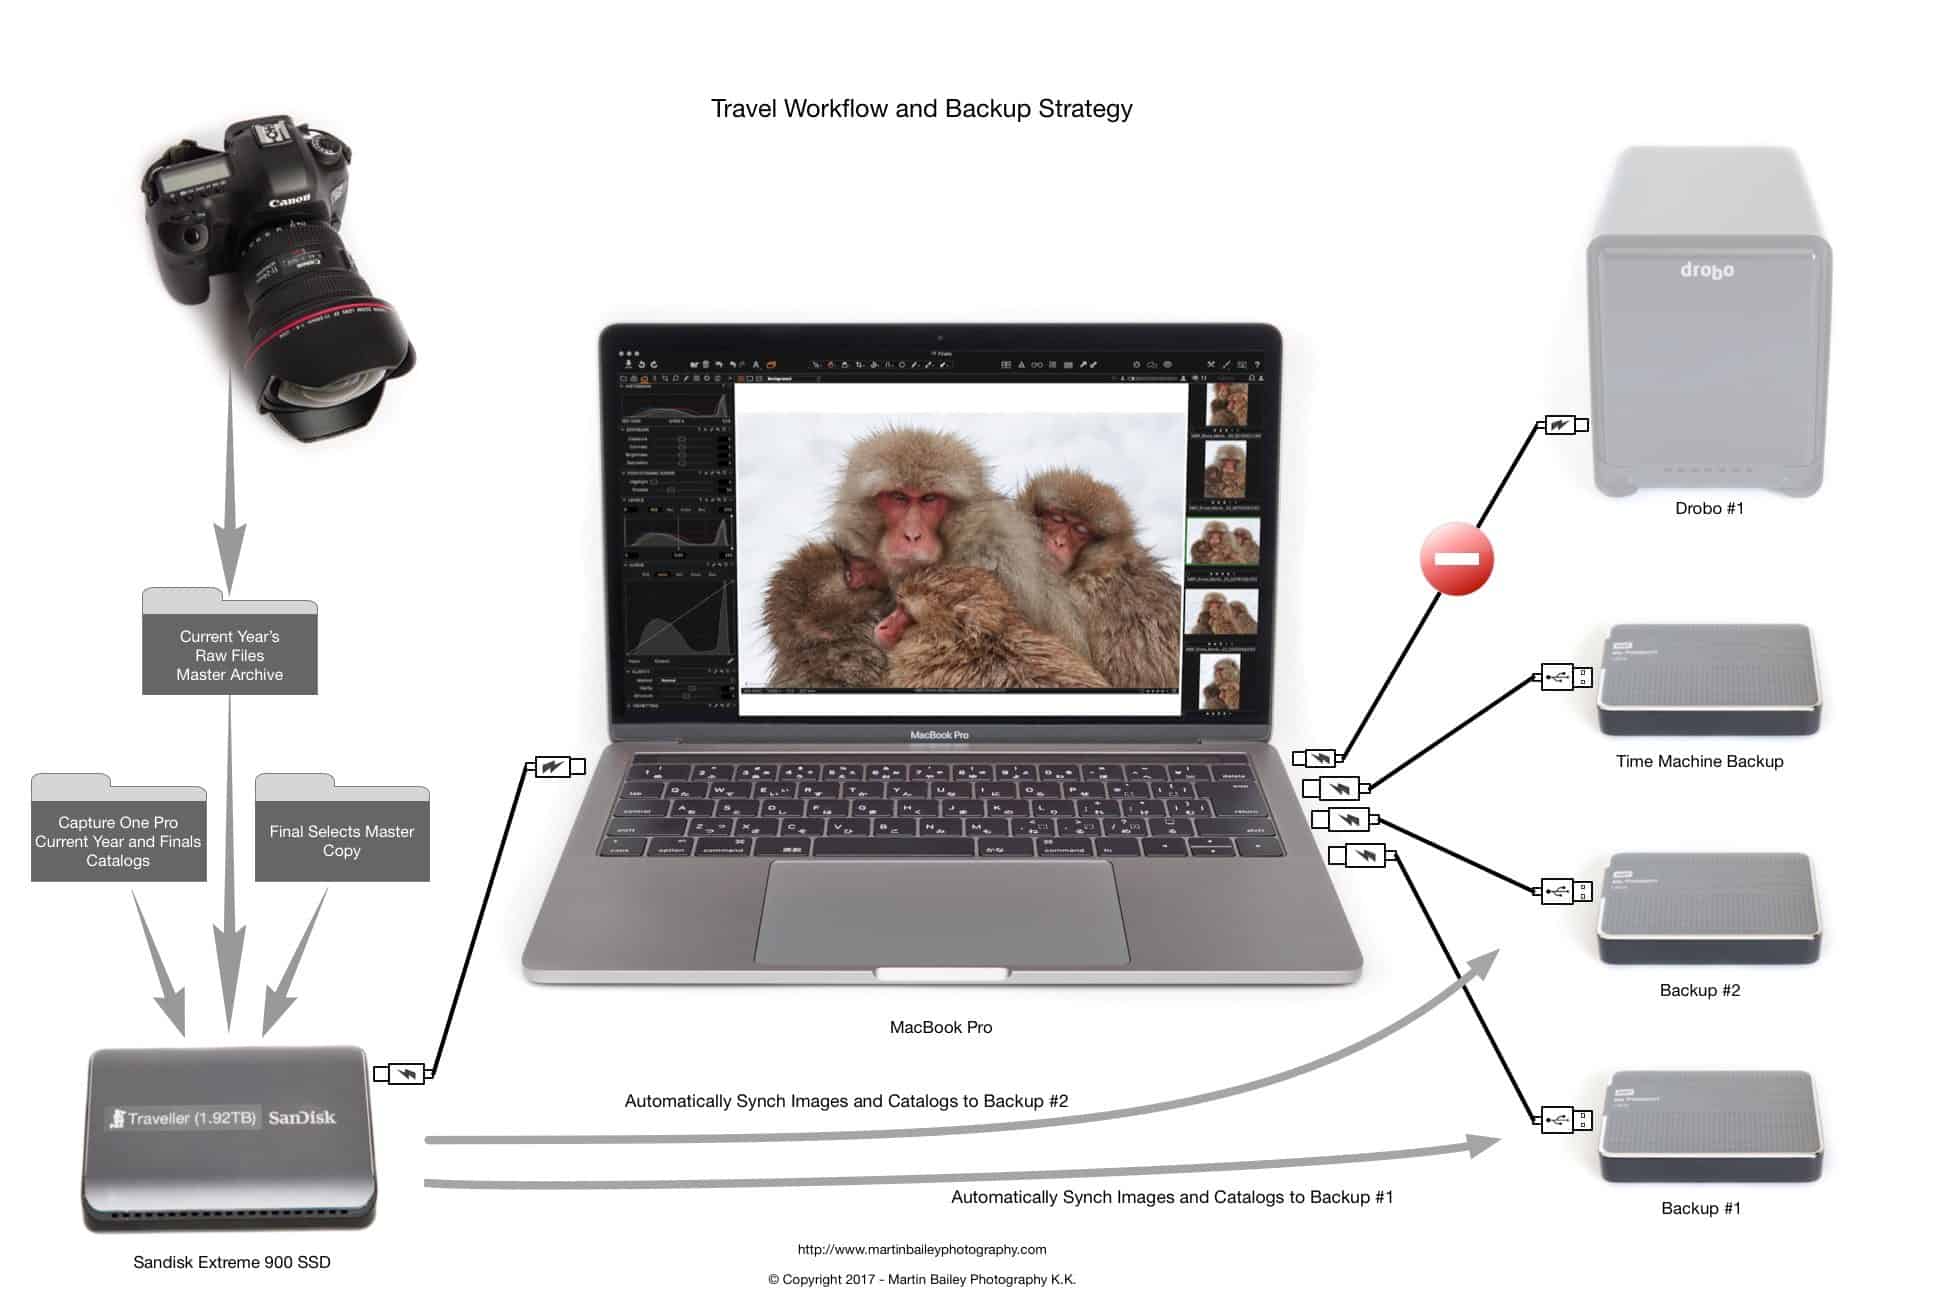
For me, I’ve found it best to have my current years worth of images and all of my Finals on my Sandisk Extreme 900 SSD drive, and I have all previous years on a Drobo 5D, which is attached to my iMac in my studio. I never need to access my original photos from previous years while traveling, and I because I do travel with all of my Final selects, I can get to those if necessary.
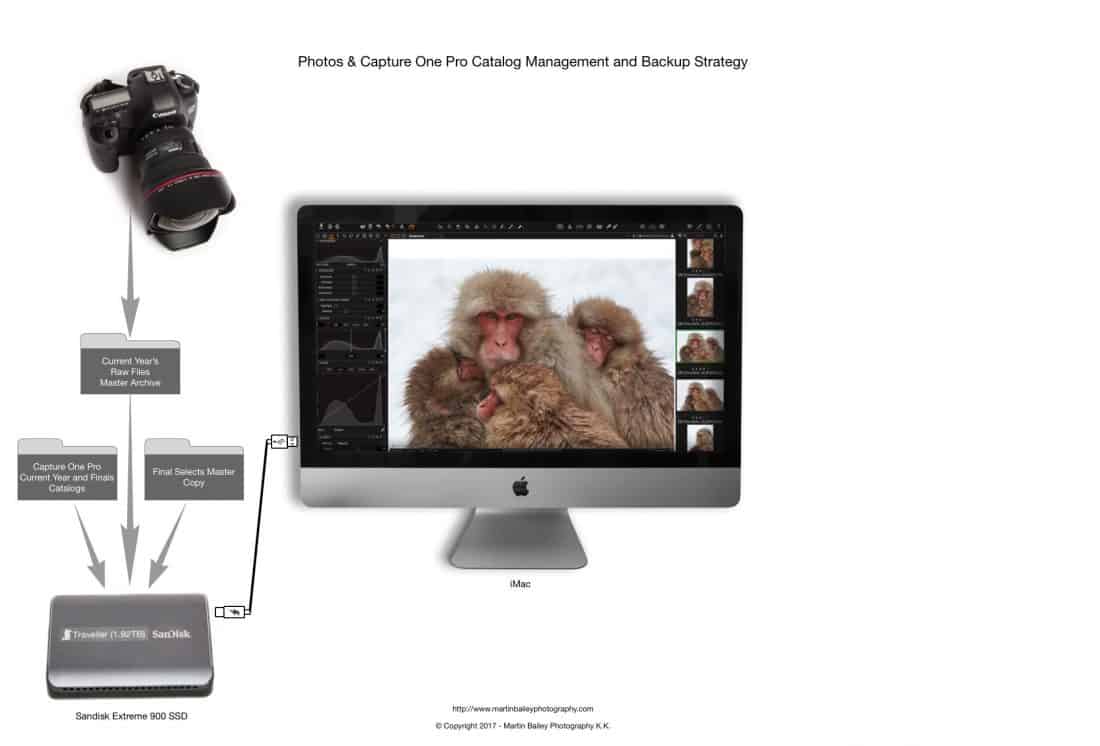
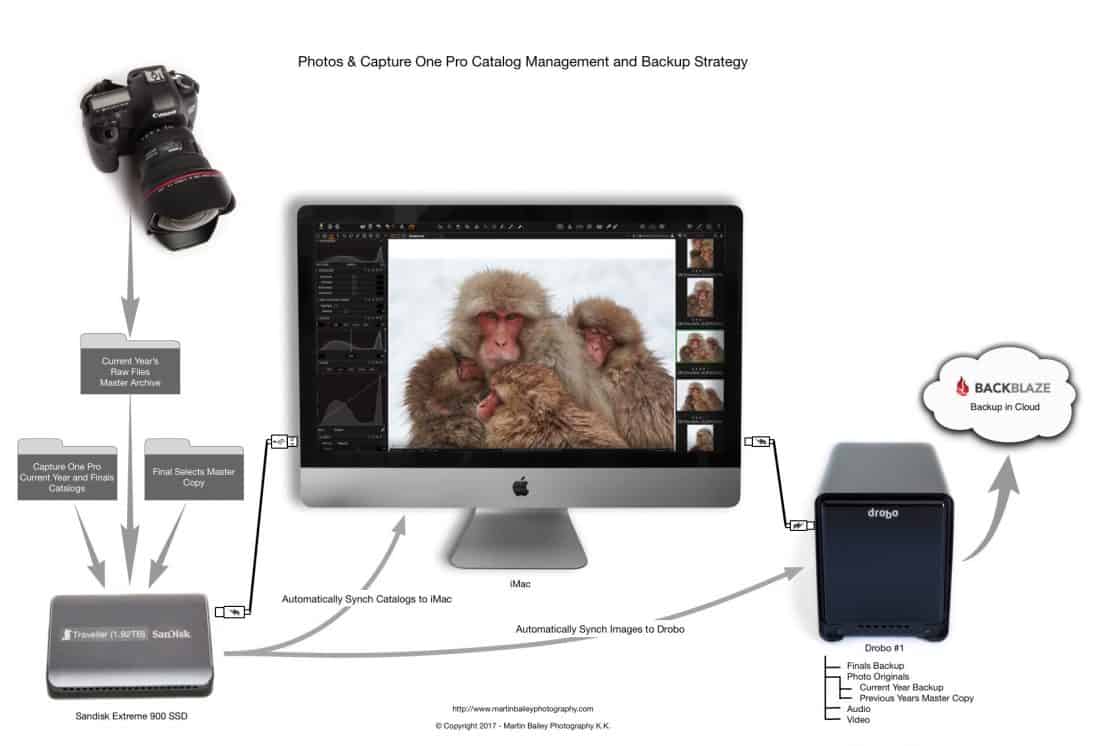
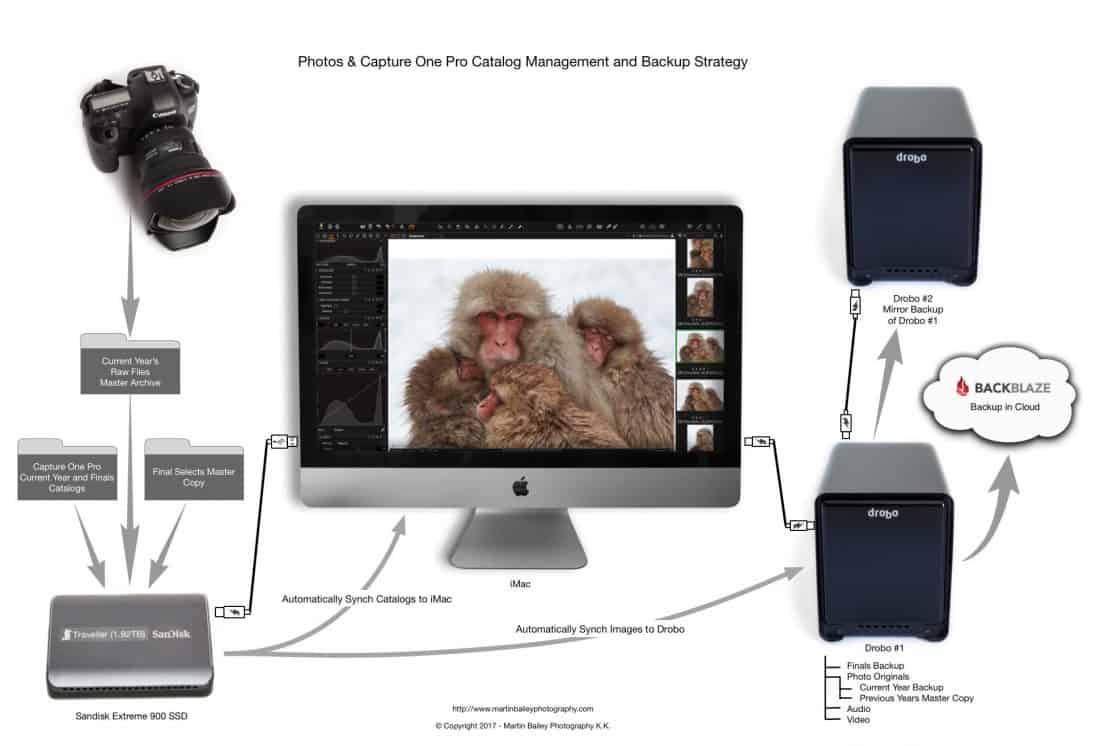
Let’s map this out and start to visualize my strategy, starting with my desktop computer, in the studio. When I have my Sandisk Extreme SSD drive, which I call Traveller, attached to my iMac, I can see, open and edit every image I’ve ever photographed. We’ll build this out like a presentation slide deck, so excuse the blank space on the right side of Diagram #1 (below).
At it’s bare minimum, my workflow starts with shooting images, and transferring them to my Traveller drive. This drive contains the master copy of all of the current year’s images and all of my Finals, which is every photo I’ve ever made that I consider good enough to use, and my current year and Finals Capture One catalogs. These things all live on my Traveller drive, so that I can easily move this to my laptop, as we’ll see shortly.
Automatic Backups
I use an application called ChronoSync from Econ Technologies to synchronize my files and catalogs around. I used Robocopy when I was on Windows, but it’s not all that intuitive. Other Windows applications that were suggested following the last post I did on this are SyncBack and GoodSync, which is multi-platform.
With ChronoSync you can create synchronization jobs and bundle them together, and schedule a batch of jobs to run whenever a specific drive is attached to a computer. Let’s walk through this
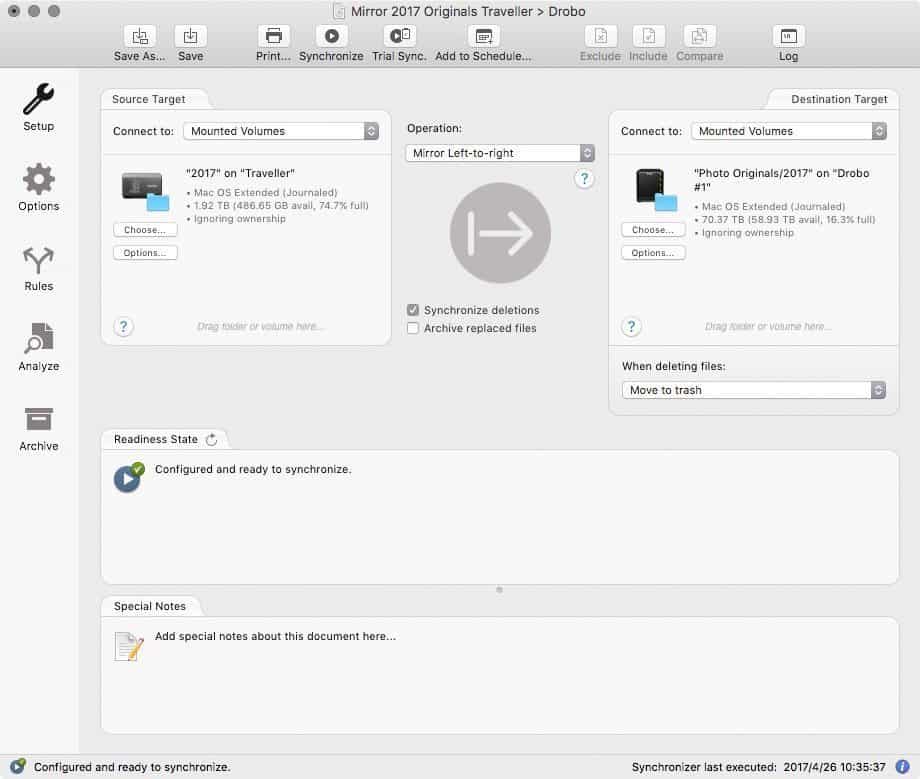
I have two sync jobs that mirror my current year and my Finals folders to my Drobo. Here is a screenshot of my current year sync job (below) and this is simply going to copy everything new in my 2017 folder on my Traveller SSD to a 2017 folder in a folder called Photo Originals on my Drobo.
Using the Mirror option will also delete anything that I have deleted from my Traveller. This is important, because as I remove images from my main copy, I don’t want to leave them in my backup. I also create a Rule to not copy the hidden .DS_Store files to my Drobo. They are specific to each drive, so I don’t want them to be included.
I have a similar job to Mirror my entire Finals folder to my Drobo as well. I don’t Mirror just the current year of my Finals, because as I work on images, I sometimes change images from previous years, so I want to keep this all synchronized with my Drobo.
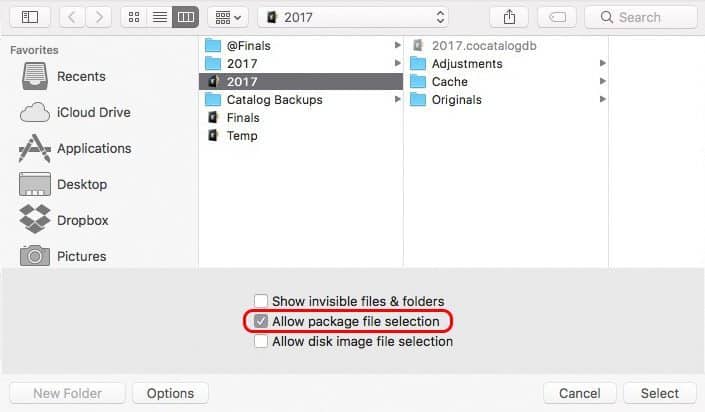
I also have two special jobs that synchronize only things that have changed inside my Finals and current year Capture One catalogs. To do this, turn on “Allow package file selection” when you are locating the drive and folder to synchronize, and then ChronoSync will treat the package files as a folder, and synchronize the contents.
If you don’t do this, ChronoSync will synchronize the entire package, and that would cause a very large file to be copied to my Drobo every time I sync, and it would cause the entire catalog to be unnecessarily backed up to the cloud every time I sync.
Group Jobs Together in a Container
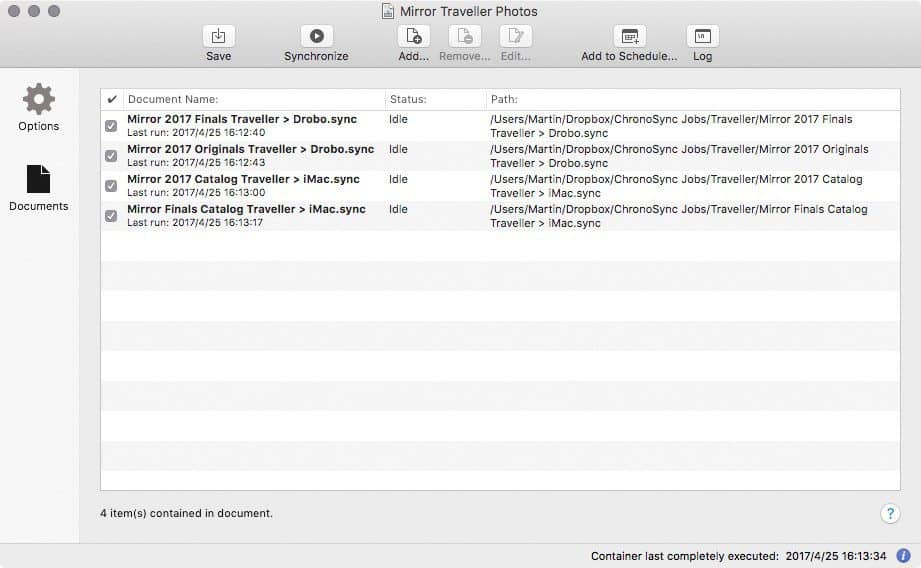
Once I have all of my sync jobs created, I wrap them up in what’s called a Container, as we can see in this screenshot (below). After adding all of the relevant jobs to a container, you can click the Add to Schedule button and schedule these jobs to run automatically.
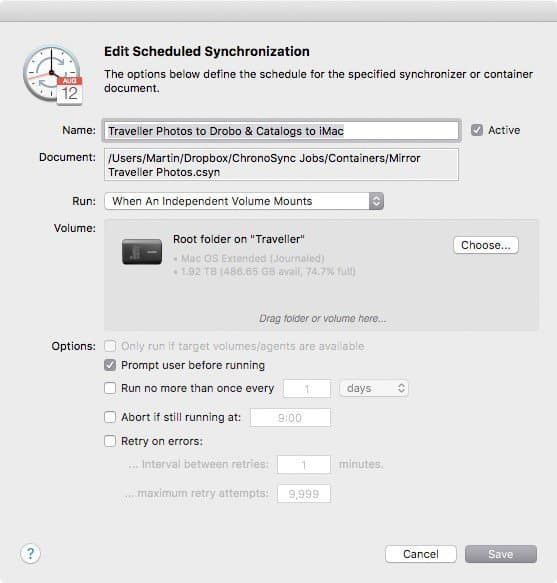
You can schedule sync jobs based on various actions, or simply have them run at a set time each day, but for this purpose, I select to run the job “When An Independent Volume Mounts” and this enables me to select my Traveller drive (below). I also select “Prompt user before running”. I want to be prompted, because I don’t necessarily want or need to synchronize my drive every time I plug it in to my iMac.
Once I have this set up, whenever I plug my Traveller drive into my iMac, I see a little popup like this (below) that asks me if I want to synchronize my Traveller with my iMac.
So, although it takes a little bit of time to set up, I can now with one click automatically backup my images and catalogs to my computer. Let’s continue to build out the slides to check where we are in our backup strategy (below).
We now see that as soon as I attach my Traveller drive to my iMac, my catalogs are automatically backed up to my iMac. I keep a backup of my catalogs on my iMac hard drive for a number of reasons. The first is because if I put them on the Drobo, it would take me longer to backup my Drobo, because I’d need to create separate ChronoSync sync jobs to avoid copy entire catalogs, as I mentioned earlier. The second reason for doing this is that I also set up Time Machine to backup my iMac drive, so that would be an easy way to get back to a working copy if anything went wrong.
Cloud Backup
We can also see from this diagram that as soon as any new images are copied to my Drobo, they are automatically backed up to my Backblaze account. Backblaze has been great, and for just $50 per year, you can get unlimited storage in the cloud. If I ever had some kind of catastrophic disaster that took out all of my local copies of my images, I could have Backblaze send me hard drives with my 12TB of data on them, and I’d be back up and running in no time.
Location of Files
Let’s also recap on where everything is now. The master copy of my current year’s work and my Finals library of images, and the working catalog for this work is all on my Traveller SSD. The master copy of all of my previous years work is sitting on my Drobo, and whenever I reference these images, I launch the catalogs from my iMac hard drive.
An easy way to look at this, is everything from previous years is based in my studio, on my desktop workstation. Everything that travels with me, is on my Traveller drive.
Local Fault Tolerance
Let’s move on to look at one last slide from my studio setup (below). Although my Drobo has fault tolerance built in, and I can have one drive fail without losing my data, there is always a slim but real chance that more than one drive dies at the same time, or that the entire device could die on me. Because I don’t want to rely on Backblaze sending me my work on hard drives just for a drive failure, I actually have a second Drobo 5D, which is a straight mirror of my first.
I have a reminder scheduled on my computer to remind me to turn on my second Drobo once a week, and mirror my first Drobo to it. I use ChronoSync for this as well. When I set up my first Drobo 5D I used drives that turned out to be very noisy, so I demoted that Drobo to the backup, and have bought quieter Western Digital Red drives for the main Drobo, as that’s turned on most of the time. They also use quite a lot of power running five 3.5 inch hard drives, so I only turn on the second one when necessary.
I know that some people have had bad experiences with Drobo drives, but I have been very happy with mine, and have never had any problems. But, technology does fail, so I just don’t want to have my main copy of all of my work to exist in just one place locally.
Mirroring Entire Drives with ChronoSync
To close the loop on the last diagram before we move on, please note that to mirror the contents of my first Drobo 5D to my second with ChronoSync Task, because we will mirror the root of the drive, I set up a few Rules to prevent ChronoSync from copying and overwriting some important system files, as we can see in this screenshot (below).
Let’s Get Mobile
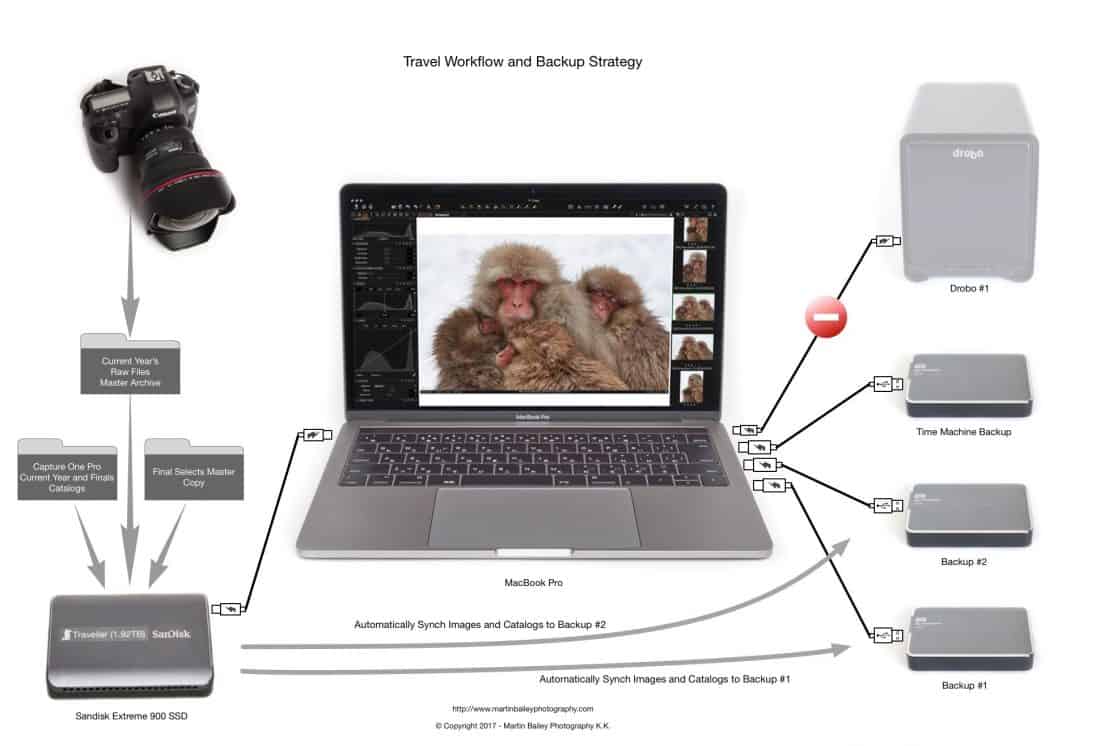
OK, so now let’s move on and look at what happens when I’m traveling, or simply working away from my studio. As you can see, I just plug in my Traveller SSD drive, and continue working. If I had actually closed down Capture One Pro on my iMac with that Snow Monkey photo displayed, it would have opened at the same location when I move to my MacBook Pro.
I also travel with three USB 3.0 hard drives. These are too slow to run my catalogs and images from, but as backups they work fine. One is just a Time Machine backup, that I plug in at the hotel every few days, usually over night, if I can leave my MacBook Pro plugged in to the electricity.
Carry Spare Backup Drives
I then have two backups, which I once again automatically synchronize with ChronoSync. I have a schedule set up to detect each drive as it is attached to my computer, and it asks me if I want to mirror my images and catalogs to the hard drive. I make two backups, simply because one drive could fail. Actually, all of my drives could fail, but having spent many months on the road, over the years, I’ve actually had just one drive fail on me. That was in Antarctica though, and believe me, when there are no shops around, having a spare is very important.
It’s a little nerve racking to only have one master copy and one backup of my images while traveling, but if my second backup drive was to fail, I’d kill my Time Machine backup, and continue to make a backup of my images. Thinking of it this way, carrying these three drives is more to give me backup drives, than an actual backup of my images, but as it’s all automatic once I’ve plugged the drive in, I just keep them up to date at the end of each day.
Keep Your Copies Separated
One other important aspect of having these backups, is that I feel it’s very important to keep these separate as you travel. I always travel with a photographer vest, and keep my master copy in my vest, on my person, at all times. Even when I go to the bath when traveling domestically here in Japan, I take my Traveller drive with me and put it in a locker.
Having three backups of your images isn’t going to help you at all if they are all in the same bag, and you lose that bag. I generally keep one backup in my bag, and the second in my suit case. These means something would have to happen to all three copies in separate locations for me to lose my entire library of images while traveling.
Turn Off Cloud Backups While Traveling, Please!!
I don’t do cloud backups while traveling, partly because I only pay for one computer on Backblaze, and it’s better to make that my iMac as it’s always on and connected to the Internet. Also, hotel Wifi is usually not good enough to bear up to uploading large numbers of raw files. Many people have automatic backups turned on now, and you can literally watch the network go down as a bus load of photographers get to their rooms after a days shooting. I wish more people would turn this off while on the road.
Synching Settings Files
One other thing that I need to mention before we move on, is that to make moving between computers totally seamless, I also synchronize my Capture One Pro settings folder by moving it to my Dropbox, and creating a symbolic link in the original location. This isn’t officially supported by Phase One, but I’ve been working this way for 10 months now, and haven’t found any problems.
Here is the code I use with my name replaced by USER_NAME. This assumes that you’ve moved the “Capture One” preferences folder under the “Application Support” folder to a folder called “Capture One Prefs” inside a folder called “Capture One” in your Dropbox. This code only works on a Mac, and please do this at your own risk.
ln -s "/Users/USER_NAME/Dropbox/Capture One/Capture One Prefs" "/Users/USER_NAME/Library/Application Support/Capture One"
You of course have to do this on all computers that you will work on, to ensure that your preferences are copied between each via your Dropbox. If you don’t know how to create a symbolic link in Windows, this tutorial will probably help.
Set a Hard Drive Letter for Windows
If you use this strategy in a Windows environment, you’ll probably also need to ensure that the drive letter of your Traveller drive doesn’t change as you move it from computer to computer. Here’s another tutorial on how to do that. Just ensure that you select the same letter on all computers you work on. Give yourself some room too, so that you can still have lots of dynamically lettered drives on your desktop. T for Traveller would be a good option.
Not Really a Cross Plastform Solution
I should also mention that this solution may not ideal if you switch between Windows and Mac regularly. The catalog can be taken from one operating system to the other and will open, but Windows and the Mac OS reference drives differently, so you’d need to tell the other OS where your files live each time you open the catalog on the other system.
Voilla!
Once you have all of this in place, you will literally be able to move your Traveller hard drive from computer to computer, and continue working as though you were on the same computer. Because you have your Capture One Pro settings syncing too, even all of your presets are available on both computers. They essentially become identical.
Exporting Original Format Images
Let’s start to wrap up now, with a few other pieces of advice based on my own workflow.
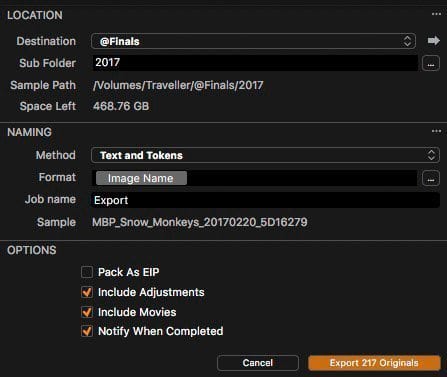
To get my final select images from my original photo folders to my Finals folder I select the images that I want to export and right click one of the thumbnails, and from the shortcut menu, select Export > Originals. You can also get to this option from the File menu.
I don’t change the image name on export, because I change it on import. After checking the destination, I ensure that Include Adjustments is turned on, then click the Export button, as you see in this screenshot (right).
I don’t package my images as EIP or Enhanced Image Package format files, because the thought of wrapping my images in something non-standard scares me. I just want my raw images in a new location, that’s all.
Synchronize Finals Folder
Once the export process has completed, I switch to my Finals catalog, locate the folder for the year I exported my images to, then right click that, and select Synchronize. Capture One will then go and look for anything new in my current year folder, and import them into my Finals catalog. As long as you turn on the Include Adjustments checkbox on export, any changes made to your images will also be applied to your new copy.
Starting a New Year
At the start of each new year, I have a little bit of cleaning up to do, to prepare for starting to photograph the new year. First of all, I ensure that I have completed all edits that I want to do on my previous year’s images, and ensure that I have run my backup to mirror these images to my Drobo.
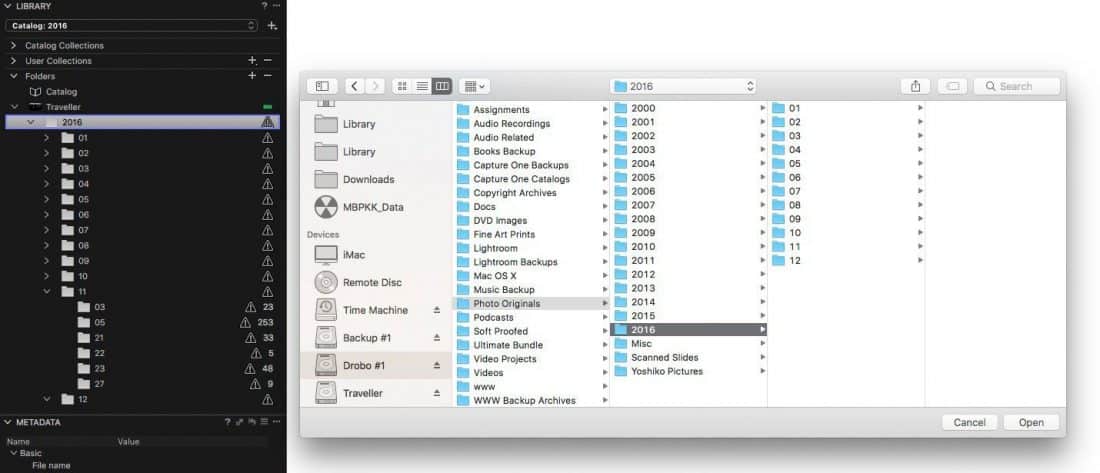
Then, I close the catalog in Capture One Pro, and delete the folder from my Traveller drive. After that, when I reopen the catalog in Capture One, my folders all show up as missing, as you can see in this screenshot (below).
To fix that, and complete the process, right click the top level drive or folder, and select Locate from the shortcut menu. You’ll then be able to navigate to the copy of your year folder that was your backup copy until a few minutes ago. After spending some time locating all of your images in the new location, you are ready to continue to use your catalog. From this point on, this becomes your master copy, along with all of the other previous years.
Create a New Year Folder
And of course, you also need to create a new year folder to ingest all of the new work that you’ll make. Remember that this will live on your Traveller drive for the current year, along with your Finals, if that’s how you work, and you’ll just proceed as you did in the previous year. It’s all quite easy once you have gotten your head around it.
Wrap-up
Having spent many years tweaking and developing a smooth workflow, I’m very happy with how I work, so I hope this helps you to smooth out any possible kinks that you might have in your own workflow. As I mentioned earlier too, if you don’t use Capture One Pro, the techniques and strategy that I covered should be pretty transferable to whatever program you use to manage and edit your photographs.
Show Notes
Sandisk Extreme 900 SSD: https://mbp.ac/sd192TB
ChronoSync: https://www.econtechnologies.com
GoodSync: https://www.goodsync.com
SyncBack: https://www.2brightsparks.com/syncback/compare.html
Western Digital Red Drives on B&H: https://mbp.ac/wdr8tb
 Subscribe in iTunes for Enhanced Podcasts delivered automatically to your computer.
Download this Podcast in MP3 format (Audio Only).
Download this Podcast in Enhanced Podcast M4A format. This requires Apple iTunes or Quicktime to view/listen.




Martin,
Interesting update.
I am also using Capture One. For me CO is a very good Raw Processor, but only a so-so Catalog. You really need a rigidly defined workflow with workarounds. I can pick up some pieces from your workflow to improve mine, I think.
My main system is Linux for everything except for Capture One where I (am forced to) use Windows. I have a macbook Pro but I do not like it very much. But it is my traveling companion because of its compactness (but I will replace with Dell if it breaks down). So I have a bit of a mixed environment to take into account for my workflow (backups on USB, NAS and Cloud).
I am not a professional and I probably do not have the same volumes you have (I have 35,000 Nikon NEF files). I do require a single Catalog for doing queries like finding all pictures within a certain country/place for instance. I find that on my Dell 7710 with M2 disks this works sufficiently fast.
I use Capture One Sessions as my basic units of work. I guess in a way similar to you annual catalogs, but smaller granularity.
Now I would like to have one clarification about your workflow. It seems you are actually duplicating RAW files into your FINAL Catalog ?? I am trying to avoid that. What is roughly the percentage of pictures that you move/copy to the FINALS catalog ???
Jozef Dassen
Hi Jozef,
Thanks for stopping by and for commenting.
I agree that Capture One Pro could do better with regards to the performance of it’s catalog. I shoot around 25,000 image each year, and I tried to put multiple years into a single catalog when I first switched to Capture One and it just wouldn’t take it. One of the reasons that I wanted everything in one catalog, was as you say, I wanted the ability to search across my entire library.
I haven’t really missed not being able to do this though, because I have my Finals folder, which spans 17 years of work. This also allows me to carry all of my photos that I really think anything of with me as well, so I don’t mind making a copy of the raw files. I could of course get a view of all of my selects by filtering on my original file catalogs, and not make a copy, but then I wouldn’t be able to carry my Finals around with me, without carting a Drobo around. 🙂
From previous years, the percentage of images that goes into my Finals folder is about 3 to 5% so it’s not a huge amount. My goal after every shoot is to whittle down my final selection to as few quality images as possible. The percentage obviously varies based on the type of shoot. For landscape I have a much higher percentage than for wildlife, as an example.
I hope that helps!
Regards,
Martin.
Martin,
This couldn’t have come at a better time. I’m at a (another) workflow and data management crossroad! I currently work on a G-Tech Raid 1 “Working Drive” with images that eventually get backed up to a separate Raid 1 called “Archive 2017.” This archive then gets backed up to Backblaze. I also use Chronosync. However, having to access older Archives like 2016, 2015, etc is a pain as I have to mount the older drives using a toaster.
Just this week, some bad data was written across three of my drives which really is scaring me. I was able to recover my work using software, but it shows how even redundancy is not foolproof. Does your system have a way to check the health of the drives before Chronosyning??
Your post has inspired me to revamp my large backup system (your Drobo part of your system) with a 5 or 9 disk Synology. Heck, maybe even two! Thank you for sharing this as it’s something that we as photographers should take very seriously.
very best,
Omar
Hi Omar,
It’s great to hear from you.
I have had bad data propagated out through my backups before too. It was only a handful of corrupted image files, but it’s not fun. At that time, my Backblaze copy had also been overwritten, but the Backblaze versions had a copy of the good files, so that was great.
One question on your current strategy though. If you unmount your previous year drives, doesn’t that result in the old data getting deleted from Backblaze? I seem to recall that if a drive isn’t mounted for more than 30 days, the data gets deleted.
The Drobo Dashboard keeps tabs on the “health” of my Drobos. I have had disks fail, but simply replaced them and the data was rebuilt successfully. I have the Drobo Dashboard set up to email me when a drive fails or something else goes wrong, and I always have a spare drive sitting next to the Drobos, so I can replace them quickly when necessary.
If your question is more about checking for corrupted image files, then I currently don’t know of a way to do that automatically. There are ways to do it for JPEGs but I have never found a way to do this for raw files, without packaging them as DNGs and I don’t want to do that.
I’m not sure what the benefits of using a 5 or 9 disk Synology would be, but now that the Drobo 5D, with 5 bays, supports up to 64TB volumes, I am using 8TB Western Digital Red drives, and will not run out of space for many years to come. I know that some people don’t like or trust Drobos, but if you aren’t against the idea, check it out too. It might work out cheaper.
You’re welcome, for the information. Thanks for stopping by.
Cheers,
Martin.
Thanks for the reply Martin! You’re right, but as of now my yearly archive drives hold client jobs. My personal work/best of/portfolio images are backed up to backblaze. Older client jobs are archived onto two drives, one held in a separate location, one in the office. If I were to lose both archive drives, my jobs at least still live in the cloud at Smugmug…so the very least I’ll have pristine jpegs. I am highly questioning my Raid 1 working drive as it is not portable like yours. Thanks again…and I’ll look into the Drobo. Thanks. Omar
A very interesting article, Martin, which makes me reconsider cloud backup.
I have a very different setup and workflow, using Lightroom and importing catalogues after travel. I have a newly-upgraded high-spec PC with a RAID 10 as my main data drive, a DroboS as backup and hard drive backup as a further backup level. If I were to backup everything, that would be 5.8TB.
One approach would be to use Acronis, since I already use it for backup. I could backup all 3+ star images from Lightroom which would come to 1 to 1.5TB and cost me $A120pa for cloud backup. The advantage of this route is that I can separate out old folders and back them up just once so I would usually only be backing up current folders the speed overhead of cloud backup would be low. Some years ago, with an earlier version of Acronis and a slower PC I found that my PC slowed down if Acronis was looking through all files to see whether they had changed and needed to be backed up.
The other approach would be to back everything up with BackBlaze or perhaps CrashPlan for $A67 or $A80 respectively. Backing up everything could be an advantage because there two occasions when I lost some data due to holes in my backup systems. One concern I have is would backing up 5.8TB of data to the cloud slow down my system even though it’s a fast modern PC? Or are programs such as BackBlaze optimised to run in the background unnoticed irrespective of the data load?
The other concern I have with Backblaze is that it will dump backed up data if a drive is not used for a month, particularly since I may go travelling for longer periods than that. I infer this only applies to external drives. However, would it apply to my Drobo, which is always connected to the PC? Would it even apply to me D and E drives, which are inside the PC and store almost all the data?
Murray,
In my experience cloud backup does not slow down my PC. The network is much, much slower than the PC normally. Initial backup could take a long time (mine took 2 weeks, and depends of course on your network speed and volume), but after this initial hurdle incremental work is easy and hardly noticeable.
I am using an unlimited SpiderOakOne plan. I can connect multiple PC’s and even automatically sync some selected files between PC’s. I am very happy with this. But it does require quite a bit of space for local “admin” files and occasionally these admin files need to be rebuilt (easily done overnight). I never notice slowdown when it is scanning for files to backup. I use a Dell M7710 with M2 disks.
Cheers Jozef Dassen
Thanks for that comment, Josef. That’s very helpful. I have a new motherboard that supports M2 disks but haven’t quite bought them yet.
Interim comment, but I think I’ve answered my questions.
I think I prefer CrashPlan to BackBlaze for several reasons. I like more control than BackBlaze offers. I can’t seem to select folders or deselect the C Drive. Crashplan retains versions indefinitely which might be useful for corrupted files and will not delete files from external drives. It also permits backup sets with different backup frequencies, which I will find useful even though they have max period of one week. It also gives me another option of transferring files from laptop to computer which might prove useful: save metadata to file in Lightroom then backup from laptop to computer via the home network.
I think I’ll just assume there’s no significant performance overhead to start with anyway. I’ll probably go for CrashPlan but might still go for Acronis.
Hi Murray,
Yes, as Jozef mentioned, I too have never noticed Backblaze slowing things down. I’m not sure if this will help, but with Backblaze, you select the drive on one screen, and can then exclude any folders that you don’t want it to backup on another screen. Also, Backblaze automatically ignores all system files.
I also am sometimes away from home for more than a month, and I just have to make sure that someone turns my computer on for a few hours as the one month limit comes around. There might be a way to avoid having to do this if there’s no one around to turn on your computer, but I’d never checked.
That said, use whatever you feel comfortable with. The important thing is getting a backup in the Cloud.
Cheers,
Martin.
Martin,
Thanks for sharing the nuts and bolts of your backup and travelling strategy. I use Chronosynch already but the detail that you have shared about the way you do things is going to immensely improve my process.
Best regards
Cathy
Hi Cathy,
That’s great! I’m pleased my post has helped.
Thanks for stopping by and taking the time to comment!
Regards,
Martin.
Hi Martin
As I indicated above, your article prompted me to consider and adopt backup to the Cloud. As a consequence of my research, I have written a fairly comprehensive review for the Canberra Photographic Society: Cloud Backup for Photographers: https://canberraphotographicsociety.wordpress.com/2017/05/09/cloud-backup-for-photographers/
Regards,
Murray
Very well written article Murray.
Thanks for sharing the link, and thanks for the mention.
Regards,
Martin.
Thank you, Martin.
Martin – Thank you VERY much for doing these blogs and podcasts. They are very educational and very much appreciated. I am currently switching over from LR to CO as my primary image editor / catalog and I have a couple of questions regarding your setup.
1. How large is your annual catalog normally, and how many photos do you normally have in it?
2. How about your finals catalog?
3. How much of a slowdown do you see working with either the annual catalog (towards the end of the year when it’s the fullest) or the finals catalog vs. just working with individual sessions? I know were not comparing apples to apples but I’m just curious how the size of the catalog impacts the overall speed of CO.
Thanks!
Steve
Hi Steve,
You’re very welcome. I’m pleased these posts are helping. On your questions…
1. My annual catalog for 2017 at this point is 32GB, and I have another tour left in Nov, so it will probably end up around 40GB by the end of the year. At the moment there are 20,000 images in the catalog. This will probably finish up at around 25,000.
2. My Finals catalog at the moment is 11.4GB and contains just under 8,000 images.
3. I haven’t noticed a slowdown at all as the catalogs get larger. Perhaps this is because I’m running both my current year and finals catalogs and images from very fast external SSD drives, but they don’t really change. And, I never use sessions, so I wouldn’t know. Sessions just don’t suit my workflow, so I doubt I’ll ever use them.
I hope that helps!
Regards,
Martin.
Thanks very much Martin. Much appreciated!
Hi Martin,
I’m glad I came across this post. I’m following you for quite some time now, but somehow haven’t seen it.
Wow! I completely overhauled my management and organization after reading it and I feel so liberated now.
I have a question though, on exporting your finals… I tend to work with variants and, on export, Capture One exports the original unedited raw and, let’s say for the sake of example two variants, a black and white and the edit I made in color. That makes for 1 file and two variants. I cannot edit the name of the file without affecting both variants.
You said that you renamed your finals on import. How would you go at it working with variants?
The obvious way that appears to me is to make a first variant, in black and white for example and export it, and only then create a second variant and export it. That way it seems that the end result would be 2 files and 2 variants that I can rename with appending BW ou CO to the name.
I am OK with this or would you suggest something else?
Thanks a million for your time and expertise, Martin. And keep up the great work you do educating us all.
Hi Michel,
Sorry for the delayed reply. I’ve been catching up after returning from Morocco.
I actually rename my files on import of my original images, not when copying to my Finals. I do this via the import window, I explain how I do that under “Renaming Files on Import” on this post: https://mbp.ac/537
When I need to rename a file after import, I just click the name and change it, but as you say, this doesn’t work great with variants. You essentially have to keep the same name as the original. It’s not been a problem for me, but that’s because I don’t really need to change names after import.
When I do want to create a copy of both variants though if I recall it is handled fine. I just end up with a 1 appended to the file name of the second image or variant that I export. As for while working with these in Capture One Pro, I’ve learned to not worry about the filename, and I can see that one is black and white and one isn’t by looking at the image.
Your method would work, but then you’d end up with two copies of the same file, rather than using variants, which obviously takes up more space on your hard drive. I’d try to avoid that if possible.
Can you actually work on both copies if you ignore the necessity to change the filename?
Cheers,
Martin.
Thanks for the great post Martin!
I have one question and one suggestion for those who might struggle with the price of a large external SSD.
The question: Do you keep the images as managed in the catalog or do you simply keep the catalog and the referenced images on the same drive. I saw one image above that looks like managed images but another with folders by month and day, so I wasn’t sure which way you decided to go.
And the suggestion: Seagate sells a Fast HDD Portable Drive that is 2 2.5″ drives in a raid 0 configuration with up to 4TB of space. While not as fast as a SSD, it is much faster than just a single 2.5″ drive. Of course Raid 0 does leave the possibility of failure on either of the two drives, but a good backup plan can address that worry. I don’t work for Seagate, it’s just a solution that I found to work well for me.
Thanks again for the great post.
Hi David,
You’re welcome, for the post. Thanks for commenting! 🙂
I just keep the images and catalog on the same drive. The images aren’t managed in the catalog.
Thanks for the suggestion as well. Have you actually run Capture One Pro from this setup? I would be concerned with the speed. I tried to run Capture One Pro from my RAID 0 WD thunderbolt drives, and it wasn’t quite fast enough, and that was over Thunderbolt 1. I would be reluctant to work over USB 3.0 with regular hard drives. Maybe it would work with small catalogs and not so many images, but could be stressful with more data volume.
If you have been working like this though, I’d welcome your feedback on speed.
Cheers,
Martin.
Hi Martin,
I have been trying to think of a way to give a qualitative answer for your question.
The Blackmagic disk speed test on my mac shows read and write speeds of 196MB/s on a drive that has been heavily used and is half full. I think it showed closer to 250MB/s when I first started using it. But, the drive is full of CO sessions right now, rather than one big catalog so I guess I cannot give a solid answer to the topic being discussed here. I can say that before finding this particular drive I did a lot of testing with different drives and controllers and I was surprised and how much the speed differences varied by controller rather than by drive. I’m going to try building a catalog with 2TB of images and will let you know how it goes. I’m still not sure what is “fast enough” though.
Hi David,
Thanks for getting back to me on this. That’s a very good speed for spinning disks, so I can see why you are happy with that solution with individual sessions.
I’m totally with you on the controller. Last year, when WD stopped selling a small reasonably priced 4TB HDD via amazon.co.jp I ended up trying a few enclosures with a separate Seagate hard drive that should have been pretty fast. In short, the worst one I tried from StarTech was only giving me read/write speeds of around 30 MB/s. I sent it straight back.
The best I could find that would house a 4TB 2.5″ drive was from DeLock and gives me around 115 MB/s with a single drive. It was the same drive that gave me just 30 MB/s in the StarTech enclosure. This is only used for a backup of my SSD drives, so that’s enough.
In comparison, the Sandisk Extreme 900 gives me 750 MB/s write and 860 MB/s read speeds over USB 3.1 Gen 2 on my MacBook Pro, and still runs at 355 write and 420 read speeds over USB 3 on my iMac. This is why I’m now using these drives, but as you say, they are expensive.
As for what is fast enough, I used to run my Lightroom Catalog and images from a Thunderbolt drive that ran at around 190 MB/s, and was fast enough, but this was not fast enough for Capture One Pro. It was somewhat stressful. That’s why I started to look into alternatives, and ended up with the Sandisk SSDs.
I’d say you would be close to that if you try to run a catalog with a lot of images in it, but it’s worth a try to see what it feels like.
Cheers,
Martin.
Hi Martin,
Thanks for sharing your workflow. Mine is still based on Lightroom for which I have a question, and I hope you can recall your practice when you did use it for your catalogs 😉
In your former workflow you did create a backup copy of your current year folder on the Drobo 5D, and you synchronized the content of this backup folder back into your Lightroom catalog. I like the idea of validating the backup folder content but one question remains: How did you make sure that these images were updated with their development settings, keywords etc in the catalog? These edits in the catalog are originally linked to the current year originals folder on the traveller only, and a simple copy of the image folder would not result in the backup versions bringing this information with them to the Drobo 5D.
I can think of 2 ways to achieve this: (1) I don’t care until year end, when I redirect the folder link in the lightroom catalog to the Drobo 5D which now becomes the place for the master copy for that year, or (2) the use of sidecar (XMP) files – which I currently don’t use. What did I miss in your workflow?
Thanks,
Michael
Hi Michael,
Thanks for the comment. Yes, I used to keep a working copy of my current year in my catalog, so that I could get to images quickly if necessary without my external drive, but that was a number of years ago, and I changed to this workflow even with Lightroom before switching to Capture One Pro.
In answer to your question, the key point is that I always saved all of my changes to XMP files in Lightroom, so as long as I ensure that I periodically sync my images from my external drive to the Drobo, all of my Develop module changes would automatically get picked up by Lightroom. Because of my settings, the LR Catalog was not important for keeping my changes. It was just a link to the files.
But, because I would occasionally change images on the Drobo and then wonder which was the most recent, I changed to this current workflow, and your (1) supposition is correct. I continued to backup the current year’s images to the Drobo but didn’t include them in my Catalog until the start of the new year. I also stopped referencing my Finals folders from the Drobo, only referencing these from my external drive.
Basically, this means that any given year, I have my current year and my Finals now on two separate SSD drives. Current year on one, and Finals on another. Because Capture One Pro doesn’t handle all of my imaegs in one catalog, I also have a catalog for each of these (Finals and current year) on my SSD drives. These are my master copies of my Finals and current year.
When I get home from a trip, I sync my current year folder to my Drobo, but that’s just a backup. I could open the catalog on my iMac, but I don’t, because it still points to the external drive for the images at this point, so these are just backups.
At the start of a new year.I run one last sync of the previous year, and then delete the year’s images from the SSD, causing Capture One Pro to complain that it can’t find the images. I then right click the year folder and locate it on the Drobo, and Capture One rebuilds all of the links, and I’m good to go with the photos referenced from the Drobo.
My Finals folder and catalog always live on my second SSD now, although I back them up to the Drobo, just as a backup, and so they get copied to the cloud in my Backblaze account.
I hope this makes sense. Let me know otherwise.
Cheers,
Martin.
Martin,
Thanks for the clarification. I appreciate you sharing your workflows in detail. My other favourite of yours are the posts and ebooks on printing, framing etc, for which you are one of my key resources.
Keep it up,
Michael
There seem to some confusion with Backblaze deleting the external drive data after 30 days. Backblaze does in fact delete the data for an external drive after 30 days if it has not been connected, and the main computer was connected. In other words if you disconnect the external drive from your main computer, and continue to backup up your main computer for 30 days without the external drive attached the data will be deleted. If however you don’t connect the main computer, then the data for the main computer, and external drives will be kept for 6 months. When I leave for a trip I switch Backblaze to manual backup. That way all the data, including the data from my external drives will be kept for 6 months. When I get home I switch Backblaze over to continuous and it picks up right where it left off. Backing up image files that I downloaded after arriving home.
That’s good to hear Michael, though I wish the email that I receive when a computer has been offline for almost a month was clearer in that respect. Thanks for letting me know about this though. There are times when getting that computer turned back on within the month is a little difficult.
Yes the emails are a little unnerving. If you root around on the Backblaze web site, support and FAQ’s its clarified. The problem is probably unique to Backblaze since they offer unlimited storage. Imagine this situation. A user has a Backblaze account, and also keep one or two local backup copies, The external HD that has the data backed up to Backblaze fails. Now the user purchases a replacement. Throws the old one in the the dumpster. Attaches the new one and copies his local backup to the new drive. Backblaze would see this as a new drive with data, even if it had the same name. Most likely identifying the drives by serial number. Backblaze would now have to supply twice the space, duplicating the data. If they were charging by the amount of space they provided it wouldn’t be as important since they would just increase the users monthly charges. This situation could be repeated thousand of times within their user base creating a real headache for them.
I’ve switched drives with TBs of backed up data before, so I’ve carried out the scenario you mentioned, but not wanting to simply backup multiple terabytes of data again, I looked into what it would take to link the data that was already backed up with that on the new drive. There is a file in the root of the drive, if I recall, that is hidden by default, but this identifies the drive to Backblaze. If you copy or change that file accordingly, it can be picked up as the new drive. I’d need to go and find the knowledge base article to relay exactly how it’s done, but basically, it’s like running a migration to another PC, but on a drive level. Once the new drive is recognized as a new location for the old data, it gets relinked and all is good.
I’m getting a new iMac tomorrow and will be migrating my 12TB backup over to it, and that is always a little nerve-racking, so I’ll be glad when it’s done. 🙂
This post got me thinking about backing up to the Cloud and I decided to go with CrashPlan Home. However, not long after getting everything backed up (4.5TB), CrashPlan announced they were discontinuing CrashPlan Home. The obvious alternative was then to switch to BackBlaze but I think I’ll go to CrashPlan for Business, even though $US120 instead of $US50, because it has unlimited versioning and no restrictions on external hard drives. In other words, you should be able to get back anything you have saved no matter how long ago.
Backblaze offers a B plan that is similar, but I haven’t looked in to it.
Migrating your data to a new computer isn’t that bad. I’ve done it. If you look at the menu items under the Backblaze icon in the menu bar there is an item called “inherit Backup State”. Once the new computer is setup, all the external HD’s are connected, and Backblaze is installed. Backblaze will think you are a new user with the 30 day trial. Somewhere on the preference panel will be a place to log in to your account. Once logged in you can click on the “inherit Backup State” and it will show you the computers that you are licensed to backup and ask ;you which one to inherit . You will click on that one then then you will get some kind of graphic indications of the progress its making transferring all the data over to the new computer. I suspect it is checking all the attached drives. It only takes a few minutes to switch over. At least with my 1.5TB. Since I have more than one computer under my account I just have to make sure that I inherited the correct computer and not my wives. Its painless and doesn’t take for 5 to 10 minutes.
It will be the fourth time I’ve migrated to a new computer too. That’s why I said it’s “always” a little nerve-racking. 🙂