Having just completed my second Japan Winter Wildlife tour for 2016, and taking way too long to whittle down my final selection of images, today I’m going to talk a little about some of the techniques I use during this editing process.
Despite 2016 being an el niño year, resulting in us having much less snow than usual on both of my Japan winter tours, this turned out to be just as productive a trip as any year, if not more so. The more we have taken away, the more we seem to receive in other opportunities.
I shot about 500 more images on this trip compared to the first, giving me a total of 7,500, and after my initial run through these images to find the ones that I thought were good enough to show people, I similarly had 750 images, compared to around 800 from the first trip for this year.
As with the first tour, I decided to leave my 7D Mark II at home, and worked exclusively with my two Canon EOS 5Ds R bodies, despite this being a wildlife tour. I touched on this a lot during my four travelogue episodes for the first tour, so I won’t keep going on about this, but I have continued to be amazed at how well the 5Ds R coped with the fast paced shooting.
The autofocus worked incredibly well. Much better than the 5D Mark III in similar conditions, and I actually found the reduced frame rate liberating. It had me thinking much more about the critical timing at which I would release the shutter, especially for the eagle shots that we’ll look at later in the series of travelogues that we’ll follow up with. I also had less than half the images to look through, which saved me time, and that’s always a welcome benefit from any new shooting style.
Whittling my Final Selects
With so many images that I was happy with from this trip, I found the selection process even more challenging than usual, and I used a few different techniques for whittling down my images from this trip that I thought might be useful to talk about, so before we get into the travelogue series, I’m going to walk you through some of these processes.
As I travel, I try to look through my images from each shoot, and when other activities such as sleep get in the way, I make a note of which days I’ve looked through, and which one’s I haven’t. For this trip, I managed to look through 9 of the 12 days, so I went through the other three days over the last week, after getting back from the tour.
During my first pass I generally just give anything that I want to look at again 3 stars. This is my “worth a crap” rating. It means that I’d be happy to show people the image, although might not proactively do so. After tour #2 I had 750 of these initial selects which I then needed to reduce to a more appropriate number, which is as few as possible, as usual.
Using Lightroom Smart Collections
To make it easy to review images I generally create a Smart Collection for three star images and above for any multi-day trip that I do. This helps me to quickly view all images that I have rated by going to that Collection, rather than selecting all folders from the dates of the trip, then filtering on three stars or higher.
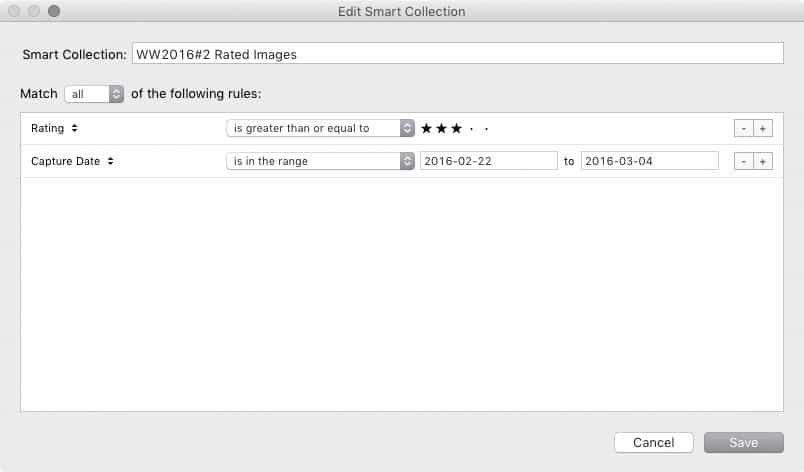
To create the Smart Collection I just go to the Collections panel in Lightroom’s Library Module and click the + symbol to the right of the Collections label, then select Create Smart Collection… As you can see in this screenshot (below), I then select three stars for the Rating field, and this is set by default to “is greater than or equal to”, so anything with three or more stars will be included in this Smart Collection.
I then click the + button to the right of the Rating line to add more criteria, and select Capture Date, then “is in the range” and enter the start and end dates for my tour, which was Feb 22 to March 4, 2016. Now, I can see all images with 3 stars or above for the entire trip, just by clicking on this Smart Collection folder.
To reduce my 750 initial select images, I started to look at groups of similar images and reduce them to as few as possible. After my second pass, I was down to 348, so I was able to remove just over half of my original selection. I still had 151 images of the Steller’s Sea Eagles and White Tailed Eagles, so I did a third pass just through these images, and removed an additional 25 images, but then I was stuck again. I really felt as though the 125 eagle shots that I had left were quite strong images, so I guess this is a nice problem to have, but I really wanted to reduce my overall number of selected images even further.
Lightroom Slideshow Functionality Change
With a total of 323 images left in my Smart Collection for the trip, I tried using my slideshow and coffee process. I’d been through the entire set a number of times at this point, but having hit a wall, it was time to simply feel my reaction to the images as the slideshow progressed.
I start a Lightroom slideshow, and if I am happy to see the next image come up, it stays, but if I get even the slightest sinking feeling as the next image comes up, I hit the 1 key on my keyboard to demote the image out of my selection. 1 star is my “once great” rating. It means I once thought enough of it to promote it above the others, but then decided otherwise. I just like to keep this star on there as a reference.
Anyway, it was this point in time when I realized that Lightroom no longer works as it used to, so the keyboard is not recognized during slideshows. This is actually quite huge for me, as I use this process a lot. It’s even more annoying because the slideshows in Lightroom are being nicely enhanced with features like “Pan and Zoom” and better synching with music being added, but now I have to click through each image in full screen mode, which I don’t like so much. I like to remove anything that disrupts how I “feel” about each image, so the slideshow was perfect for me.
So, while manually going through the images, even after doing this a few times, I was still at 311 images. I’d only managed to remove another 12 from my gut reaction to the images. At this point, I decided to go the other way, and promote the ones that I really liked.
Using Raw Emotion to Select Images
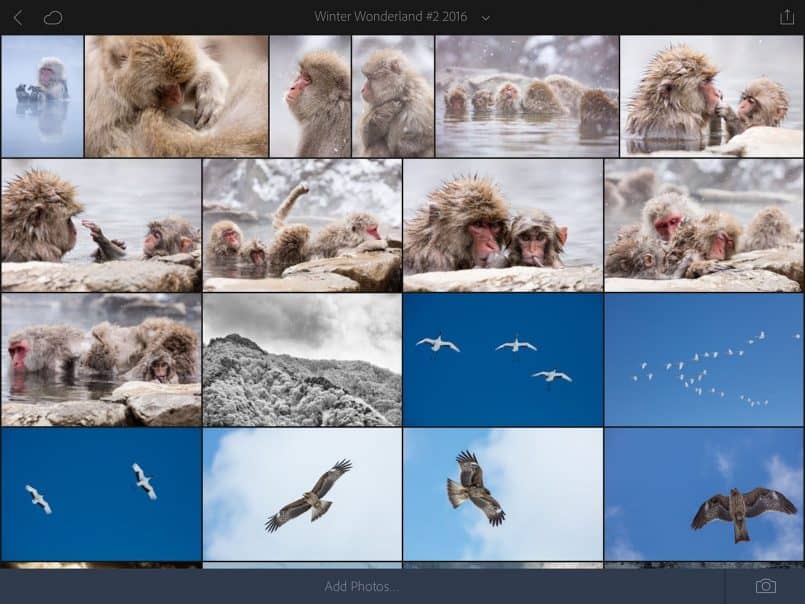
When traveling these days, I generally create a Lightroom Collection that I set to sync with Lightroom Mobile, so when I drop images into that Collection they automatically sync with my iPad and iPhone. I just set that Collection to be the Target Collection, which means that I can add images easily by hitting the B key while browsing or editing images. This gives me an easy way to show the tour participants what I’ve been capturing as we travel, and also my wife can follow along with my progress from home.
The thing with this process is that I obviously don’t just drop all of my selects into this synced Collection. Unlike my initial selection which I give three stars simply to indicate that I want to look at these images again, for my Lightroom Mobile Collection I only add images that I feel are good enough that I want to show people. I make this decision as I work through my initial selection process, so there’s a lot of gut feeling involved. It’s a raw emotional response to the images, and I think that is worth working with.
By the time I’d been through all images from the tour I had around 180 images in my Lightroom Mobile Collection for the trip, so these are images that I already knew that at some point I’d felt strongly about. More strongly than the superset of 750 initial selects in the Smart Collection, so I decided to do some further comparisons of the larger group against this subset of images.
I went into my Lightroom Mobile Collection and labeled all of the 180 images in there with a blue label, then went back into my Smart Collection, and in the grid view I could now easily see all of the images that I had added to my gut feeling favorite images Lightroom Mobile Collection. More importantly, this blue label also enabled me to filter out all images that did not have a color label assigned, so I could look at only the images that I had not yet added to this subset. Theoretically these should be the less-good images.
By this point, I’d been back from the tour for over a week, and the emotion of each shoot was pretty gone, so when I looked through these images, I was able to simply feel my reaction to them a fresh, and add anything else that I thought was good enough to want to show people to the Lightroom Mobile Collection.
After doing this, with the memory of the last pass through my lesser images still fresh in my mind, I went back into the Lightroom Mobile Collection, and did another pass, this time with the newly added images included, and removed everything that I didn’t feel was up to scratch. Some of them were from my initial Lightroom Mobile selection, and some were added for the first time. I could see this because of the blue labels, which I thought was useful.
This process enabled me to reduce my overall 3 star image count to 251, which is a closer number to what I like to work with, but by this point I’ve been pretty ruthless, and felt uncomfortable removing anything more at this point. These base three star images will probably remain in the collection, and I’ll present these to Offset, my stock photography agency, for their consideration as well.
My Lightroom Mobile Collection, which contained images that I would more proactively like to show people, had increased a little at 214 images. At this point, I promoted all of these images to 4 stars, and removed the blue label. I don’t like to leave color labels on images, and it was no longer necessary. My 4 star rating is, as I say, for images that I proactively want to share, and I give 5 stars only to images that I feel are portfolio worthy, or actually in a portfolio.
Selecting the Absolute Best to Show You!
By this time, it was 2:30 on Monday afternoon, and I am supposed to be releasing the first travelogue episode for Tour #2 today! At this point I started the process of selecting my final 30 or a maximum of 40 images to talk about. We already now that I wasn’t able to get to the travelogue episodes. The process just took too long. I made Lightroom’s Quick Collection the target Collection again, and then sat through the entire set again, hitting the B key when an image that I thought I’d like to talk about came up on my screen.
Well, as you might imagine, I ended up with a new shortlist of 112 images. I’d added just over half of my 4 star images to my Quick Collection. Aargh!
So, I had to go back and start to select similar images again. I had 46 sea eagle shots, so that was an obvious place to start. For example, I had five shots of White-Tailed Eagles with their talons forward, coming in to catch a fish, so I removed four of them. I had six shots of White-Tailed Eagles side-on actually catching the fish, so I removed five of these, leaving just the one with the most dramatic splash.
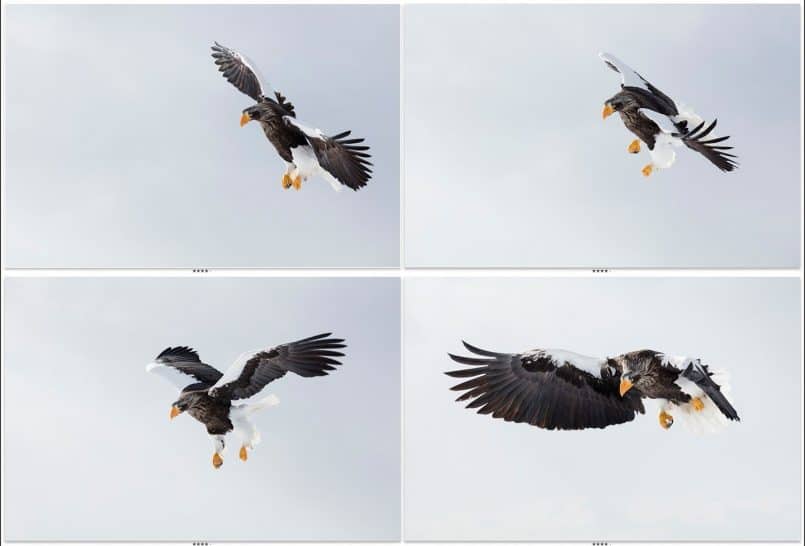
I repeated this process for the various types of eagle shots, but the most difficult group to reduce was these four images of a Steller’s Sea Eagle coming in to land on harbor wall at Rausu (below). These four images are already a subset of a series where the light reflecting from the snow on the wall, back up onto the eagle, was absolutely stunning.
I love each one of these shots with a passion, so I was disappointed to see that on closer inspection, the third image was a little bit blurred as the eagle lunged forwards. That did make removing one more image a no-brainer though of course, and the other three were absolutely tack sharp.
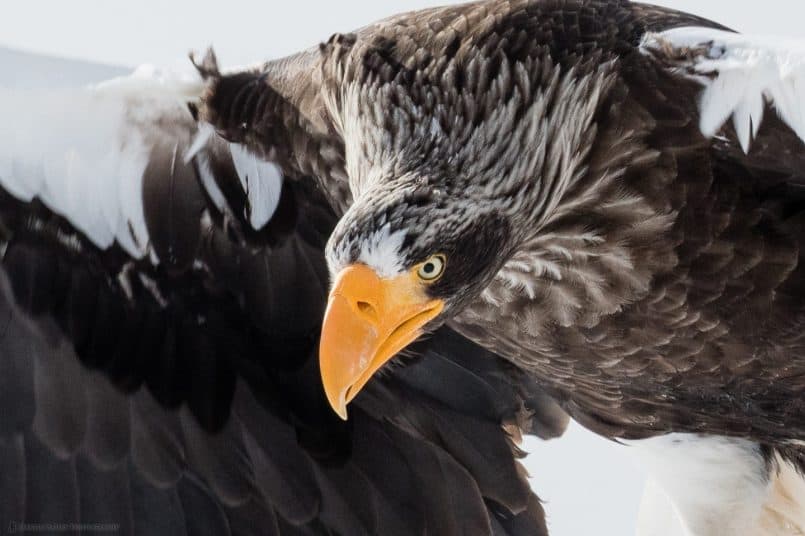
In fact, as we are not going to have time now to actually start the travelogue this week, let’s take a look at just how sharp these images are. Keeping in mind that the image is already cropped slightly, here is a 100% crop of the fourth of these images (below). I can’t tell you enough how much I have fallen in love with shooting wildlife with the Canon EOS 5Ds R.
All I’ve done to this image in post is increase the Shadows slider in Lightroom to +18 and increased the Clarity to +12. Apart from that, and the crop of course, this is straight out of the camera, so hopefully you’ll see why I’m so excited about the resolution and image quality of this camera. The shutter speed was 1/1000 of a second at f/10, ISO 400, at 234mm.
In a desperate bid to reduce the number of images down futher, I actually removed the last shot of the White-Tailed Eagle snatching a fish from the water as well, as the Steller’s Sea Eagle shot was better, and this enabled me to get the eagles down to just 12 images for now, so I went through the rest of the remaining 75 images in a similar way, trying to remove more.
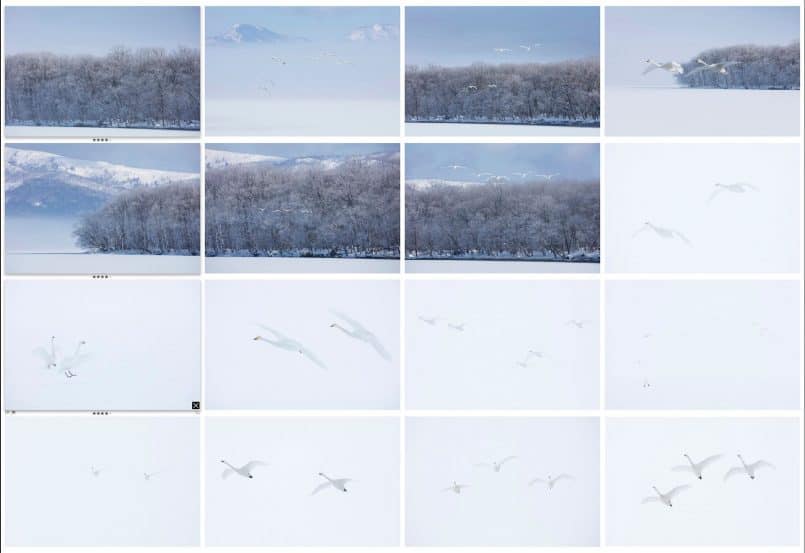
The next difficult set was trying to reduce the number of Whooper Swan images. We had two amazing mornings at Sunayu, at Lake Kussharo, with a number of beautiful fly-ins and incredible light. I found it really difficult to reduce the images I will talk about, much past this selection (below). I ended up removing some of my favorite images simply because I didn’t think their true beauty would come through in the limited Web size that we have to use here.
As you can see, we had very different conditions each day, which made it even more difficult to reduce the number. Especially the second of our two days there, the swans looked as though they were just sitting in a huge soft-box with stunning light, and such a tiny subtle difference between the birds and their white background.
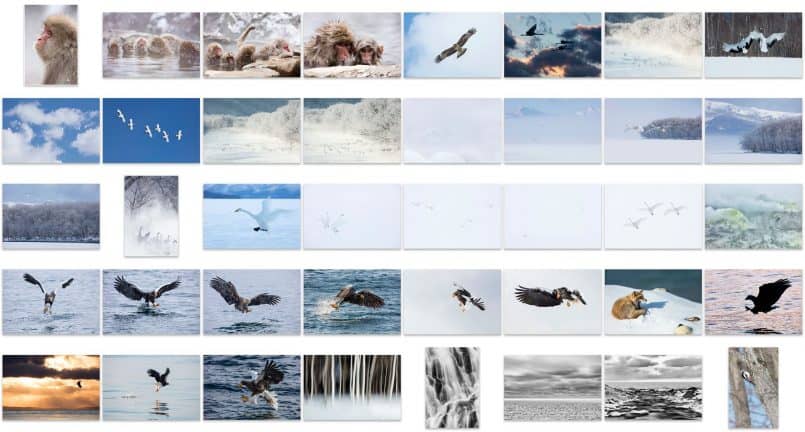
So, finally, after a few more heartbreaking decisions, I arrived at the 40 images that you can see in this screenshot (below) that I will talk about over the next four episodes.
If time allows, I’ll try to start recording the travelogue series early, and release the next episode before the end of the week, so that we don’t spend much longer on these travelogue series. I also have some other exciting stuff coming up as well, that I don’t want to delay any longer than necessary, but it really depends on how much time I can assign to these tasks in the coming weeks. Either way, let’s wrap it up there for today.
2018 Winter Wonderland Tours
Before we finish, I’d like to remind you that we are now taking bookings for the 2018 Snow Monkeys & Hokkaido Tours. For details and to book your place, visit the tour page at https://mbp.ac/ww2018. Our 2017 tours are already sold out, but if you’d like to be put on the wait list, please contact us.
Show Notes
Details of the 2018 Tours: https://mbp.ac/ww2018
Subscribe in iTunes for Enhanced Podcasts delivered automatically to your computer.
Download this Podcast in MP3 format (Audio Only).
Download this Podcast in Enhanced Podcast M4A format. This requires Apple iTunes or Quicktime to view/listen.




Hi Martin, thanks for the episode. Just one question – do you only submit your 3 star images to Offset or do you also submit your 4 and 5 star images?
I submit 3 stars and above to Offset.
Thanks Martin. It’s very useful to see how you cull your photos after a trip. This takes me a long time and I always end up with too many. I like your method of dividing the photos into topics and working on each topic to reduce the number. That may help me reduce the number of photos I subject my friends and family to.
That’s great Lynne. I’m pleased this helped. Thanks for taking the time to comment!
Hi Martin. Regarding the problem you highlighted in that you can no longer star-rate images in Lightroom’s slideshow, I’d like to suggest an alternative. When in, say, the grid view if you hit the F key which will display the selected image full-screen, you can then use the number keys to star-rate the image and the -> cursor/arrow key to move to the next image. You may already know this by now but I wanted to share it in case it helps.
I’m a long-time blogcast subscriber and very much appreciate the tips, advice, techniques and thoughts that you share: they have significantly influenced me and help me develop my photography so if I can give a little back it would make my day! :o)
Best regards,
Ian
Scotland
Hi Ian,
Thanks for thinking to let me know! Your suggestion is actually what I have been doing, but don’t really like, because I still have to hit keys to advance through the images. The beauty of the slideshow is that it let’s me just totally sit back, and wait for the next image to appear, which I feel is best to help me “feel” the next image. Hitting a key to advance detracts from that experience and so didn’t work for me as well.
But, the great thing is that in the most recent release of Lightroom (2015.5) the number keys are recognized during slideshow play back again, so all is good once more. 🙂
Thanks so much for listening to the blogcast. I’m really pleased that it’s helped. Your suggestion might not have been something new to me, but I do appreciate you taking the time to comment, and to let me know how much you enjoy my content.
All the best!
Martin.