I spent about two and half hours in a nature research institute on Saturday the 28th of July, 2007, and today we’re going to look at 9 of the 10 images I posted on my Web site from that shoot. I was using a 100mm f2.8 Macro lens, often with a 25mm extension tube, and a pretty specialist lens from Canon called the MP-E 65mm f2.8 1-5X Macro. I was also using a Canon Macro Twin-Lite MT-24EX, which is made up of two strobe heads that fit onto the front of the lens, and on occasion also using a Speedlite 550EX to throw a little light into the background. I’ve been into many of the techniques I’ll talk about today in Episodes 42 to 44, which was a series on Macro photography, but today we’ll see how I put this gear to practical use to get some great larger than life-size macro shots.
Before we go on, I’d like to say again a huge thank you to all of you that nominated the Martin Bailey Photography Podcast in the 2007 Podcast Awards. Thanks to you we made it to the final list of nominees in the Education category, and voting has started from July 28, and will go on until August 11. I’d like to remind you that you can vote once every 24 hours, and every vote counts, so please do set up a reminder or do whatever you need to do to remind yourself to go to www.podcastawards.com every day until August the 11th and submit your vote. You’ll find the Podcast listed under the Education section. You need to provide your name and a valid email address, as many of the votes will be validated by clicking a link on an email you’ll receive after voting. There’s some pretty tough competition, but if you think this is the best Photography Podcast you listen to, and I know that many of you do because you have mailed me to tell me so, then please do support the MBP Podcast by voting as often as you can during this next week or so. And if you know of anyone else that probably would like to vote but may not be listening right now, do drop them a line and remind them to support us. Thanks in advance for all your help. And now, let’s get on with the main topic for today, and Delve into the Macrocosm!
The Shizenkyouikuen, or Nature Research Garden, not far from my home in Tokyo is not like many other parks or gardens in Tokyo, as it really is left almost totally wild. There are a few ponds and obviously footpaths, but apart from that, much of the area is overgrown grasses and wood. This means of course that this time of year there are mosquitoes everywhere, and for some reason they really love me. I wear long trousers even when it’s 35 degrees Celsius, or 95 degree Fahrenheit, but they are lightweight, quick drying outdoor trousers, so the mozzies can stick their little needly mouths straight through them. Because of that, I had sprayed them with super strength mosquito repellent before leaving the house, and I also had a battery powered repellent whirring away while dangling from my photographer’s vest, and still, I having been in the place for about five minutes, my right knee started to itch. When I got home, I found that I’d been bitten 9 times above the right knee, 6 times above the left knee, once on my right calf, once on my right shoulder and would you believe, once behind my left ear. That’s eighteen times, and I’m sure most of them were within the first few minutes of me arriving.
I’m kind of used to it now, but having grown up in Britain where there were no mosquitoes, I have no immunity to them, and so the stings tend to swell up pretty badly. So, I’m sitting here all itchy while preparing for this week’s Podcast, but this is all expected when shooting in such places. I mentioned just now that I was wearing a Photographer’s vest. I cannot shoot effectively without this vest, I should probably say that because of this I chose one that has a mesh back for good ventilation in hot weather. It also has a patch of cloth that zips into place for additional warmth in the colder months. I like the design so much that I have two of these, exactly the same, so that I can cover myself for longer trips where I might get a bit pangy but can’t wash it every day.
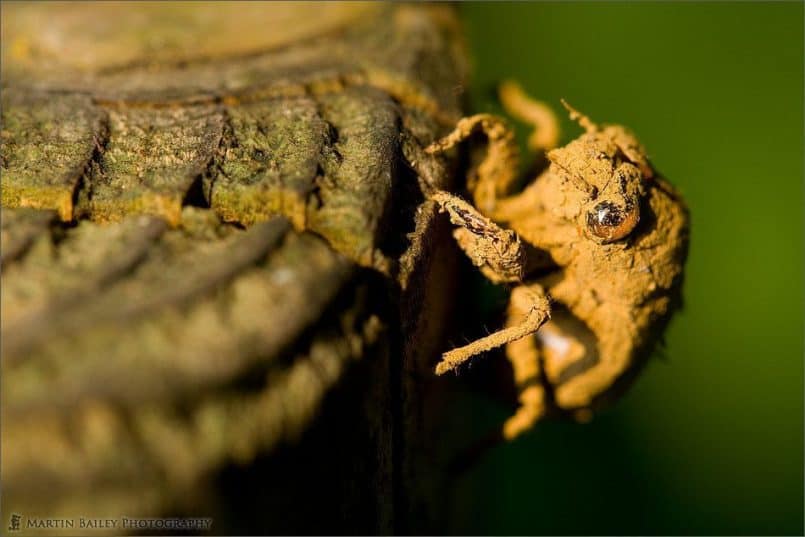
Anyway, let’s get down to looking at some shots. The first one is image number 1495, which I spotted not long after getting all of my kit ready and had started walking down the path into the more heavily wooded area. This is the shell of a Cicada, which is what was making all of that noise in the recording earlier. These things come out each year having spent a whole lot of time growing underground, ranging from just a few years, to 17 years for some species, and then in the final stage as a nymph they climb out of the ground to and attach themselves to something like a tree trunk, or as in this photo, the post of a rope fence to keep people like me out of the woods, and then they break out of this outer shell. They dry for a while, then start the search for a mate, and having mated, the female inserts her eggs into the bark of a tree, where the grub feeds before going underground and the whole process starts again. I’ll add a link to a Wikipedia page on Cicada to the show-notes in case you’re interested.
So, some details about the shot — this image was captured shortly before 3PM, so the light is starting to warm up a little towards the late-ish afternoon. I used natural light here because it was bright enough, and the quality of light was really pleasing as you can see. I stopped the aperture down to f5 so that we could get a little depth-of-field, but I didn’t go much more as I was looking to lead our eyes to the glossy membrane that covered the Cicada eye before it shed this skin. It also helps to give that partially lit green background a nice smooth velvety look and remove other possibly distractions. I did bump up the ISO to 400, and I set the shutter speed to 1/125th of a second. I was in manual mode and had to shoot a couple of trial images to stop the glare from that eye membrane from blowing out. I shot this with the 100mm f2.8 Macro lens at lifesize, or 1:1 (one to one) magnification. I know this, because I had simply set the lens to manual focus, turned the focus ring to as close as it would go, and then kept shifting my tripod forward until the subject came into focus. I wasn’t using my focusing rails, so this took a little bit of doing, but as the subject was inanimate, I could take the time to do this, probably at the expense of a few more mozzie bights. I composed the shot with the shell in the right third, which also enabled me to include a few of the year rings in the cut tree stump used for the fence post. I would have preferred to have found this muddy little shed skin on a more natural looking object like a tree trunk, but this is the reality. It’s part of nature that these creatures will use objects that man has put in place for these purposes, and with it all having a nice earthy brown tone, I think it still works.
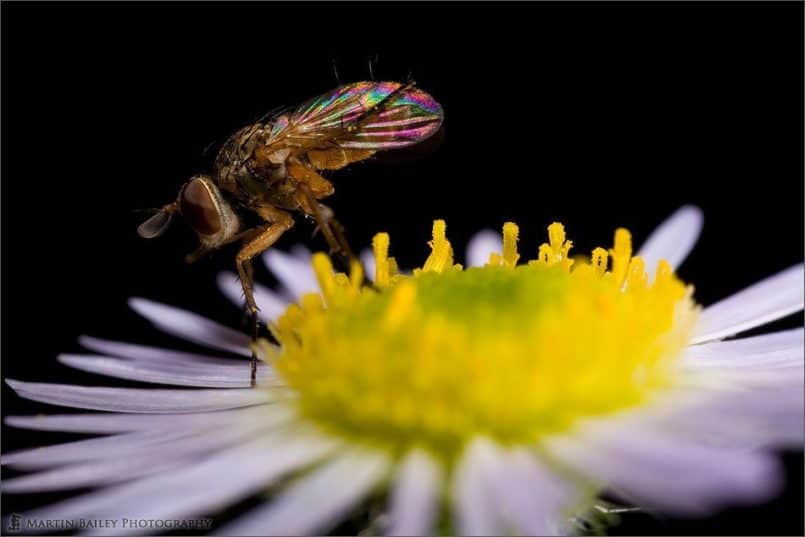
In the next image, number 1496, we really do delve into the realms of larger than lifesize, with this shot of a tiny little fly that I found on top of a daisy type flower that itself was not more than around 8 or 9 millimetres in diameter. The MP-E 65mm Macro lens that I shot this with basically has no way to focus the lens. The zoom ring on the lens has one action, and that is to move through the magnification from life-size to 5X life-size. You can use this for focusing to a certain extent, but as you do this, you are actually zooming through the magnification range, so if you want to shoot at a certain magnification, the only way to focus is to move the camera and lens closer to or further away from the subject. This requires some really fine tuning, so it’s useful to have the camera mounted on focusing rails. Also realize that once we go this large, the depth-of-field is less than a millimetre, even when stopped down to f11 or f16, so the slightest breeze is going to make focusing even more difficult. To overcome this, I was using a Wimberely Plamp here, which is a Plant Clamp. It clips onto the leg of the tripod and then you bend the flexible arm to the point you need the head to be at, and then use the clothes peg type head to clamp the stem of the plant you’re shooting, taking care not to damage it of course, and that way it doesn’t sway around in the breeze so much.
Lifesize means basically that if you photograph something 36mm across with a full-size sensor, it will fill the frame exactly. If you go down to 5X life-size, you could fill the frame with something just 7.2mm across. If you want to look at the lens itself, as I said earlier, it’s covered in detail in Episodes 42 to 44. There is also a photo of the Macro Twin-Lite MT-24EX. In fact, just to see this flash system, the lens and the focusing rails in image number 1022 in my gallery if you are interested, but I’m not going to include the image here right now. To briefly explain the Twin-Lite though, it is two individual strobe heads that fit onto a rail that fits on the front of the lens, and you can move the heads around the rail to any position, and also adjust the angle at which they point at the subject, so in this image I had them pointing right in at the subject, maybe at around 45 or 50 degrees to the front element of the lens. There is an option lens hood for this lens that actually looks like a chameleon’s eye more than a lens hood. This is because you are focusing on images so close to the front of the lens you run the risk of getting light from the flash units going straight into the front of the lens. Reducing the opening to just over a centimetre stops this from happening.
A little advice on using the flash itself while we’re at it; when using this set up, I simply drop the camera into Manual mode and set the aperture and shutter speed to what I want, and then shoot a trial image. I usually find that the camera will then figure out how much light it needs to shoot out of the flash to adequately light the subject without much problem. When shooting really close like this though, and when the subject is not totally filling the frame, the camera does get a bit over-zealous so I have to bring it back down a little to the tune of around -1 stop in flash exposure compensation. This is not your standard exposure compensation, but the flash compensation. It’s important that you change this either on the back of the flash or via the camera body, and not exposure compensation, as that won’t give you the right effect. Basically if you underexpose with standard compensation, the flash will just give out more light until it gets what it thinks is correct, but actually isn’t. You’ll also notice that when there is nothing close in the background, the light from these flash heads will not reach it. When I have time to set it up, I usually link a second flash unit remotely, as I did for some shots we’ll look at later, and have that throw some light into the background.
I also find this surreal totally black background quite pleasing in some shots. Here I think it actually adds to the effect, and totally isolates the subject on the flower head, and allows us to really study it. Also the background here was so far away that I’m not even sure the second flash would have been of much use. I’d probably need a couple and really bump up the compensation, but I don’t have two, and I really didn’t have time to set it up either. Another thing that I noticed here for the first time is that the light has created a quite beautiful rainbow effect on the wings of this tiny little fly. It’s also difficult to see in the Web sized image, but there are a few spots of yellow visible which are distinctly spherical, looking a little like fish eggs. This is actually the pollen from the flower on which the fly is standing, usually only recognizable as dust, not spheres.
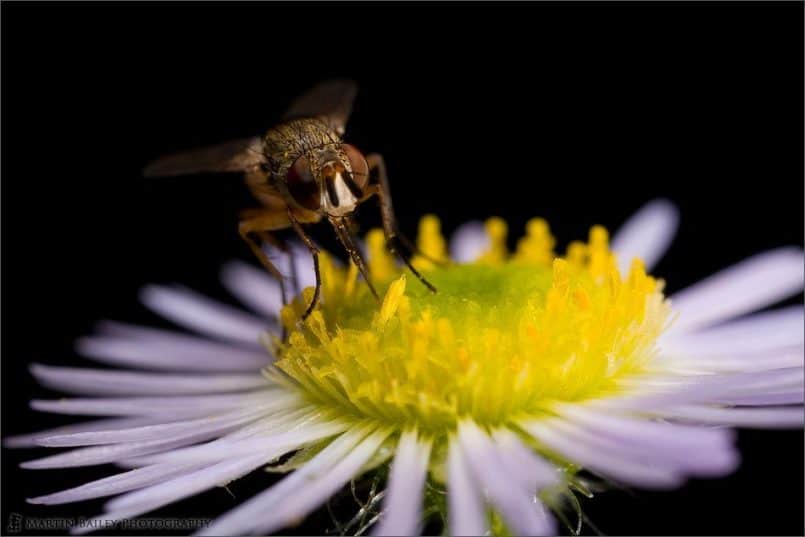
Both this shot and the next shot, were made at 1/100th of a second at f11, with ISO 200, like I said, with the flash set to minus 1 stop exposure compensation. The magnification here was about 3X life-size, perhaps a little more. In the next image, which is number 1497, we can make out these little yellow pollen balls a little better, as I’d moved to between 3.5 and 4X life-size magnification. The reason for the shift is that as the fly moved around I tracked it with the zoom ring, using it to refocus, rather than using the screw on the focusing rails, but either would work if you’re not bothered about exactly what magnification you’re shooting at. We can get more of a feel of the actual size of the subjects here by the transparent filaments seen below the flower head through the petals. This is a totally un-cropped full sized 35mm image, so I think you’ll be able to appreciate how small these subjects really are. The focusing distance is around 3cms in front of the lens at this magnification, which always amazes me as to why the subject doesn’t just fly away. Sometimes the subject does get skitty, but this one, although moving to another flower a few times, kept coming back and allowing me to shoot it. I did get the second flash out and use it to light a rock somewhat for a third shot that I uploaded, but this is of the fly’s backside, which is not really a pretty site, so I’m not going to include it here. If you are interested, it’s the next one along in the gallery to this shot.
While shooting the fly, a large blue-grey dragonfly kept flying up and sitting on the foliage and a bench nearby. I decided to concentrate on the fly first, and then changed lenses for the 100mm and a 25mm extension tube. This gives a magnification of 1.39 times, so it’s closer than life-size, but not as close as the magnification used in the last two shots. The reason I switched to this lens is because the dragonfly was about 7 or 8cms in length and wingspan, maybe more. This means that with a lens that will only focus at one point when set to life-size, and only getting smaller as you increase the magnification, it’s simply not possible to shoot anything larger than 36mm wide. Now, if I could get close enough, I would hopefully be able to get a real close-up of say the head of the dragonfly which would be spectacular, but I was not confident that I’d be able to get that close. The 100mm on the other hand allows me to get a 1:1 life-size image at a greater distance, and with the 25mm extension tube attached, I could get even more magnification. The other thing is this lens allows me to focus on things further away, so although the subject might be less magnified than life-size, it would still be pretty impressively close if I could just get in close enough myself. Anyway, the reason I’m telling you this is so that you can understand my thinking in changing lenses in anticipation of a shot, but the dragonfly flew away as soon as I moved even just a little bit close to it. I couldn’t get within 5 feet, so it just wasn’t going to happen. This was one of the times I kind of wish I had one of those nice long 180mm life-size macro lenses from Canon, but there’s a lot of other stuff lingering much further up on my somewhat stagnant shopping list.
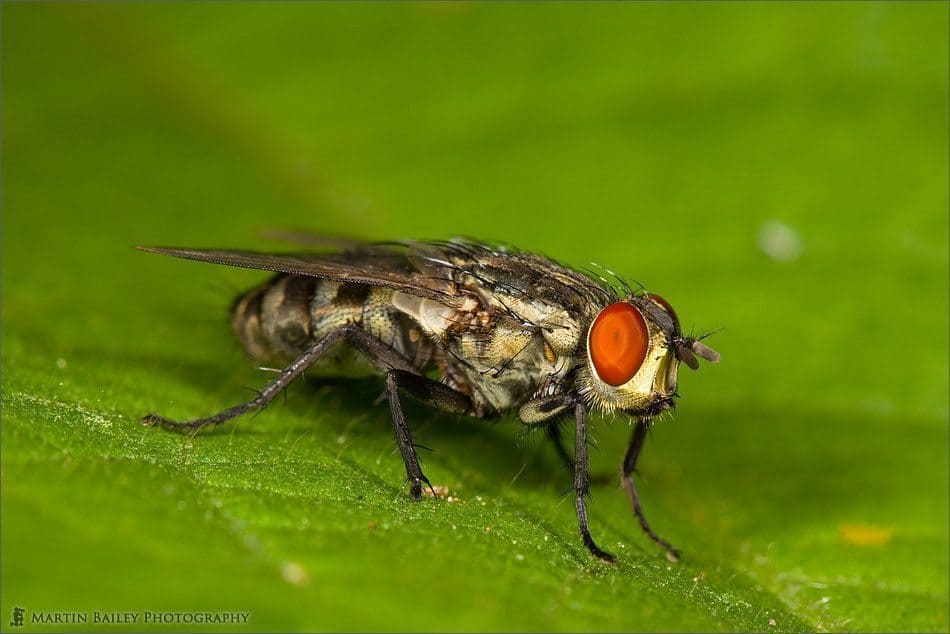
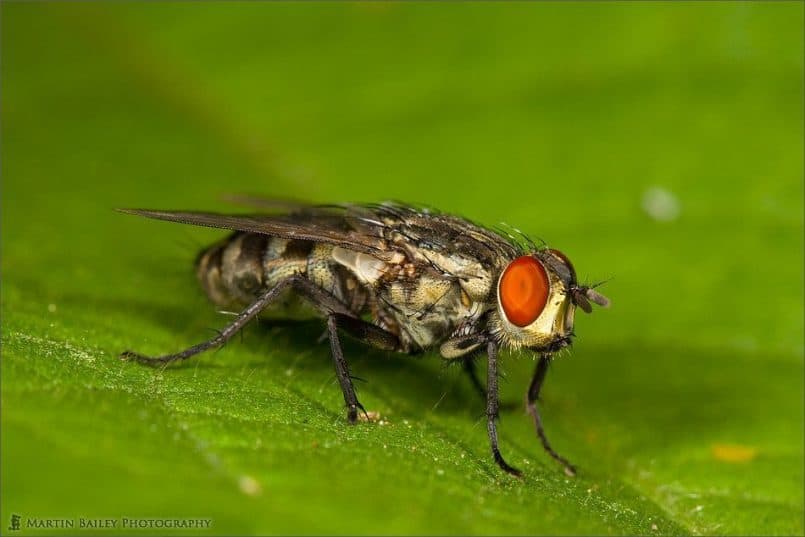
With the 100mm f2.8 macro and the 25mm extension tube fitted though, I focussed on a common fly seen just about everywhere in Japan, that was sitting on a leave posing for me. We can see this in image number 1499. Once again, I set the lens to manual focus and moved the focus ring to the shortest focus distance, and tripped the shutter after the fly came into focus. This time because the leaf was large enough to fill the frame there is no dark background to content with, although I did now have a second flash ready in my vest pocket. I was using my tripod as a monopod here too. Basically I had the legs closed together with the clips holding them in place, and had extended one of the legs slightly to get me the right height, but with just one leg on the ground so that I could roll the tripod back and forward easily. This is kind of a happy compromise between the tripod and handholding and works well when using the Twin-Lite as well, as you are working with a sharp burst of light. This was shot again at f11, as with the last few shots, but I changed the shutter speed to 1/60th of a second, still at ISO 200. The detail of this shot is amazing though, as with the last few. I’m really going to spend more time working with the Twin-Lite and a second, and hopefully soon also a third Speedlite to light the background for more natural looking lighting. I should mention too that before I started shooting today, I shot my WhiBal card with the Twin-Lite and set the camera’s custom white balance with that shot. From that point on, I didn’t have to change the white balance, and didn’t touch it in post processing either, except to see that it didn’t look any better by moving the slider a little either side of that set by my custom white balance.
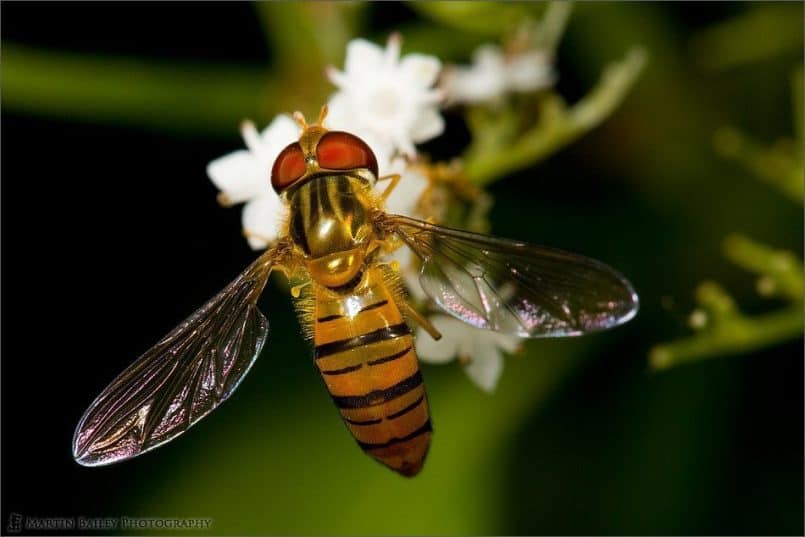
Thirty feet further down the footpath, and I came by a hoverfly that we can see in image number 1500, feeding on the pollen of a bunch of white flowers that were standing very helpfully about 5 feet above the ground. Again using the tripod as a monopod, I shot this hoverfly for a few minutes until he flew away. I upped the ISO to 250 and the shutter speed to 1/160th of a second to give me a little better chance of freezing this buy as he moved around. There’s a little bit of that rainbow effect on the wings again, from the Twin-Lite, but I was really taken back with the wonderful glossy gold back of this fly. I hadn’t realized they were this gold when fully lit by flash. Again a very sharp shot because of the shooting conditions I was using, and once again shot at 1.39X life-size by pre-focussing. It’s really great just zooming to 100% and pouring over the detail in this creature. You can literally see every hair, and body parts that I never realized they had.
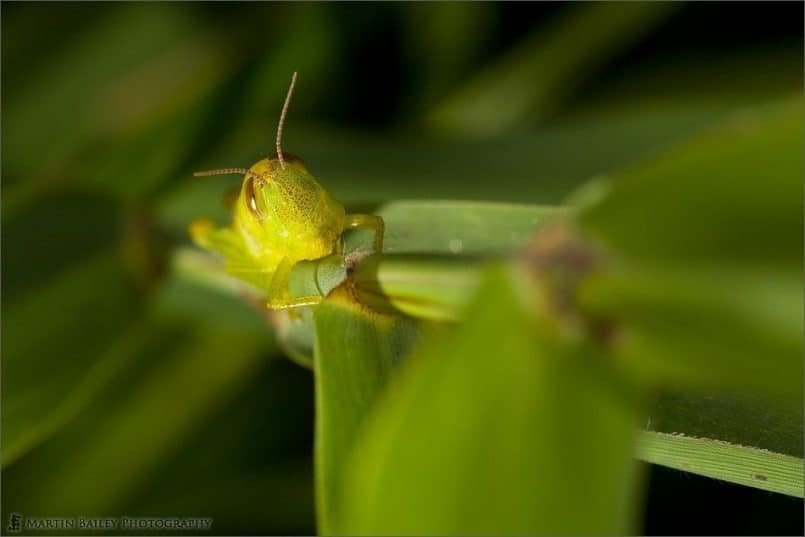
In image number 1501, we can see a grasshopper that I noticed clinging to a large grass stem. This was actually a few feet inside the low rope fence, so I took the camera off the tripod to hand-hold it, and then pulled the grass towards me and held the tip in my right hand as I held the camera. Then in my left hand I held a Speedlite 550EX flash unit, and pointed it down towards the base of the grass. Not entirely successful, but by doing this I did manage to get a bit of light into the background, stopping it from dropping off into total darkness. I thought about raising the ratio of light to the 550EX, but this guy was getting scared, and started to back down the grass stem, so I decided to leave him be. There’d be another day when I can get one of these in a better situation so that I don’t have to upset him too much to get my shot. I really got the feeling that this little guy was looking back up at me and thinking “Oh no! Not you again!”.
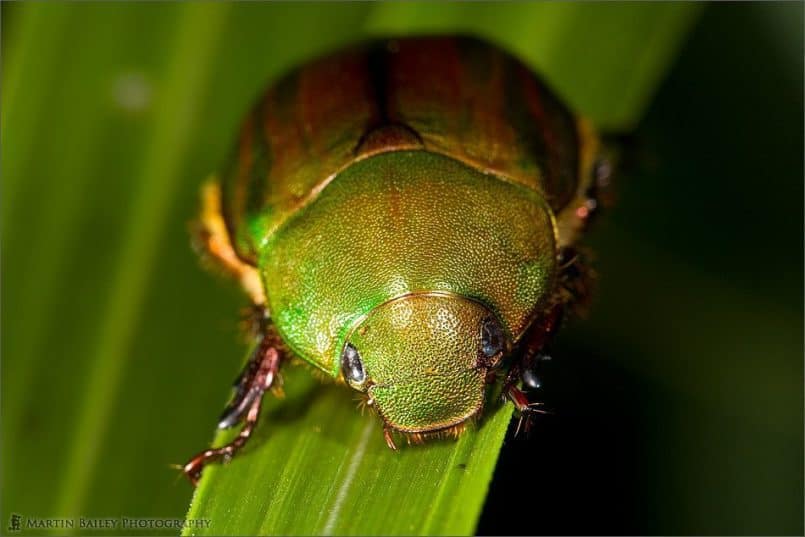
Next we have two examples of the same subject although with slightly different composition, but one with just the Twin-Lite and the second with the Speedlite lighting up the background a little. The first shot is number 1502. Here we see what the Japanese call a koganemushi, but I’m not sure what this is called in English. It’s a type of scarab, and really quite common across Japan. This one was sitting happily on a leaf by the pond in the institute, so I decided to get a few frames. The settings still at f11, with ISO 200 and a shutter speed of 1/160th of a second, and I was still using the 25mm extension tube and focusing at the nearest focusing distance by moving the camera back and forth. Here we can see that the foliage either side of the beetle has gone totally dark as the light from the Twin-Lite hits only the closest subjects.
In the next image though, number 1503, again, I took the 550EX from my vest pocket, and held it in such a way that it caught some of the background. Again, slightly rushed, as the park was about to close by this time, but you can see here that I do have slightly more colour in the background than the previous shot, especially on the left side where the background is closer. I actually really like the highlights that the twin-lite has introduced in the front of the shell of the beetle, and again this is incredibly sharp, even when viewed full-size. That’s helped of course by the fact that I was using a tripod, as a tripod here, not as a monopod as mentioned earlier.
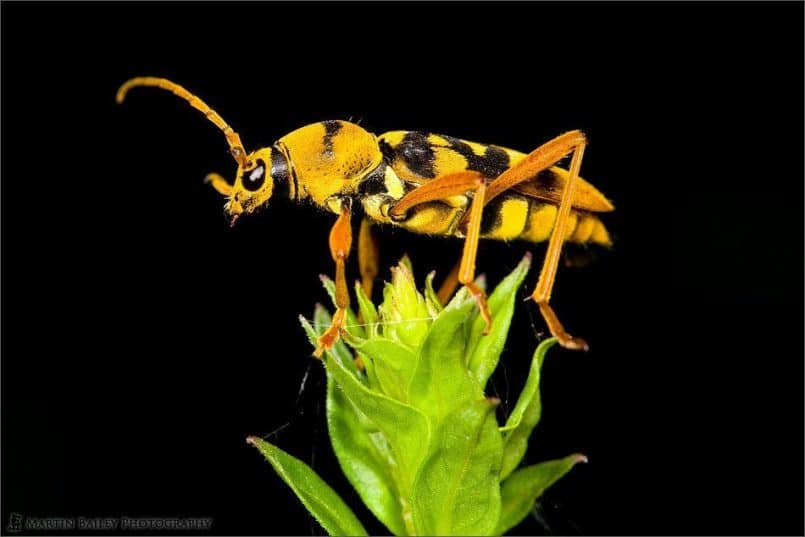
Let’s move on to the last shot for today, which was literally the last shot of the day for me too, and that is image number 1504. The only thing I don’t like about this nature research institute is that it’s run by the City, which means it’s staffed by civil servants and not a public sector company. So even though it’s light for another two hours at this time of year, they kick you out at 5PM. I’ve tried just staying in here actually, but someone comes around and actually asks you to leave by about 5 minutes to 5. So, at 10 minutes to five, I was almost ready to start walking for the gates, when I spotted this buy climbing up a plant. Climbing up a plant for many insects means they’re either trying to get to the flower for the pollen, or they’re getting to the highest ground to fly away. As there are no flowers on this plant, I figured it was the latter, so there was no time to position the second flash, even though there was some greenery in the background, so I just fired off three frames with the Twin-lite as this guy got into position to fly, and of the three, only this once was crisp and sharp. A nice profile I think, but then he was gone. I wasn’t quick enough to capture him actually take off unfortunately. This is a Tiger Beetle by the way, due to the obviously tiger like markings and colouring. This one has lost his left antenna somehow, which is a little disappointing, but I’m sure he was much more upset about than I am. The ISO and shutter speed were still the same as the last few shots, but the aperture was down to f10 here. I must admit though, this was totally unintentional. I didn’t even realise that it had changed until I check the EXIF data, so I must caught the dial with my finger and accidentally jogged it a third of a stop wider, probably in my hast to shoot this guy before he flew away.
So that’s it for today. I hope you’ve enjoyed a virtual trip around one of my local haunts. I dare say I’ll be back here a few more times over the summer, hoping to get better at my macro shots, and really start to give that second flash something to do, and I’m probably going to pick up a third flash at some point to really give me a good chance of lighting the background up some. I’ll report back as and when I get any shots worth sharing with you.
Once again, if you are interested in more of an overall Macro tutorial with information on techniques and the gear involved, do go back to Episodes 42 to 44 where I covered this in some detail. Also, don’t forget to support the Martin Bailey Photography Podcast by voting for me in the Podcast Awards, every day up to August the 11th, 2007. You can find me under the Education section and don’t forget to give a valid email address as they will randomly email a link to validate your vote. They say randomly, but most seem to be getting a mail every time they vote, so it’s really important not to be shy with your email address.
And, with this episode being a few days late this week, there’s now less a week to get your Movement Assignment image uploaded to the gallery at mbpgalleries.com. The participation has been a little low for this one so far, although it’s probably going to bump up in the last few days. If you have any ideas for the next or future assignments by the way, please do let me know either publically in the forum or via forum PM just to me or the contact form at martinbaileyphotography.com. Remember that the assignment can’t require special equipment, so as to give as many people as possible the chance to benefit from getting involved and also get themselves a chance to win a print of your choice from my online gallery, and to get in the running for the yearly grand prize that will be awarded next year. The same goes for any other feedback or ideas for topics to cover in the Podcast. Thanks to all of you that have mailed in the past too. It’s always great to hear from you and your words are often a huge encouragement for me.
Finally, a thank you to Dave Erickson from Wisconsin – USA, for your mail this week. Paraphrasing a little here, Dave said, “I have just discovered your podcast during the last week and I’m so grateful to you for such a well conceived and wonderfully executed piece of work. Your photo review format is ideally suited to learning. It so happens that I’ve been painting the exterior of the house this week and your Q&A and tips episodes have been perfect company for me and the paintbrush.” Thanks again Dave for a great mail, and I’m really pleased you like the Podcast and it helped you with your painting. Before closing the mail Dave requested that I mention who made the music I use in the intro and the housekeeping sections of the Podcast. This is a great idea, as I have been asked a number of times, so I’m going to try and do this from now on. The general rule will be that when I use music that I’ve bought for this purpose, I probably won’t mention it, but when I use music for free from the Podsafe Music Network, I’ll try to give the artist a mention and let you know the title of the track used. Today we were played in and out by a band called Shams with a track called Creation. And with that, I’ll say goodbye for this week, and you have a great week doing whatever you do. Bye-bye.
Show Notes
Here’s a link to a Wikipedia page on Cicada: http://en.wikipedia.org/wiki/Cicada
The music in this episode is from the PodShow Podsafe Music Network at http://music.podshow.com/
Subscribe in iTunes for Enhanced Podcasts delivered automatically to your computer.
Download this Podcast in MP3 format (Audio Only).
Download this Podcast in Enhanced Podcast M4A format. This requires Apple iTunes or Quicktime to view/listen.



0 Comments