I’ve been asked many times about the type of camera bag I use. Most of you that follow the forum will know that I’m very much a Lowepro advocate. As I bought yet another Lowepro bag for my resent trip to India, and continue to be amazed about the quality and usability of these bags, I thought I’d put together a Podcast about the bags that I currently use on a regular basis. Why I use so many will become clear as we proceed.
Also, I’m very excited and proud to announce today that top camera bag manufacturer, Lowepro, will be sponsoring this Podcast for the next four weeks, and have kindly agreed to provide the same bag that I just bought, the Stealth Reporter D650AW, as a prize for the Assignment Grand Prize. This and the next Assignment’s votes will all get added to the grand total, and the person with the most votes after the next assignment will receive this amazing camera bag. If you are worried that you have not yet entered the Assignment to date, please don’t be. Many people have only been entering sporadically, and total points of any one member are not yet surpass able. One outstanding image that blows everyone away could still amass enough votes to thrust you to the top of the ranking, so please do get involved if you aren’t already shooting for the assignment. I announced the theme for the current Assignment last week, but just to reiterate, it is “Silence”. Listen to episode 69 for more details.
And here is a word from Lowepro to kick off the sponsorship:
Our trek started in a small Colorado garage over 30 years ago. Since then, we’ve been traveling the world on the backs and shoulders of the best photographers on the planet. We’ve learned. We’ve innovated. We’ve become a leader. For over 30 years, we’ve worked to develop and perfect camera carrying systems – maybe to the point of obsession. But we’ve never stopped at just innovating and improving products.
We strongly believe that we owe it to ourselves, and to our industry, to do whatever we possibly can to protect and save the environment. We take as much pride in this aspect of our business as in the work we put into our products.
Most of our bags were inspired by helpful advice from you and your peers. We greatly appreciate your artistry and input. We’ve listened carefully to your suggestions, and we’re sure you’ll find something we’ve designed that’s exactly right for you. Because wherever you go on your next assignment, we want to be right there with you.
Lowepro products are distributed in more than 90 countries around the globe through photo, outdoor, computer, consumer electronic, mail order and online resellers. For more information about Lowepro or Lowepro products, visit www.lowepro.com.
Thanks again to Lowepro for your kindness and cooperation, and more importantly, for your amazing camera bags. Now let’s hear how good these bags really are.
Five years ago I bought my first Lowepro bag, just after my bought my first DSLR, the Canon EOS D30, not to be confused with the new 30D. Of course, Lowepro SLR bags are as useful for film cameras as they are for film cameras, and some of the newer models have paid particular attention to digital, making the digital photographer’s life much easier. We’ll get to that later, but first, my first bag was a smallish rucksack type bag, the Micro Trekker 200. The bag comprises an inner compartment with moveable padded partitions that stick to the bag and other partitions with Velcro so that you can customize the bag to fit your equipment. I found this bag to be a perfect size for a DSLR with a battery grip and a long lens, like the 100-400mm, and a couple of other shorter lenses. I don’t have a photo to show you of this bag, but when we look at the next bag, you can see how the partitions work if you are not already familiar with this kind of bag. In fact, in addition to the photos I’ve shot of my own gear, I’ll put a link to all of my bags on the Lowepro Web site into the show notes. That way you can browse and see more detail later. The Micro Trekker 200 also has an outer pocket, that holds a surprisingly large amount for the size of the bag. When I use this bag, I’ll usually put all my filters and spare batteries, and a reflector in the outside pocket. If necessary, you could drop a 50mm F1.4 or 1.8 in there as well without any problems.
I actually have a funny story about including this bag, when I was travelling on an internal flight from Sydney to Melbourne in Australia. As the plane trundled down the runway to take off, the overhead compartment above me sprung open, and my tripod slid out. Luckily, I saw it coming and caught it, so it didn’t hurt me or anyone else, but then this Micro Trekker started sliding out as we continued to gather speed, bouncing along the bumpy runway. Although not particularly heavy, I didn’t want to take the chance that I could not catch this one, with my precious D30 and lenses inside, but as I stretched my arm up, I couldn’t quite reach the bag hanging half out of the compartment, because I still had my seatbelt on. So I started to push up with my legs, against the will of the seatbelt, which was now acting as a sort of fulcrum with my feet pushing heavily down, and my back applying rather a lot of pressure to the seat. I had just managed to grab the bag and lower it to safety when, and I still can’t believe this, but the back of the seat broke at the hinge. The next thing I knew I was laying down flat, with the guy behind me in the seat to the left of the one I was now lying on, looking at me rather surprised and exclaimed “Jees mate, you scared the shit out of me!”. I must admit, I was a little shaken myself. This was the first time I’d experience full-flat seats in economy class. Anyway, I waited patiently in my comfortable full flat seat until the seat belt sign went off, and went to tell the cabin staff that I’d broken the seat. At first, I was asked if I meant the headphone socket, or the ash-tray, but when I said no, the seat, they didn’t seem to want to believe me until I took her back to my seat and showed it to her. Luckily I didn’t have to pay for it, and I got moved to a nice other seat for the rest of the flight.
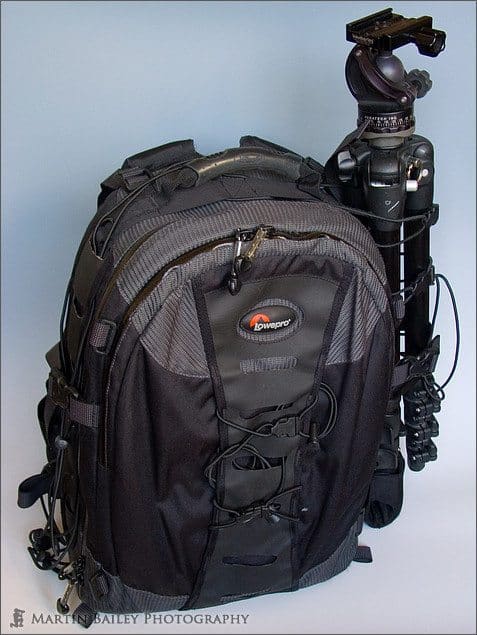
Anyway, moving on, my arsenal of lenses was growing, and I wanted something that could hold a little more for my second trip to Hokkaido in February 2004. It was then that I bought the Lowepro Nature Trekker AW II. Again I’ll put a link to this bag in the show notes, but I also took a few photos of my own for us to look at. Let’s take a look at image number 1296 in which we can see my bag closed with my Manfrotto tripod attached. You can change the tripod leg holder to the other side, or even the back of the bag. It also came with lots of elastic straps, to attach things, and secure the tripod etc. You can see that there are a few already on the bag but not used. I leave them here so if say I want to take my coat off while out and about, I can just tuck it into the elastic strings and forget about it. One other thing that I found very useful on this bag is the weatherproof zips. This is not only effective in rain showers, but also when coming in to a warm building from sub-zero temperatures I’ve found this to be enough to prevent condensation from forming on my gear. This was going to be very useful for my trip Hokkaido to shoot in temperatures well below freezing. Actually, now I think about it, I actually bought my Nature Trekker as a set with the optional Trekker Day Pack II. The Day Pack is another rucksack that can be used on its own, or actually attached to the outside of the Nature Trekker itself. This Day Pack is really handy if you are going away for a day or so, and want to drop in a change of clothes or something. All of these things came in very handy for my first Hokkaido trip and many trips since.
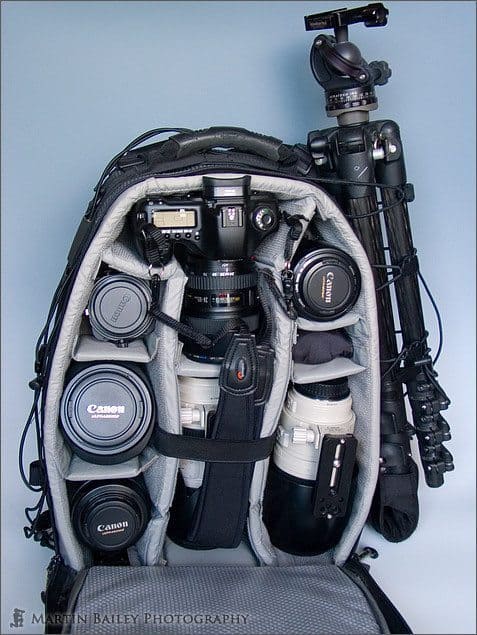
In the next image, number 1297, we can see what my Nature Trekker will usually look like on a typical day out shooting. We can see the moveable compartments that I mentioned earlier, that allow you to customize the layout of the bag. Just in case you’re interested, that my 5D with a battery grip attached and the 24-105mm F4 lens at the top, then to our left as we look at the photo we can see my 24mm TS-E lens. Below that is my 16-35mm F2.8 lens. The hood for the 24mm TS-E lens is actually at the bottom of the compartment with the 16-35mm lens mount passing through it. This allows me to fit the 24mm TS-E into a smaller compartment. On the bottom left we can see the 100mm F2.8 macro lens. In the middle is the 70-200 F2.8 lens, and to the right of that is the 100-400mm F4.5-5.6 lens. Above that is my angle finder in its pouch, and above that, you can see the 50mm F1.4. Behind the 50mm is a 1.4X extender. If I was going out to do some high magnification macro work, this compartment would probably contain the MP-E65mm F2.8 1-5x lens instead. I also sometimes leave the 100-400mm at home and put the Canon Macro Twin-Lite MT-24EX flash unit.
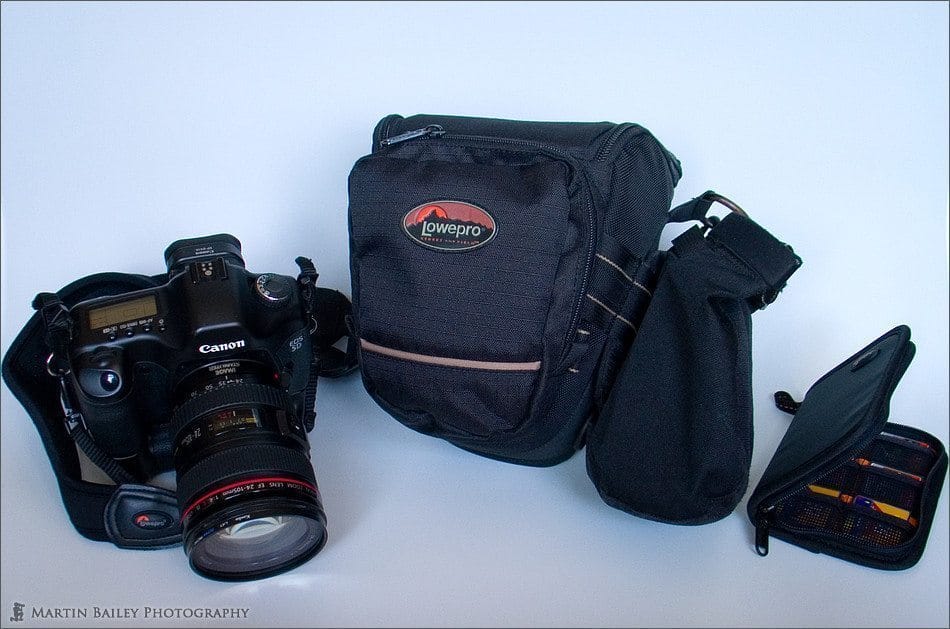
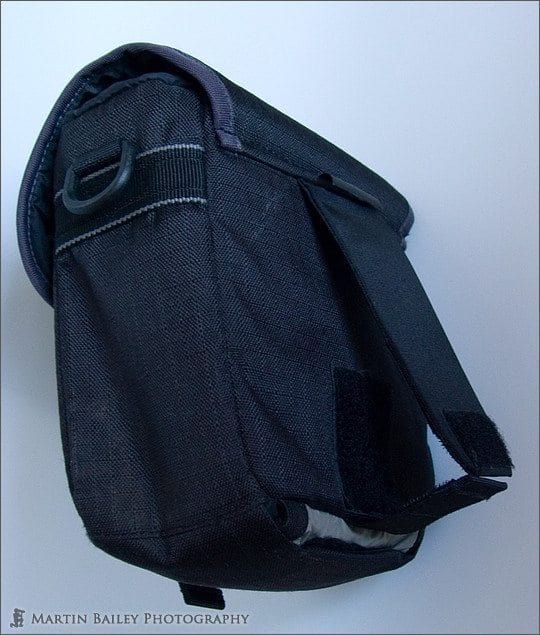
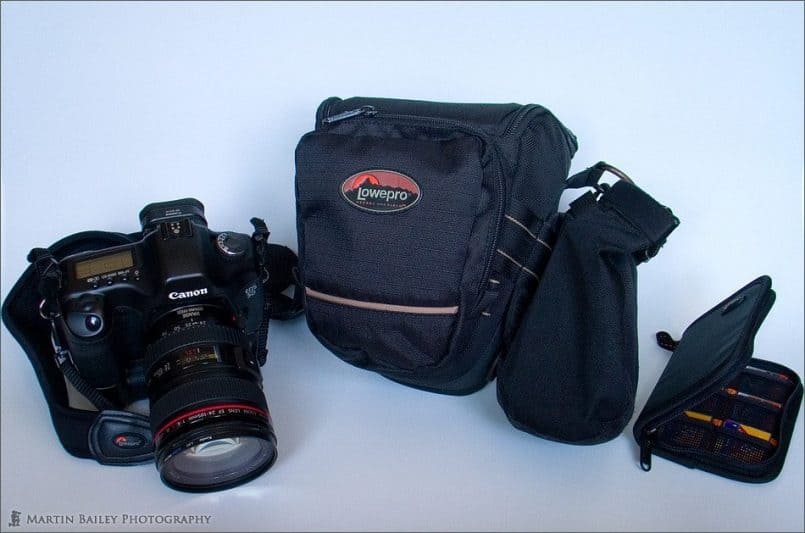
I often feel uncomfortable leaving the 100-400mm at home though, as you never know when you’re going to need it. This is where the Lowepro “Sliplock” accessories come in. Let’s take a look at image number 1298 which is a Lowepro SlipLock Pouch 60AW that I often use to attach the Twin-Lite flash to the outside of my rucksack when there’s no more room inside. You can see in the picture that the system is made up of a stiff flap that drops through the SlipLock loop on the bag your affixing it too, then it fits first to the Pouch itself with magic tape. Then a second flap it fixed over that from the bottom, again with Velcro, securing the pouch to the bag. I have a number of lens cases as well, that I attach to the outside of my bags when I want to take more lenses than I can fit inside. It also enables me to just build the method of carrying my gear as I feel necessary. For example, let’s take a look at image number 1299 in which we can see my smallest Lowepro bag, the Toploader 65 AW with probably my most used SlipLock accessory, the Snap Top AW pouch. I use this bag when I just want to carry my camera, with a lens, such as the 24-105mm F4 attached, and some memory cards, notepad and spare batteries etc. in the Snap Top pouch. The pouch though usually goes onto any bag I use, then when I start shooting, I slip it onto my belt. That is, either the belt of my trousers, or the waste belt of the rucksack. This way I have quick access to any little gadget I might need. I always keep my lens blower in this pouch for example, and the little spirit level that goes into the camera’s flash shoe to level my camera. I usually also have a PL filter and an ND filter in here. It’s surprising how much you can stuff into this relatively small pouch. It’s like Dr. Who’s Tardis. Note that if I want to take just one more lens with me attached to this Toploader, there are SlipLock loops on either side, so I can put a lens case on the opposite side to the Snap Top Pouch that you see here.
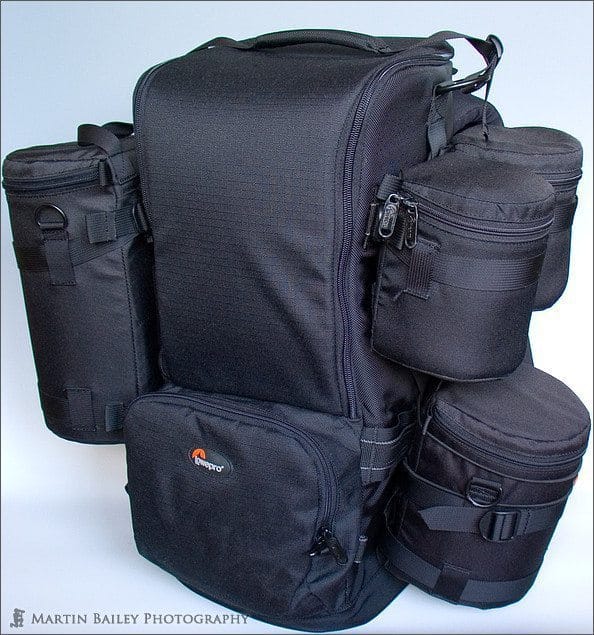
I have pretty much taken the SlipLock Lens cases to the extreme in the next bag that I want to look at. When I first bought the 600mm F4, I thought that I would pretty much be using just that lens, and at locations close to the car, but with my character, I couldn’t leave much at home, you know me, “just in case”. So I started to still take my Nature Trekker with a fair amount of kit, and carrying the 600mm F4 over my shoulder. This soon became very tiresome, so I started to look for another solution. Well, I was happy to see that the guys at Lowepro had come up with the goods again, with the Lens Trekker 600 AW, that we can see with all of my Lens Case in image 1300. If you look at the bag without the lens cases, again, there’s a link to this on the Lowepro Web site in the show notes, you can see that it is literally just a long tall bag, designed to fit from a 300mm F2.8 to a 600mm F4 with the camera body attached, and even an 800mm without a body attached. I must mention that to fit the Canon EF 600mm F4 into this bag with a camera body attached, I have to remove the pad from the bottom of the bag. There is still ample padding in the outer shell, so I’m not concerned about this, but I would have liked the bag to be about three centimetres deeper.
Apart from that though, this bag is, as are all the others, simply amazing. If I only take the 600mm F4 with a camera body out, I can hardly feel the weight due to the fact that like all other Lowepro rucksacks, in addition to ergonomically designed shoulder straps and a padded waste belt, to spread the weight between my shoulders and waste. The harness with this bag, as with the Nature Trekker is fully adjustable. The bag comes with a large plastic arrow shaped plate called The Pack Jack, Harness Adjustment Tool. You slide the plastic arrow down between the padding that goes against your back when wearing the bag, and the Torso Plate on to which the shoulder straps are attached. This separates the Velcro from the Torso Plate temporarily to allow it to be slipped up and down. This is how you adjust the height of the shoulder straps to best fit your body for maximum comfort and ease of carrying.
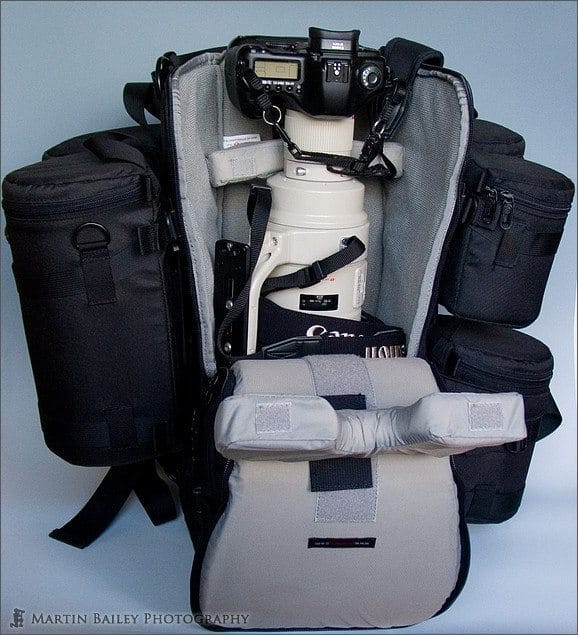
The lens cases that you can see that I’ve attached to my Lens Trekker 600 AW are, again, on the left as we view the bag, are two Lens Case 4s. These will take the 100-400mm F4.5-5.6 and the 70-200mm F2.8 lenses side by side. On the right, at the top are two 1W lens cases. The W I believe if for Wide lenses. I put my 24-105 F4 and the 16-35mm lens in these two cases. The 24-105 fits in with the hood on, although it’s a tad on the tight side, and the 16-35mm will fit in with the hood on at a squeeze, but I generally remove the hood and drop the lens in with the front element facing down, then drop the lens hood in diagonally over the back of the lens. This saves stressing the lens hood and stops the lens from flopping around. At the bottom on the right we can see the 4S lens case. The S this time is for short. This case is roughly the same diameter as the 4s on the left side, but only about two thirds there height. I use this for my 100mm F2.8 Macro lens or the 65mm 1-5X macro lens with the tripod shoe attached. This usually gives me a little height left over, that I use to store the PL filter for the 600mm F4 lens. This filter fits into the back of the lens not on the front like normal PL filters and the case is pretty big as PL filters go, but this along with a 100mm macro lens fits perfectly. A final word on this bag is that it does come with a tripod support and straps, although I’m not using them here, but if you’d prefer, you can attach a large tripod instead. Before we move on actually, let’s take a brief look at image number 1301. In this photo we can see the 600mm F4 lens in the bag, with the 5D attached.
I also should mention that the AW in many of these bags, cases and pouches names is for All Weather. They all contain an All Weather Cover. These are rubberized fabric covers that are hidden in the base or in a pocket of all of the AW cases and bags. You can actually see the All Weather Cover compartment at the base of the SlipLock Pouch 60AW that we looked at earlier. I don’t bother to use the All Weather Covers in short, light showers, as the bags are made of quite tightly woven material, but if the rain gets heavy or looks like it might be prolonged, I take the covers out and pull them over the bag. The rucksacks all weather covers are large enough to go over a certain number of lens cases and the tripod, so it’s rarely necessary to take the case out of all of the attachments.
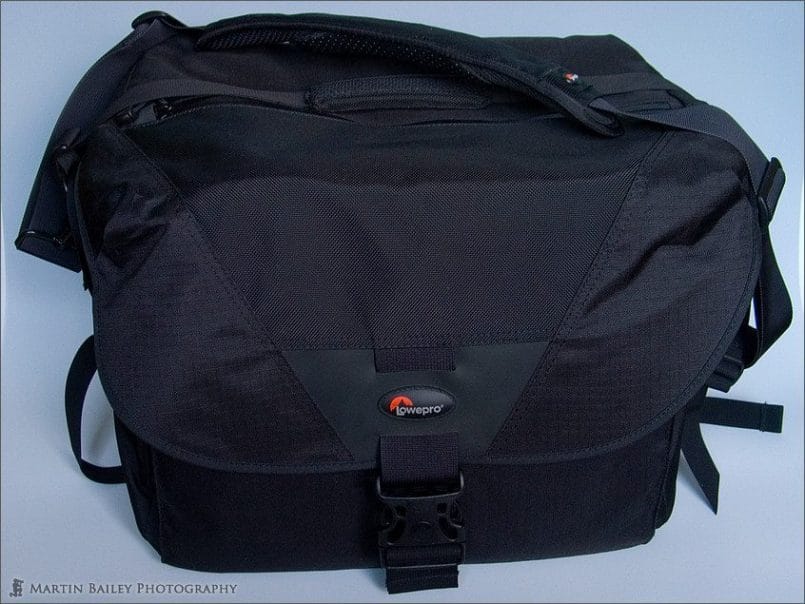
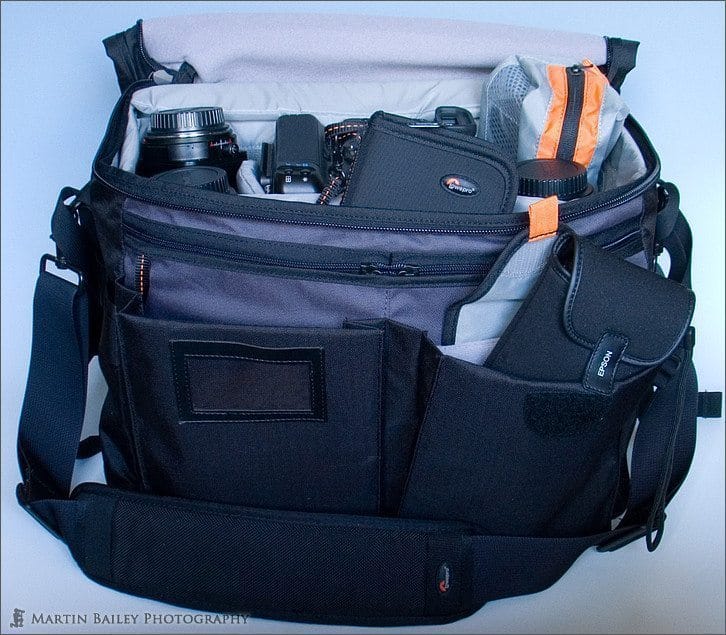
Let’s take a look the last Lowepro bag that I added to my collection, which is the Stealth Reporter D650 AW. In image number 1302 we can see the bag all closed up. You can see that this is a shoulder bag. It has a very comfortable padded shoulder strap as well as a smaller handle for carrying by hand and a waste belt, to attach the bag around your waster if you want for added support or security. We now know what the AW stands for, but the new D here stands for Designed for Digital. In image number 1303 we can see the bag with the top open, and the gear that I took on a recent business trip to India. The camera was placed in the middle, attached to the 70-200 F2.8. The compartments again are customizable, and have padded separators that can be used to split up items vertically. That is, in most of the compartments around the center one, I placed an extender, or lens, then a separator, then another lens. The bag comes with a small bag, that you can see there with the orange stripes on it, that you can use to keep cables, battery charges and other small objects together, or I guess you could put toiletries into it as well. It also comes with a memory card case that holds up to 12 cards, and this is attached to the bag by a small strap, which I find very comforting. I’ve dropped a card case before that I tucked under my arm to shoot some swans that took off as I changed my card, and then forgot about the case and it fell to the floor. I was fortunate that the case was found later that evening by Yoshiaki Kobayashi, the Photographer I was shooting with in Hokkaido, but it meant that we both had to go back to a snow covered beach in the dark scouting around with flash-lights, and then, I was lucky to get it back. You can also see there that the big front pockets, which are padded enough to feel comfortable dropping in your precious portable storage and picture viewer.
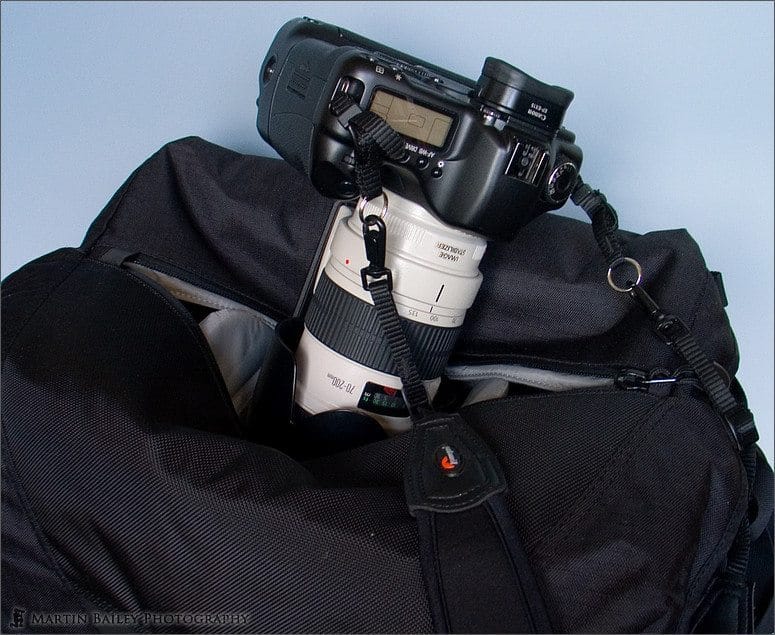
Although I’ve shied away from shoulder bags over the last few years, since my kit got heavy, I found this to be an excellent bag for a business trip in which I was able to fit in some photography. There are two more big selling points for me, in addition to the things I’ve just mentioned. The first is that if you look at the back of the picture here, you can hopefully see a large grey flap. This is the cover for the notebook PC compartment. This is large enough to fit a pretty big laptop and its adapter and cables etc. The other big selling point for me can be seen at work in image number 1304. This bag incorporates a water-resistant top zip so that you can get quick access to your equipment. Designed for photojournalists, this bag allows for very quick access to kit, for those chances that come and go in a split second. As you can see, there is no problem getting the 5D with battery grip and a 70-200mm F2.8 lens out of the top, and grabbing lenses from either side is just as easy. This bag also has tons of pockets, including some that are very hard to find, for hidden security. Note that the guard at the Taj-Mahal found all but one of the pockets. I couldn’t fit my tripod in that pocket to sneak it in though, so we can still say he was very good at his job.
I should also add before we close that all of these bags are OK as airline carry-ons. I have taken all of them on airlines at least once, some many times, and I’ve never had any problems. I would imagine the airline might well at some point ask me to remove some of the lens pouches, from the Lens Trekker 600, as it is pretty wide as you see in the photo, but it hasn’t happened to date.
As usual, I’ve today only spoken about bags that I have first hand experience with. Remember that Lowepro does a huge range of camera bags, for pretty much every type of camera. From compact digital through SLR bodies, to Video cameras and Medium and Large format cameras. What ever you’re looking for, I’m sure they have something to suite your needs, and with no problems with any of the products I’ve been using, some for up to five years, I can definitely vouch for the quality and strength of Lowepro gear.
So I hoped you enjoyed and found this explanation of what Lowepro gear I use and how I use it. As I said in the introduction, Lowepro have been kind enough to donate a Lowepro Stealth Reporter D650 AW camera bag which will be the Grand Prize for the Assignment, awarded to the member with the most votes after the second assignment from now. If you have not entered the assignment yet, remember, there’s still plenty of room to catch up. Just get stuck in, and shoot for the Silence Assignment we started last week, that will run until midnight on Sunday the 18th of February. Then after two weeks of voting until the end of March 4th, we’ll start another Assignment, and the winner of the bag will be the one with the most votes from your peers at the end of that Assignment which will finish in mid-may, with voting until the very end of May.
Remember that the individual winner for each assignment will still receive an original print of their choice from my online gallery at martinbaileyphotogrpahy.com. Keith Guthrie from the UK, the winner of the last Assignment chose his print last week, which was image number 1101 of the flower fields at Farm Tomita in Furano, during my summer visit to Hokkaido in 2006. Keith chose the Epson Professional UltraSmooth Fine Art Paper for his print, and once again, I was reminded of just how beautiful this paper is. The print is amazing and is on it’s way to you right now Keith. If you enter a real stunner to the next two assignments, you could end up with the camera bag and one of my original prints.
That reminds me of one other thing I want to quickly talk about before we finish. Keith asked if it would be possible to arrange a time to meet the UK listeners while I’m back in the UK for a wedding in a few weeks time. I’m going to be busy meeting friends and family, as I haven’t been back to the UK for a holiday for six years, but I should be able to open an afternoon and evening to meet up if anyone else is interested. The problem is, I’m fully booked at the weekends, so this will have to be a weekday between January the 23rd and February the 1st. What I’d like to do, is ask for those of you that would like to meet up, is to drop me a line at info@martinbaileyphotography.com and tell me if you could make it and let me know whether you can make the afternoon, just the evening, or both. Also let me know where you’d be coming from so that I can try to find somewhere to meet that suites the majority. Unfortunately, I’m probably not going to have time to make it all the way down to London, as I’ll need to get back to Nottingham in the evening, so it will probably be somewhere between the two cities, and not far from the M1. We can probably arrange a dinner for the evening, so that we can all sit down and have a nice chat and get to know each other in person. First mail me with your availability, once again, at info@martinbaileyphotography.com. Put something like UK Listener Meeting in the Subject so that I can locate the mail easily.
And that’s it for this week. Thanks again to Lowepro for sponsoring the Martin Bailey Photography and for the amazing Camera Bag, and thank you for listening. Now get out and start shooting for the Silence Assignment! Bye bye.
Show Notes
Music from Music Alley: www.musicalley.com/
The Lowepro Web site is here: http://www.lowepro.com/
Click the “Product Finder” button to browse by type of bag or use.
Here are some links directly to the bags I’ve mentioned today.
Micro Trekker 200:
http://www.lowepro.com/Products/Backpacks/classic/Micro_Trekker_200.aspx
Nature Trekker AW II:
http://www.lowepro.com/Products/Backpacks/allWeather/Nature_Trekker_AW_II.aspx
The Trekker Day Pack option for Nature Trekker:
http://www.lowepro.com/Products/Accessories/add_ons_upgrades/Trekker_DayPack_II.aspx
Toploader 65 AW:
http://www.lowepro.com/Products/Toploading/allWeather/Toploader_65_AW.aspx
Snap Top AW:
http://www.lowepro.com/Products/Accessories/sliplock_cases/Snap_Top_AW.aspx
Lens Trekker 600 AW:
http://www.lowepro.com/Products/Backpacks/allWeather/Lens_Trekker_600_AW.aspx
Stealth Reporter D650 AW:
http://www.lowepro.com/Products/Shoulder_Bags/notebook_camera/Stealth_Reporter_650_AW.aspx
Here you can see a list of available Lens Cases and other SlipLock Cases and Pouches:
http://www.lowepro.com/Products/Accessories/lens_cases/
http://www.lowepro.com/Products/Accessories/sliplock_cases/
And here is a word from Lowepro:
Our trek started in a small Colorado garage over 30 years ago. Since then, we’ve been traveling the world on the backs and shoulders of the best photographers on the planet. We’ve learned. We’ve innovated. We’ve become a leader. For over 30 years, we’ve worked to develop and perfect camera carrying systems – maybe to the point of obsession. But we’ve never stopped at just innovating and improving products.
We strongly believe that we owe it to ourselves, and to our industry, to do whatever we possibly can to protect and save the environment. We take as much pride in this aspect of our business as in the work we put into our products.
Most of our bags were inspired by helpful advice from you and your peers. We greatly appreciate your artistry and input. We’ve listened carefully to your suggestions, and we’re sure you’ll find something we’ve designed that’s exactly right for you. Because wherever you go on your next assignment, we want to be right there with you.
Lowepro products are distributed in more than 90 countries around the globe through photo, outdoor, computer, consumer electronic, mail order and online resellers. For more information about Lowepro or Lowepro products, visit www.lowepro.com.
Subscribe in iTunes for Enhanced Podcasts delivered automatically to your computer.
Download this Podcast in MP3 format (Audio Only).
Download this Podcast in Enhanced Podcast M4A format. This requires Apple iTunes or Quicktime to view/listen.


0 Comments