Equinox flowers bloom for a short time coinciding precisely with the autumnal equinox on September 23rd. These are beautiful flowers that I shot for three hours until almost total darkness on Sept 24. Today I’m going to talk about the techniques and artistic decisions made during this short shoot, including one technique to gain a quite strange effect that sprung to mind on seeing the opportunity. Listen out for this too during the course of this virtual tour.
Before we start I also want to apologise for the problems on Friday the 22nd and Saturday the 23rd as I switched my Web sites to a new server. It didn’t go as smoothly as I’d hoped, with some of the settings taking quite a while to propagate around the globe, and there were a few teething problems afterwards too, but hopefully things are running smoothly now. Anyway, I’m sorry for the inconvenience and thank you for your patience. Now let’s get to today’s main topic, the equinox flower shoot.
After a number of weeks without getting out shooting, and a lot of computer work with one thing or another, I was starting to get pretty stressed. My choices for spending the afternoon of Sunday the 24th of September were creating the transcript for this week’s Podcast and maybe also recording it, or shelve it all and go out shooting for a few hours. Although this has meant with my other responsibilities and workload that this week’s episode is going to be a few days late, I opted to go out shooting, and the result of that shoot is what I’m going to talk about today.
I’ve mentioned before about keeping certain subjects that are only available at certain times of the year in mind as the seasons progress, but no natural subject that I can think of is more reliable than the Equinox Flowers that bloom across Japan at exactly the autumnal equinox. How can you forget that these flowers are blooming when the equinox comes around. I had a look through some of my mooks, which are a cross between a magazine and book, for some good places to shoot these flowers and found a promising location 80 kilometres or 50 miles from my Tokyo apartment. It is a small town called Chinchakuda, near the city of Hidaka in the Saitama Prefecture. I didn’t leave the house until almost 1PM, having had a lazy morning recovering from the lack of sleep the previous day, and although my car navigation told me it was going to take just over one hour to get there, it actually took two hours, the last hour of which was spent in the traffic jam for the last 7 kilometres. I realized that this place was very popular for these flowers as I started to see signs for temporary car parks in fields in the last few kilometres as I got nearer to the location and just because of the sheer number of people that were turning up to take a look at them.
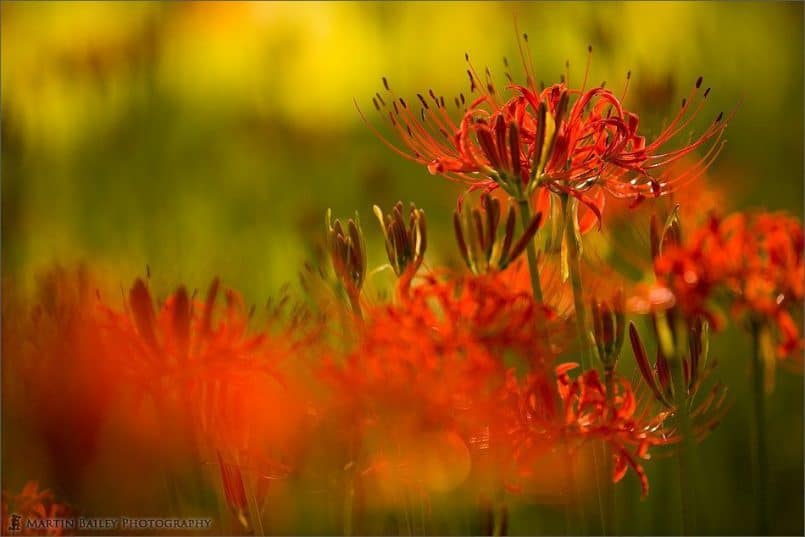
I parked up and was heading towards the area that the flowers were blooming in at 3PM, which was actually just right as the light was starting to warm up in the last couple of hours before the sun dropped below the horizon at around 5:20PM. It wouldn’t leave me much time for reconnaissance, but the area that these flowers are growing in is probably only around an acre or so, which will be around half a hectare. As I walked into the woods in which the flowers are blooming, at first I thought I was maybe a few days early. The flowers around the first part were a little sparse, but as I walked further through the growth was much thicker. Before I got there though I had already started shooting, and the first shot that I chose to upload to my web site is image number 1115. You can see in this image that there are still a fair number of the flowers that are not opened, in the kind of red pods that look a bit like red chillies. Also the fact that the flowers that were open hadn’t been for very long meant they don’t look too tired. These flowers can look pretty drab and withered if you wait until they are all in full bloom. You can also see here that there was still quite a lot of available light. The light area in the background was the edge of the woods and the sun was just almost behind the flowers, backlighting them. This gave me a nice light background and also some nice highlights on the red petals. I was shooting in Aperture Priority with minus two thirds exposure compensation here. The reds start to clip very easily in conditions like this, so I was making full use of the RGB histogram as I find tuned the exposure to get the red close to the far right to ensure a bright image, but not quite clipping, for this example at least. The obvious artistic decision I made here was to search out a combination of flowers that would allow me to put a patch of flowers close to me in the foreground and use a shallow depth-of-field of F2.8 to throw them totally out of focus for that foreground bokeh. This ISO by the way was set to 100 and this gave me a shutter speed of 1/400th of a second. I’ve placed the main focussed batch of flowers in the right third for a more pleasing composition. Also note pay a lot of attention to the background, adjusting the height of the camera to ensure the out of focus area, those blotches of colour, add to the shot without taking too much attention away from the main subject. Just because the background will be way out of focus, it doesn’t mean you can ignore where the graphic elements are in the shot. These are as important as the main subject in the part they play in making your images successful. You see how I do this in most of my flower shots, including some others we’ll look at today.
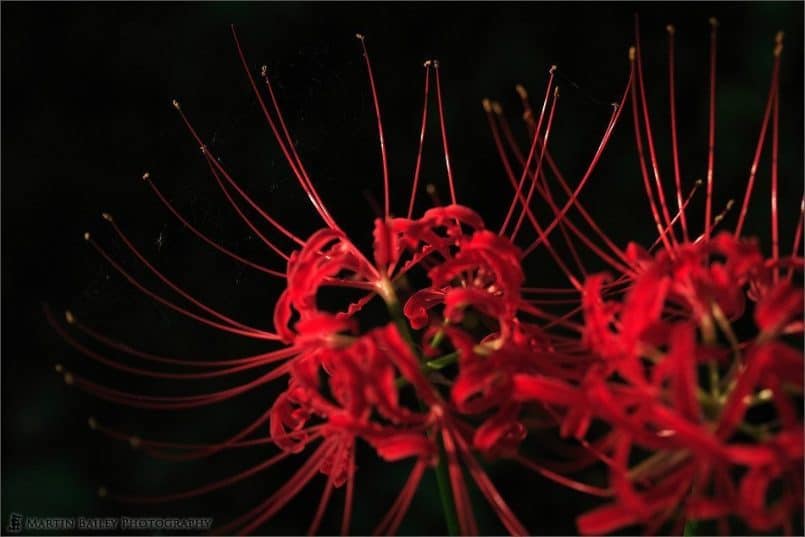
In the next shot for today, image number 1117, you’ll see two equinox flowers with the main focus on the left one, and this time I found a pair that were being lit by the sun as it got lower in the sky, but it was not illuminating the ground below the flowers, so the background of the shot is very dark, making the red stalks that emanate from the centre of the flower. I’d switched to Manual mode for more control with the dark background, but basically this was shot with the same EV, that’s Exposure Value, as the last shot. I had changed the aperture, closing it by one stop to F4 for slightly more depth of field, which caused me to select a shutter speed one stop slower than the last image, which gave me 1/200th of a second. I also chose this pair because there’s a spider’s web around the stalks of the left flower. There’s also actually a tiny spider in the horizontal centre, about 1/4 of the way into the shot from the left. It’s very difficult to see on the Web site because of the size, and if you are viewing on an iPod you won’t be able to make it out at all, but it makes for an interesting addition when viewed at full size.
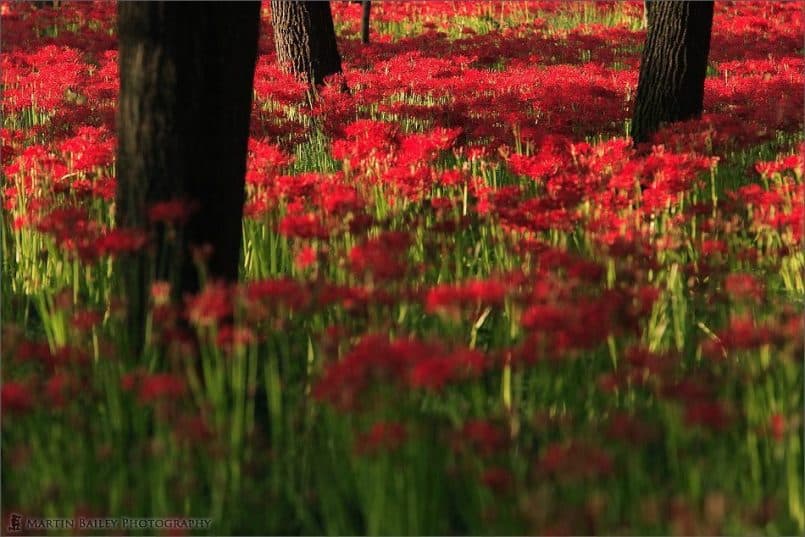
In the next image, number 1118, I wanted to briefly explain what I did with the focus and depth of field. Basically I noticed a patch of flowers that was brightly lit in contrast to the foreground that was in shadow. I also found the side lighting highlighted the texture in the bark of the two trees in the background, so I decided to focus on the patch of flowers between the two trees in back and used an aperture of F8 to give me a certain amount of depth of field, but not so much that the foreground would also be in focus. This has the effect of leading us into the shot from the blurred foreground and giving us something to look out deep inside the image at the top. The trees help to stop us going right through and out of the back of the image though. I had switch back to Aperture priority again, as there’s not particularly anything challenging about the lighting, but I was exposure compensating to the tune of minus 1 and two thirds of a stop, as the front of the image was quite dark, and I wanted to stop the top half of the shot from blowing out. The reds in this shot are in fact clipping slightly, so I am very close to the edge here. I might have gone right down to -2 stops, but I wanted to keep that top half bright and warm which is how I saw it. The shutter speed as a result was 1/40th of a second, again at ISO 100. I should also mention that I was using a 1.4X extender or teleconverter with my 70-200mm F2.8 lens at full zoom, for a focal length of 280mm.
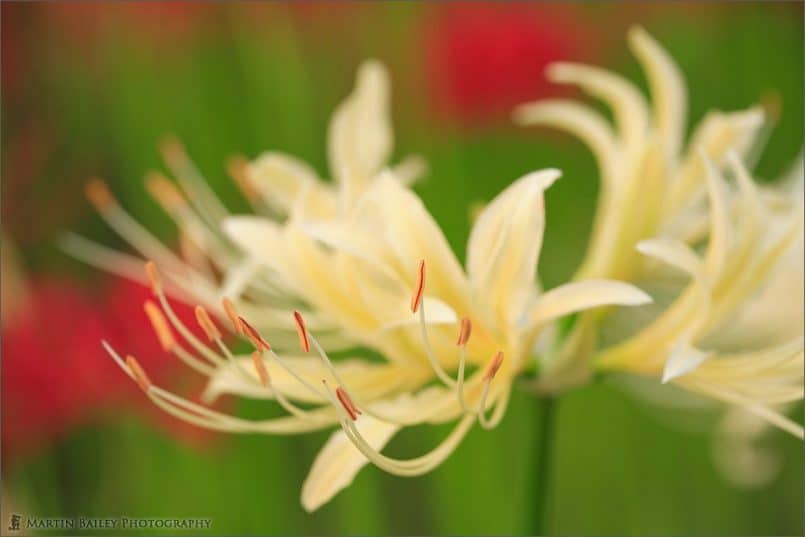
As I walked a little further around the path through the patch of flowers and woods, I noticed a number of white equinox flowers amongst the reds, and in the next shot, number 1119, you’ll see that I found one very close to the edge of the enclosure so I was able to make a nice macro shot. I lowered my tripod and got right down to the level of the flowers, as I wanted to play with the patches of red made by the other red flowers, so I had to be on the same level. I used an angle finder so that I could look down into the finder rather than also having to get right down to this same level. I was actually sitting on a post with a rope running through it to mark the edge of the enclosure and keep people out. The other great thing about using an angle finder is that it has the ability to flick a switch to double the magnification, allowing you to really fine tune the focus. I almost always switch to manual focus for macro work, and on this occasion I ensured that focus was spot on the anther in the centre of the image. This was almost parallel to a number of the other anther, so we have a few in focus, but even with the aperture set to F5.6 for this shot, you can see that the depth of field soon drops off as we move into the image. I touched on this earlier too, but notice here how I’ve positioned the blotches of red in the background. They touch on, but don’t disturb the main subject of the white equinox flower. They also add interest to the green that makes up the rest of the background, broken up really only by a few stems of the flowers. I have added one third of a stop exposure compensation here too, as the off-white flower was causing my camera’s meter to slightly under expose the image. Also, again at ISO 100 I now had a shutter speed of 1/8th of a second, so you can tell that light was now fading as the end of the day drew nearer.
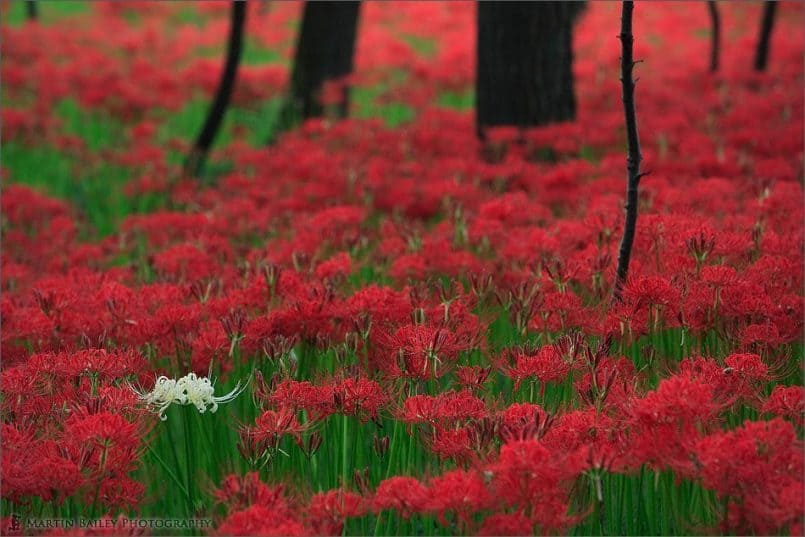
I moved around the patch of flowers for a while longer and found another white flower, alone amongst the reds but this time quite a way into the patch. In image number 1120 you can see how I singled it out with the tree trunks in the background and the single thin tree trunk in the foreground but to the right. I focussed on the main subject, which is of course the white flower, and I chose an aperture of F5.6 to get both the flower and thin tree trunk in focus, but nothing after that. It was getting darker by now, so I couldn’t simply use the depth of field preview button to check the depth of field, so I bracketed the aperture a little, also shooting F4 and F2.8 versions, but the depth of field was too shallow. This shot gave me just the right amount of focus. It also renders the rest of the shot slightly out of focus, but not so much that it’s unrecognisable, which gives us an interesting, but not distracting background. The shutter speed was now down to 1/6th of a second, which was attained by exposure compensating to the tune of minus one stop to keep the feel that it was now getting gradually darker.
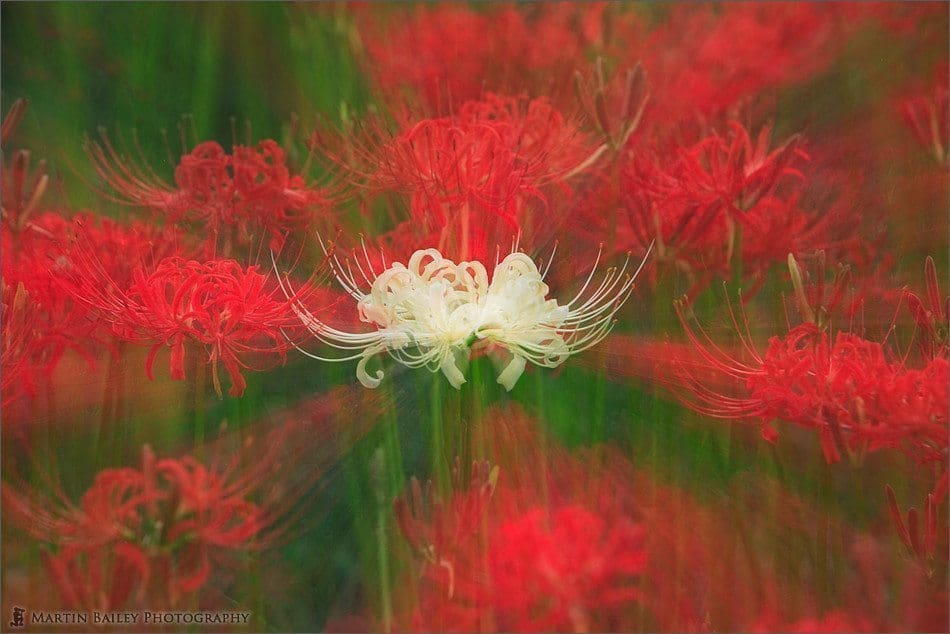
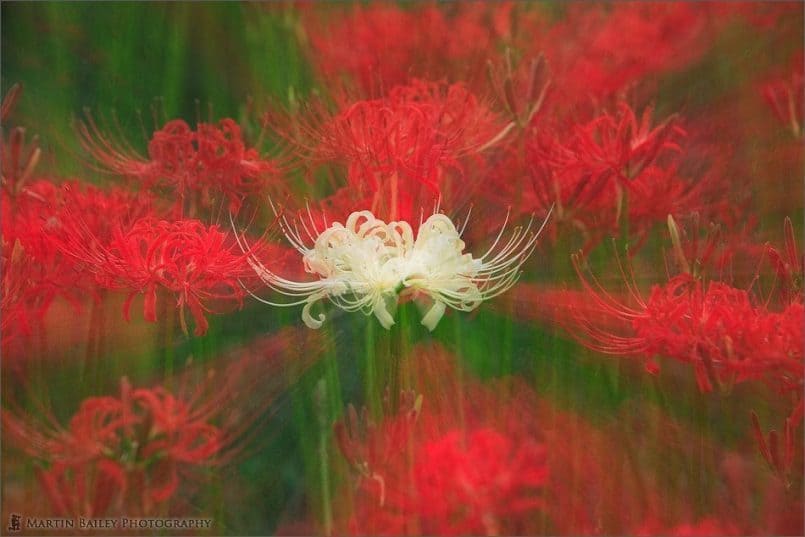
Now, I promised to introduce a weird technique today, and the next shot, image number 1121, is the one in which I employed that technique. This reminded me of the importance of keeping techniques like this in mind while shooting. I have never tried this myself, and it must be quite some time since I read about this technique in a book too, but when faced with a single white flower in a path of red, and ambient light requiring an exposure of more than 3 seconds at F8, I recalled a technique that I thought I’d give a try. Basically what I did here was set the camera on my tripod, obviously, and placed the white flower in the middle of the frame. I was using my 70-200mm lens, though any zoom lens with a range of more than 100mm would work, and I zoomed in too 200mm and set the focus. Again, I switch the lens to manual focusing so as not to loose the focus when I press the shutter button, and then I zoomed out to 70mm. I then tripped the shutter, and during the first two seconds of the three second exposure I slowly and steadily zoomed in from 70mm to 200, leaving the last second to burn the impression of the white flower more permanently into the image. The result is the reds of the flowers around the white one leave a trail, streaks of red radiating out from the middle of the image. The white flower doesn’t leave a trail because it is covering its own tracks as it grows in the image. If you look closely you can actually see the remains of some of the red flowers from the moment before I started zooming. One problem with this technique is that you have to place the main subject in the centre of the frame, but if you don’t over use it, I think it can produce some interesting effects, so you might want to give it a try yourself at some point. Of course, you could also try this technique in normal lighting conditions by using a neutral density filter, maybe an ND4 or ND8, to block out some light for a longer shutter speed. I just thought of the technique because of the conditions, but you don’t need to be governed by these conditions as long as you have the technology, i.e. the ND filters, with you when you want to try this.
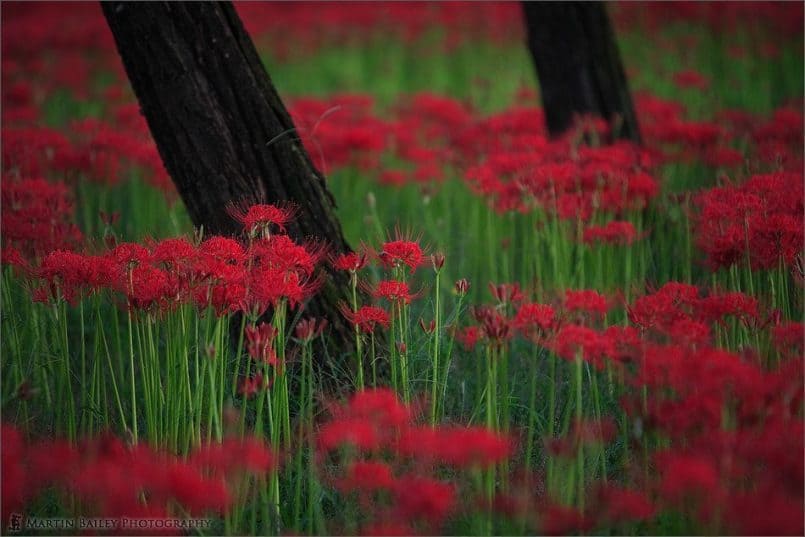
The last image I uploaded to my online gallery from these three hours shooting equinox flowers is number 1122. This one again was 3.2 seconds at F2.8 now, so you can hopefully appreciate that it was really quite dark by this point. I actually had a hard time finding my car in the dark about five minutes after this. I was in aperture priority mode and applied minus one stop exposure compensation for this image. Again, I used the graphic element of the tree trunks, but this time singled out just two that were leaning over, and I focussed on the equinox flower just in front of the left tree trunk as it was slightly taller than the others around it. A tip here is that as it is very difficult to focus on your subject when it gets this dark, if you are using a digital SLR, you can see what your camera gives you as a best effort, and tweak as best as you can by looking through the viewfinder, but then start to bracket your focus by turning your focussing ring very slightly either side of what you think it should be, and then check the results on your LCD. I actually shot five or six frames here to get the focus spot on. Also remember that at F2.8 the depth of field is very shallow, so it’s quite important to do this if you need accurate focusing, which is pretty much always going to be the case. I was quite surprised at how much colour ended up in this final image, with there being so little available light at this point, but I really like the overall effect in this shot. I like the patches of red separated out with the green areas in which we can see the flower’s stems, and the two tree trunks break it up nicely I believe. And that’s about it for today.
So, I hope you’ve enjoyed joining me during my three hours shooting equinox flowers here in Japan at the autumnal equinox. The few take-aways from today’s episode are, be careful of what your backgrounds are doing, even if you have blurred them out of recognition, keep various techniques in mind and use them when the opportunity arises, and you don’t always have go home when it gets dark. There can be some great opportunities lurking in the shadows.
Also I’d like to give you a quick reminder that the “Reflections” assignment is still in progress. You will be fine to upload your entry until midnight on Sunday the 22nd of October, just about anywhere in the world. Check out the assignment forum at martinbaileyphotography.com for more details. I’ll also put a link to the Assignment details in the show notes.
Also I’d like to say a huge welcome to all of those new listeners and forum members that have joined us during this last month. I know that many of you have found your way over here from the Photocast Network, so Welcome! I hope you enjoy what you’re hearing. Note that the archives are all still available in iTunes and on my Web site. If you go to martinbaileyphotography.com and click on the Podcasts link in the toolbar at the top of the page you’ll be able to browse the archives. If you want to see more than the last 12 episodes, just click on the link below the index or with any episode’s details to view them all, either in one big table or in a larger full text index. Also note that you can view any of the images I’ve spoken about today in iTunes or by clicking the thumbnail on the Podcasts page. And also by entering the number I give out with each image into the small field on the top page or the top of the Podcasts page on my site and clicking the orange button. Finally there’s a button with each Podcast to stream it directly to your desktop, and if you listen on a Pocket PC or other small form factor device you can browse the archives via the Light page, to which you can also find a link at the top of the Podcasts page.
So once again, thanks for listening, and that of course goes out to all listeners, old and new, and I hope you have a great weekend, as the episode is a little late this week. Enjoy yourself anyway, whether you’re out shooting or whatever you’re doing. Bye bye.
Show Notes
Music from Music Alley: www.musicalley.com/
Subscribe in iTunes for Enhanced Podcasts delivered automatically to your computer.
Download this Podcast in MP3 format (Audio Only).
Download this Podcast in Enhanced Podcast M4A format. This requires Apple iTunes or Quicktime to view/listen.


0 Comments