Much of the Nikko area in Tochigi Prefecture, a few hours drive north of Tokyo, is perched high in the mountains, and is very close to the Japanese people’s hearts. Nikko is the synergy of Culture and Nature. Last week we looked at some shots from two Sundays I spend in Nikko in May 2006, and this week, although we’ll initially look at another view of the famous Kegon Falls and some landscapes in the area, we will also take a look more into the cultural side with some shots from the Toushouguu Temples and Futarasan Shrine areas.
To give you a brief outline of the Nikko area, Nikko is split mainly into two areas. The area we visited last week perched high in the mountains at around 1,400 meters, and then the Nikko City itself, where there are 103 Shrines and Temples. Nine buildings are registered as World Heritage national treasures and 94 of them registered as important cultural property and natural environments. Forty two of these buildings are in the Toushouguu Shrine area, 23 are in the neighbouring Fatarasan Shrine area, with the remaining buildings in the surrounding area. Before we take a look at just a few images from the Nikko shrines at Toushougu and Futarasan, let’s look at a few more shots from the highland area that we also discussed last week.
The first shot for today is image number 1000 of the beautiful Kegon Falls. This was shot with my 16-35mm F2.8 lens, using a tripod of course, and the ISO was set to 100. The shutter speed was 1/4 of a second with an ND8, 3 stop neutral density filter, to show a certain amount of movement in the water by making it a flowing stream and not freezing the motion as a faster shutter speed would have done, and the aperture was F11. Most of the scene was quite far away from me, and at a focal length of 21mm, that is plenty to attain pan-focus. That is, where everything is sharp from the nearest object in the image to the farthest.
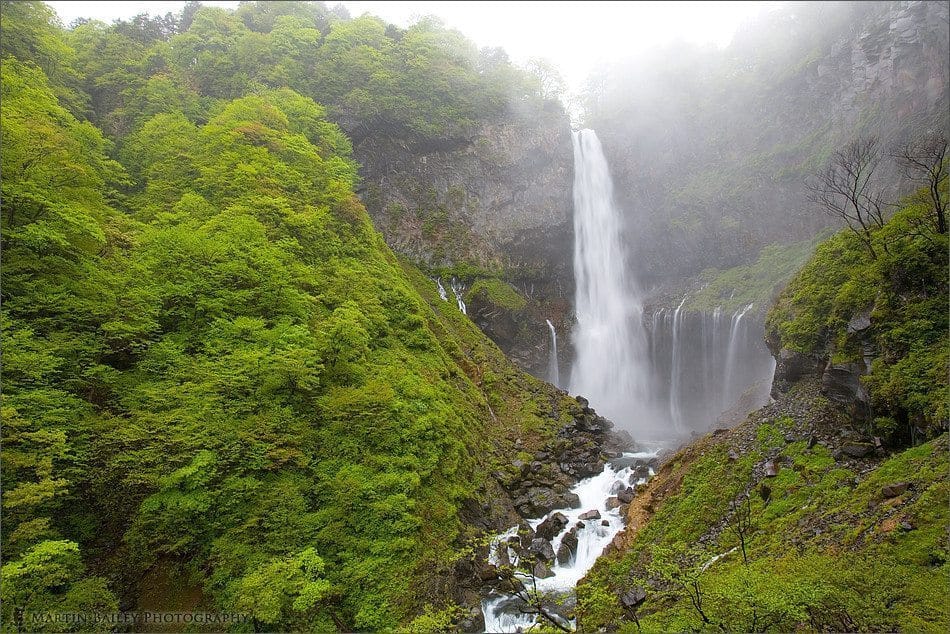
Kegon Falls in the Rain #1
Again, as I mentioned last week, the fact that it was raining on this day meant that the fresh spring greenery, being all wet, was recorded as a beautiful lush green that is just not possible on a bright sunny day, even at the same time of year. The overcast sky helps to give even lighting to the scene, as basically the whole sky is just one big diffuser box, like the ones you can put on the front of flash units. The cloud is creeping over the top of the mountain in the top center to left from the Chuuzenji lake that we can see in one of the shots I showed you last week, and this helps to add depth to the shot as the trees in the top right of the shot are quite highly contrasted against the mist and the farthest parts of the scene are basically quite low contrast because of it.
Also before anyone says it, no this shot does not need rotating a degree or so to the right. I always use a spirit level in my flash shoe when using a tripod and I can assure you this image is straight. The waterfall is flowing with such force due to the rain that the volume of water is pushing it further away from the rock face as usual making this optical illusion. I really like this and the other shot that I uploaded of these falls, just because of the misty, moody feel. I think this shot has a lot of atmosphere, and I hope it comes across in this smaller version that you’ll see in iTunes or on my Web site.
I had shot the Ryuuzu or Dragon Head falls also after shooting at this location on this day, but as we discussed that last week, in comparison to the nice bright day version from the previous week, we’ll skip those images today. After shooting the Ryuuzu falls we headed down the Irohazaka, which is a very steep winding road that leads back down to the Nikko city area. Let’s look at image number 1009. On the way down the Irohazaka, when there are not so many cars and tourist buses around, you can sometimes pull the car up at the side of the road and get out to shoot some pictures. The bus drivers as they come around the bends, which is usually where the best shots are visible from, get frustrated if you have a tripod setup taking up part of the road, as this makes them have to work harder to swing their bus around. For handheld shots you can get right up against the white crash-barrier at the side of the road as I did for this shot, and that way you don’t annoy anybody. I had a bus driver shouting at me last autumn for getting in his way, but I don’t see any no photography or no parking signs, so generally try to avoid doing this just to keep the peace. If the shot is available no other way though, just try to get as close to the barrier as possible without being in danger of toppling over it.
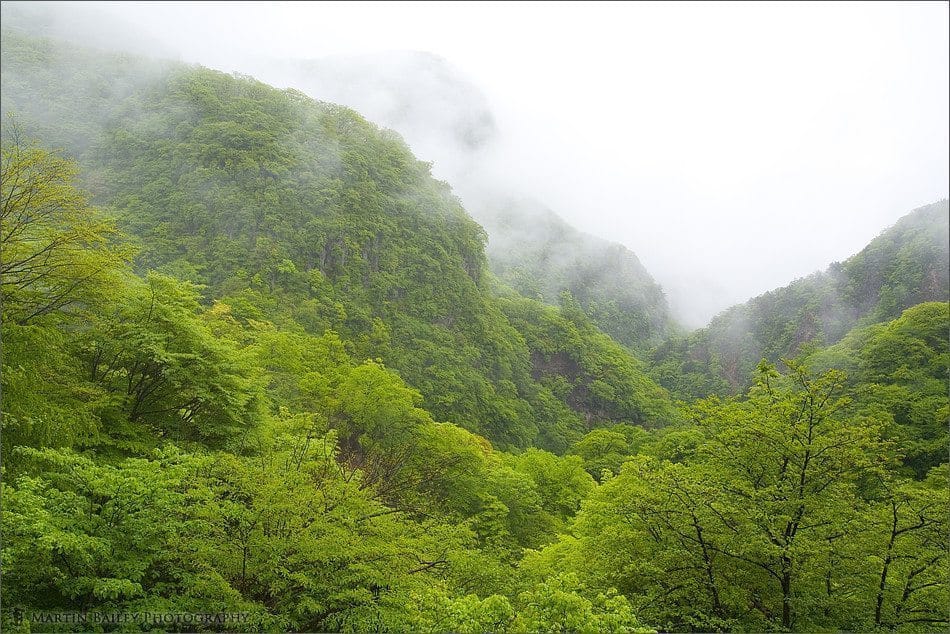
Misty Spring Mountain
This particular shot was again shot with my 16-35mm lens at ISO 200 as I was hand holding, and still at F11. Exposure time was now 1/100th of a second which is plenty fast enough for hand holding at 31mm. I was also using plus 1/3 of a stop exposure compensation, as the large expanse of white mist and cloud and the bright green foliage was fooling the camera’s meter into under exposing this image just slightly. I also shot some images from this point that were a little bit wider, containing more of the mountain to the left, but I felt that it was not adding anything to the scene, so I went again with this slightly more tightly cropped version.
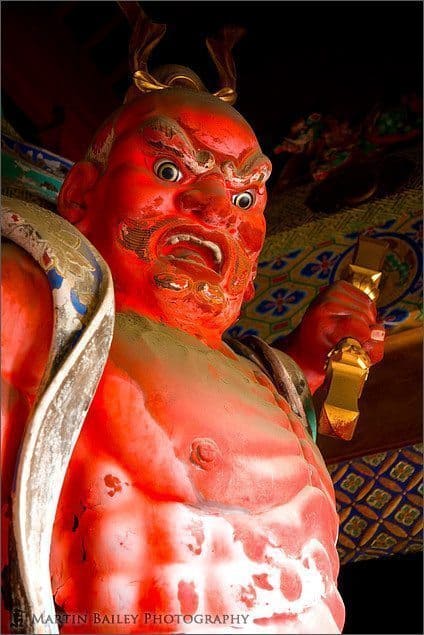
Nioh Statue
After descending the hill completely and reaching the Nikko City area, we now headed for the Toushouguu temple area. On the way into the main area there is a gate called the Omote Mon, which basically just means the front gate. This gate is guarded by a security guard to stop anyone going in that has not bought a ticket, but it is also guarded by a Nioh Statue at either side. I shot the one on the left on the way in, but the more successful shot was actually the one on the right as I came out an hour or so later, but we’ll look at that first. It is image number 1012. You will see a fearsome looking fellow, painted in the bright red that is common to many Japanese temples and shrines. Red is believed to ward off evil, and this guy looks like he will definitely be accomplishing his purpose.
I hand held this shot resting my elbows on a wooden ledge, looking up at the statue. I chose this perspective as I find looking up at this guy with his sword about to thrust down upon us helps to make him look as menacing as he can. I was shooting at ISO 400 with my 24-105mm F4 lens, wide open at F4 to get as much light onto my sensor as possible. I had the image stabilizer turned on and the shutter speed was 1/8th of a second at 70mm. I shot in a burst of about 3 or 4 shots though due to the slow shutter speed and indeed some of them were slightly blurred. I selected -2/3 of a stop exposure compensation as the shadows behind the statue would have fooled the camera into over-exposing the statue, even though as I’ve mentioned before, I always use center-weighted metering. Note that by Center Weighted, I’m using the Canon definition, which is where the camera weights the priority in the center but still is averaged for the entire scene. Please do not confuse this with Evaluative Metering, where the entire scene’s average is used, or Partial metering, which is where the center 8% of the scene is metered, or Spot metering, where just the center 3.5% of the scene is metered. To confuse matters, it seems that Nikon use the term Center Weighted to refer to what Canon refer to as Partial Metering, you’ll need to check your manual if you want more information on the various metering modes available for your camera. Basically though, I pretty much always have my camera set to Center Weighted metering, sometimes switching to Partial or Spot metering for more accurate readings from a small area.
Shourou (Belltower)
Moving on though, let’s take a look at image number 1011. This is actually a bell tower inside the Toushouguu grounds. I chose this shot to upload and to talk about today to give you a taste of the sort of architecture within the grounds, but this really does not do Nikko justice. The temples themselves are difficult to get full shots of, because even on rainy days like the one I visited on, the place is usually teaming with tourists. Most shots you see of the temples and shrines at Nikko are either just the tops of the buildings, to cut out the tourists, or they have the full building but the bottom half of the shot is indeed full of tourists. I dare say, if you really wanted some nice serene shots of the buildings you could spend the night in a hotel close by and get there as early as possible in the morning to beat the crowds and get your images, with some patience. I personally have never done that so far, and I’m not that bothered about doing so, despite the obvious beauty of the buildings.
Without going into too much detail, the temples and shrines of Nikko came to be from an original commission for a small temple to be built to house the body of Ieyasu Tokugawa, a Shogun lord, born during the feudal period of Japans history. Ieyasu is accredited largely with bringing peace to Japan, and when he died on April 17th, 1616 at the age of 75, he left a will instructing his body to be enshrined for one year in Mt Kuno in his hometown of Shizuoka. After that he had instructed that a small shrine be build in Nikko in which he was to be enshrined as a God and said he would be the guardian of Japan. Nikko is in the North of Japan, and for a long time the North was regarded as evil and barbaric. Ieyasu wanted to be enshrined there to protect Japan from the evil that lay within, and he wished for eternal peace under the Tokugawa government.
Although he’d requested just a small shrine, his third successor Iemistu rebuilt the area in today’s form which is really way more than Ieyasu had originally requested but probably more befitting one of the most powerful and influential Shoguns that Japan has ever known. The Nikko temples and shrines cost around 40 billion yen. That is 40 billion in the US or I guess 40 thousand million in the UK. This equates to around 400 million dollars in today’s terms. 4,540,000 people were involved in the reform, which took just one year and 5 months, and was completed in 1636.
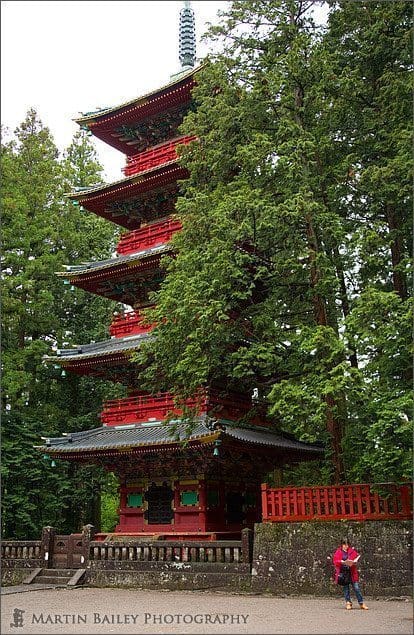
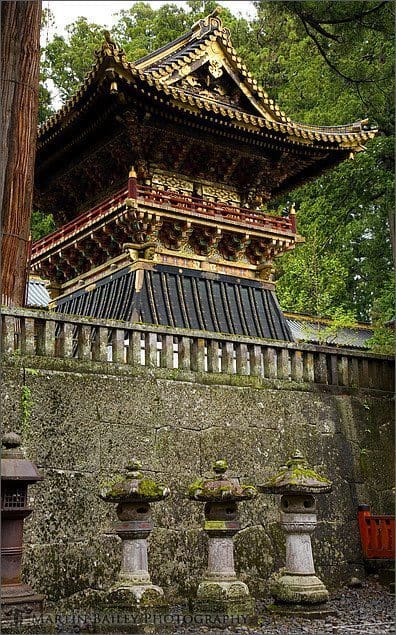
Five Storied Pagoda
Most of the inner buildings are covered in ornate carvings and many painted in bright colours or clad in gold leaf. I appreciate their beauty but have never to date been able to photograph them in a way in which I like, partly because of the crowds, but also probably because I prefer more subdued colours as opposed to bright sparkling, almost gaudy colours. Having said that, the next shot, image number 1013 of the bright red Five Storied Pagoda just outside the Front Gate with the Nioh statue we looked at earlier, could well be considered gaudy, to a certain degree. I posted this shot and included it in today’s Podcast to talk about the thinking behind the shot.
As I turned and walked down the stone steps after shooting the Nioh statue, I noticed this lady standing looking at a map to the right of the pagoda, and her striking red jacket match the red of the pagoda, and there was no other subject in the shot for a second or two. I snapped off a couple of shots before a number of other people walked into the frame, but was pleased to have noticed the matching colours and to have acted quickly enough to get at least an OK shot. In my haste I did make this hand-held shot slightly skewed. I had to rotate it in Photoshop after the event, but saved something out of the moment. It was shot at exactly the same settings as the last shot, as I didn’t have time to change anything, but the exposure compensation was now at -1 stop, as I think I had shot my last shot of the Nioh statue at -1. I hadn’t worried too much about the aperture though, as although F4 is quite wide, it was going to be enough to get the pagoda in focus and I just made sure that I focused on the woman in the red coat as she was to become the focal point of the shot, not the historical building that has already been photographed millions of times before this capture.
As you descend the stone steps from the Front Gate of the Toushouguu grounds, if you turn right and walk between the grounds and the 36m tall Five Storied Pagoda, you’ll be faced with the scene from image number 1014. This whole row of stone lanterns and the red wall leading down the right of the image is called Shinmon, or God Gate, and it leads to the Futarasan Shrine. For this image I closed the aperture down to F8 to get a little more depth-of-field, but I didn’t want pan-focus as this was have reduced the feeling of depth that we get from having the scene go slightly out of focus as we get deeper into it. I was still at ISO 200 and was hand-holding at 1/15th of a second, and -1 stop of exposure compensation. The shot looks normal as far as brightness is concerned, but this is thanks to the exposure compensation. On overcast days such as this you will often find that the camera wants to make them brighter than the scene really is, so under compensating a little can help to normalize things.
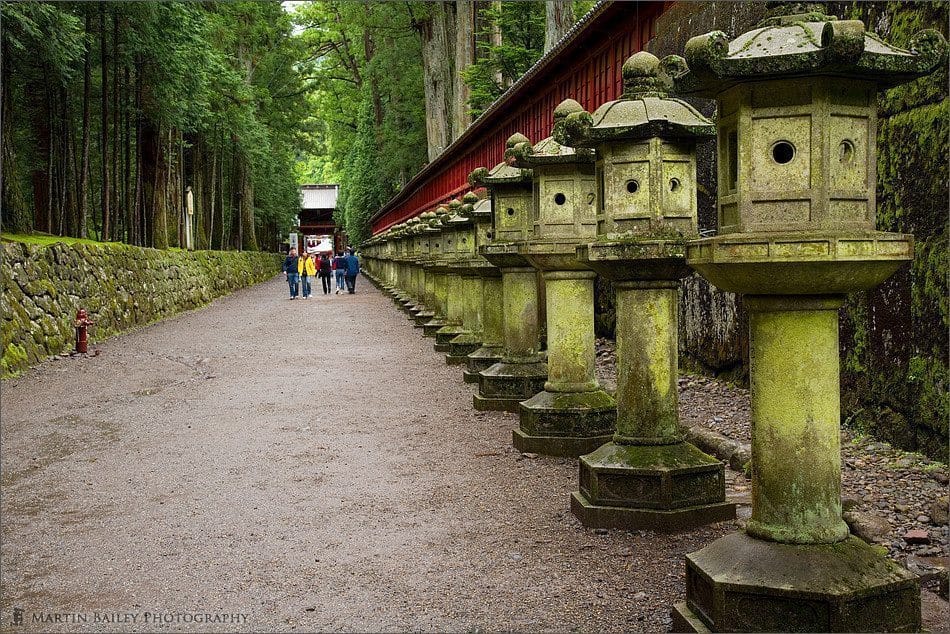
Futarasan Shrine Shinmon Gate
I could have used a tripod here, but I’d also like to stress that on this day I was with my better half and a friend visiting from India, so I couldn’t really take very much time on my shots. I had to get the shot, and get a move on pretty much most of the time. The only time during this day that I used my tripod was to shoot the falls that we looked at last week and earlier today. I enjoy using my tripod when I can, especially for landscape work, as it helps me to think more carefully about composition etc. but I think it’s also important to be able to shoot hand-held when necessary too and still get results.
The next shot is number 1016, and was shot inside the Futarasan outer grounds. This is actually a building or kind of a wall around the garden next to the Shrine’s office. I included this as I like the contrast between the bright greens and the reds, but also the witches broom propped up against the wall in the center of the image adds a little reality to the overall image. From this we can learn that people are living and working here, sweeping up fallen leaves in their daily lives. Again I was under compensating by 1 stop, with an aperture of F5.6 and shutter speed of 1/125th of a second with ISO 200 still, and still using my 24-105mm F4 lens at 55mm for this shot.
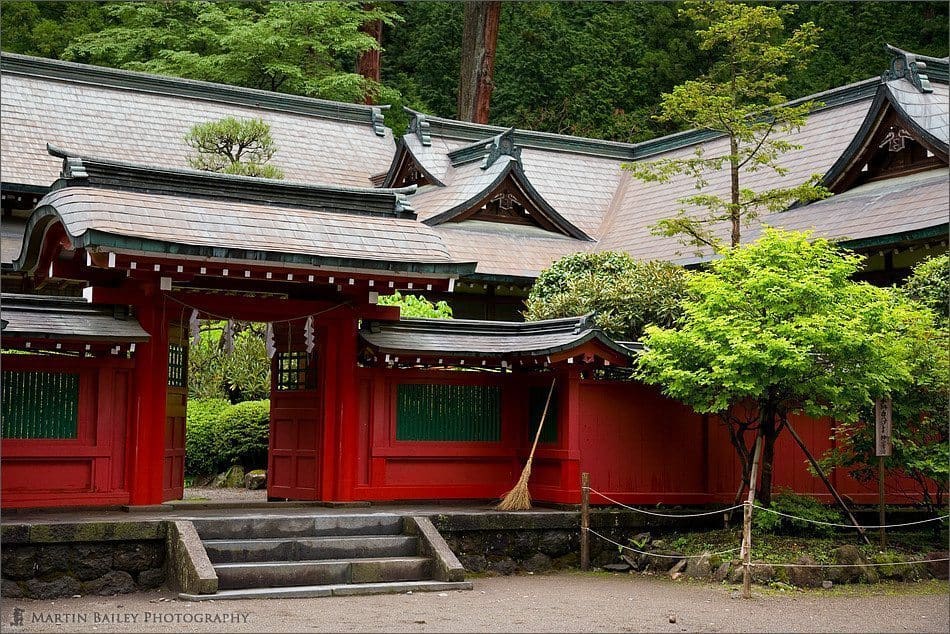
Futarasan Shrine Office Buildings
I you walk back out of the Futarasan Shrine, to right is a bank, which is what I shot in image number 1017. Again, I just like the contrast between the bright green of the wet moss in the foreground here, with the red fence out of focus in the background adding a little extra interest. I didn’t want to keep my company weighting while I changed lenses, so despite having an F2.8 100mm macro lens in my pocket, I chose to go with the 24-105mm lens already mounted, and just opened it up to the widest aperture of F4. This was enough to throw the red fence out of focus as I wanted, so I’m quite pleased with the results. So as to keep the green bright now though, I’d raised the exposure compensation to -2/3 and the shutter speed hand held was 1/50th of a second for this shot at 75mm.
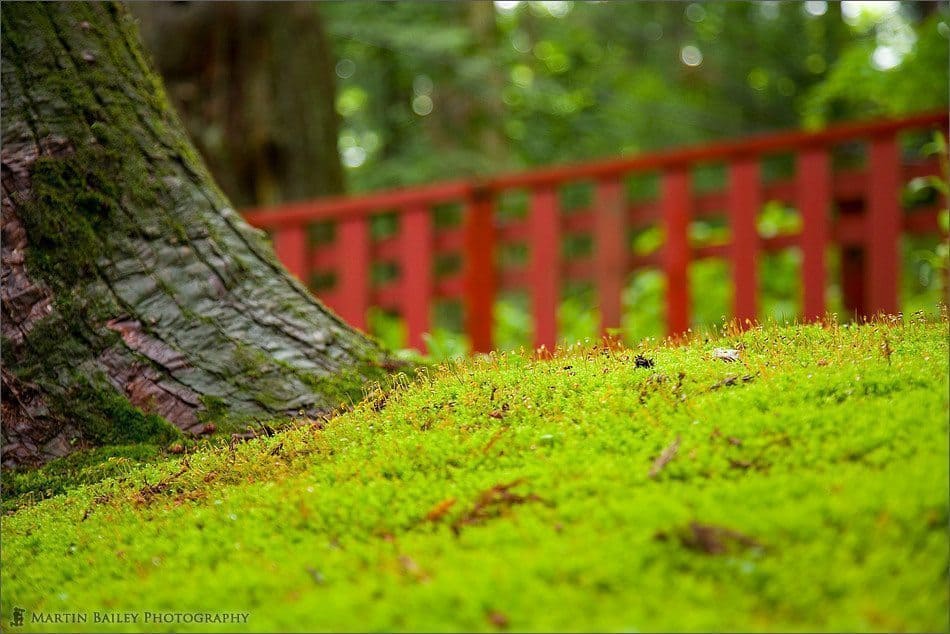
Moss with Red Fence
The last shot for today (1019) was something that I spotted from the car on the way out of the Nikko area on the way back to the highway to head back to Tokyo. This is a simple shot of the raindrops ripples in a rice paddy shot with my 100-400mm lens at ISO 400 at F5.6 and a shutter speed of 1/200th of a second. I was OK hand holding as I was resting the lens on my car door with window open. The lens was getting wet, but it’s splash proof because it’s an L lens, so I just wiped it off after I finished shooting. This simple shot kind of wraps up this two part series from two Sundays in Nikko in May of 2006. I will be going back to Nikko many times since becoming a little more free after buying a car in December 2005, but for now, this is my most recent Nikko experience.
One thing that I must say before closing, about Nikko and for that matter much of Japan, is that both Buddhism and the Shinto religion can live side by side in places like Nikko without everybody trying to kill each other and blow up each other’s places of worship. Although this is a pretty touchy subject, and I’m sure that many of those that were held captive in prisoner of war camps will have a very different opinion, in general the Japanese are an incredibly peace loving nation. I do so wish that many of the other countries and religions around the world could take a leaf out of their book and live together in peace and harmony as the main religions of Japan do today.
Even if you didn’t tune in last week, most of you will have now noticed that this Podcast is now available as an Enhanced Podcast, which means if you listen on an iPod the images I speak about will change automatically as the Podcast progresses, and are viewable freely by navigating between chapters. For anyone that does not use iTunes or and iPod to listen, I have also created a new feed that you can subscribe to that contains the MP3 version of the Podcast that has no chapters, but will enable you to continue to listen as you have done to date. The address for this feed is available on my Podcasts page and is also in the show notes.
Finally, remember that there is still just under two weeks left of the Rainy Day assignment, which closes on June 25th, so if you still haven’t posted your entry, please take a look at the detail in the Assignment Forum, and if you didn’t listen to the original Podcast on this assignment, you can go back to Episode 37 for more details. There are some great images already uploaded to the assignment gallery, and I can’t wait to see what the rest of you make of this assignment.
Thanks very much for listening, and enjoy your week, whatever you’re doing. Bye bye.
Show Notes
Music from Music Alley: www.musicalley.com/
Subscribe in iTunes for Enhanced Podcasts delivered automatically to your computer.
Download this Podcast in MP3 format (Audio Only).
Download this Podcast in Enhanced Podcast M4A format. This requires Apple iTunes or Quicktime to view/listen.

0 Comments