Welcome to this week’s episode which is number 13. I hope this doesn’t turn out to be unlucky. Last week was definitely a lucky week for me. If you didn’t catch Chris Marquardt’s Tips from the Top Floor show 74, then take a listen. I was interviewed by Christ, and it was released on Friday the 25th of November.
The interview came about because a member on both mine and Chris’s forum, called Prism posted a link to my show on Chris’s forum and I found the link and the conversation that followed it and jumped in to answer a few questions and Chris read the post and we got together. I must say, Chris is every bit the nice guy that comes across in his Podcasts.
Of course, none of this was planned, and I certainly didn’t put Prism up to this. But as a thank you anyway, today’s show is going to be about something that Prism posted a request for information about in my forum, which is how I made a shot in my gallery with my Tilt/Shift lens, which is a Canon TS-E 24mm f/3.5 L lens. We’ll get to the shot which Prism mentioned in a short while, but first I’ll explain about the lens and work my way to it.
Anyway, today’s show is for Prism. Thanks mate.
Tilt/Shift lenses are most commonly known for their application in architecture photography. Tilt refers to the action of angling the lens relative to the film plane so that they are no longer in their normal positions and the optical axis of the lens is no longer at right angles to the film plane. With a tilt angle of zero, the image is focused on a subject plane that is parallel to the film plane, and the nearest and furthest focal points are determined by the depth of field. This means the camera cannot focus on a subject that is outside the depth of field provided by the aperture setting.
If you want to make an image containing objects that are say at an angle to the film plane, but you don’t want to, or you simply can’t achieve a wide enough depth of field to get all the subjects in focus, you can tilt the lens so that the focus plane is the same as that of the angle of the subjects. You can tilt the focus plane so that it is closer to the camera on the left and further away on the right, or visa versa. By rotating the lens by 90 degrees clockwise or anti-clockwise, you can tilt up or down in stead of to the left or right, and that allows you to lay the focus plane down, so that it is closer to the camera at the bottom of the frame and further away at the top too. And again, the opposite is possible by tilting the other way.
First, let’s take a look at photo number 638, which illustrates what happens when the lens is tilted downwards. I’m not going to continue to explain this every week, but for listeners new to this show, if you are listening in iTunes, you can view the photo by clicking on the thumbnail in the bottom left hand corner. To view the next images just click the right arrow above the thumbnail to move through them, clicking on the thumbnail each time to view the image. If you are listening on an iPod, for now you will only be able to see the first shot until Apple or someone releases a chapter tool for the Windows OS. If you have access to the Internet while listening, you can view the images on my Web site at martinbaileyphotography.com, by entering the number I just gave you into the little box under the Podcast section on the top page, or in a similar box on the Podcast page. Another way to view is to jump to the Podcast page and find the episode in the table, then click on the thumbnails. If you view the shots in my online gallery you can also see all the other shooting data below the image.
Anyway, once again, this shot is number 638, and was made with an aperture of F5.6 at 1/125 of a second. It is easy to see that all the flower heads are in focus, which would simply not be possible without laying the focus plane across the head of the flowers. You can also possible see if you look closely, that the shorter flowers at the front of the frame, the ones lower than the white poppy and the higher red poppies, are out of focus. These are too low in the shot and out of the depth of field given by the F5.6 aperture.
Let me read to you a brief explanation of Scheimpflug’s Law – When the extended line from the lens plane and the extended lines from the subject plane and the film plane intersect at the same point, the entire subject plane is in focus. Sounds cool doesn’t it?
Moving on… The other feature of this lens is called Shift. Shift refers to the action of moving the lens sideways parallel to the film plane so they are no longer in their normal positions and the optical axis of the lens no longer passes through the center of the film plane.
Shift is used to straighten up converging lines, such as those you’ll see when you photograph a building looking up at it. The base of the building is larger because it’s closer to you and the top of the building looks smaller because it’s further away. When you shift the lens you make the top of the building look larger, and can effectively straighten it up.
I’m not sure about Tilt/Shift lenses from other manufacturers, but with the Canon TS-E lenses, you can use Tilt and Shift together by say first shifting the lens to straighten a building and then also ensure the entire face of the building is in focus by tilting the lens, moving the focus plane to that of the building face.
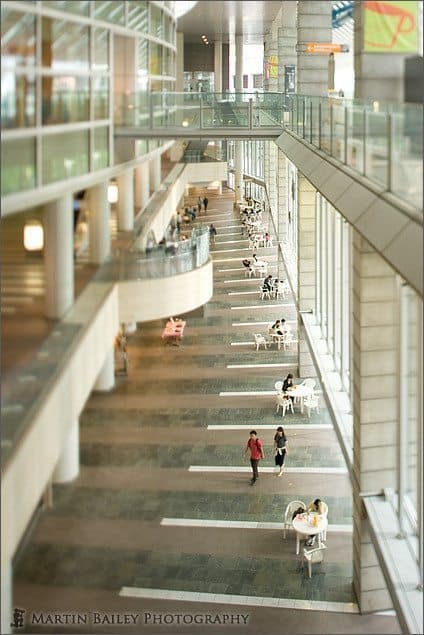
In this photo I used both the Tilt and Shift functions together but not in the conventional way. In this shot of the lobby of a building in Shinagawa here in Tokyo, I tilted almost the whole way to the right to make the focus plane run from just right of the center of the frame to the center back.
I also used the shift function to straighten up the pillars of the building. Without doing this the pillars would have been converging in at the bottom of the frame as they moved further away from me looking down on them. I set the aperture to wide open, which is f/3.5 for this lens, to get the shallowest depth of field possible. The resulting image looks pretty surreal with both sides of the image out of focus. For some reason I feel it’s almost like looking at a model photographed with a macro lens or something.
It was mainly to make shots like this that I invested in a TS-E lens. I may take some architecture shots given the chance, but I’m not running around looking for these chances. I will also at some point find this lens useful for straightening up say a rock face or a waterfall or something in Landscape photography, but as of yet have not used it to do so.
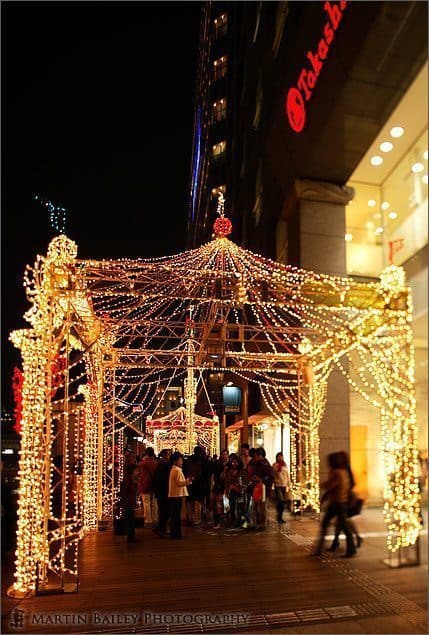
I should mention that I recently replaced the focusing screen in my EOS 5D for the Precision Matte focusing screen Ee-D, which is the one with the grid lines. This makes using the TS-E lenses much easier, as I found last weekend when I visited Shinjuku here in Tokyo and shot the next two photos for today, the first of which is number (right). I planned this shot before leaving the house, and in fact only took the 24mm TS-E lens and my 24-105mm F4 L lens.
The reason for this is that I knew that the illuminations in the two shots were going to require a lot of depth of field, but it would be dark when I made my exposures. I also thought it might make a nice effect, and I’m relatively pleased with the results. This first shot with the orange lights allows you to see that both sides of the shot are out of focus, but the center is in focus right to the back of the frame. I shot this at F5.6 at 1/10 of a second at ISO 400. Needless to say an aperture of F5.6 would not have produced a depth of field deep enough to keep the illuminations at the back of the shot in focus.
Note also that I probably could have shut the aperture down to around F8 or maybe even F11 and although it would have resulted in more of the people in the shot being blurred, I probably would have achieved pan-focus, which is where the entire image from the foreground to the background is in focus.
Anyway, I hope these shots illustrate the point that the focus can be tilted from being in line with the film or sensor plane, to being almost 90 degrees from it into the back of the frame.
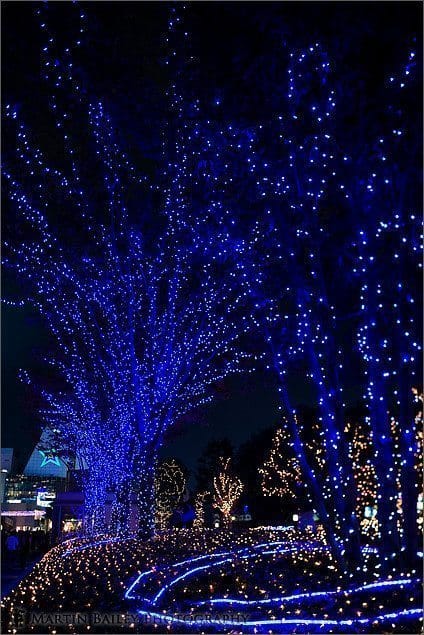
The last shot today doesn’t really illustrate this effect that well, but I’m going to include it anyway. With the blue lights on the trees, I used the TS-E lens to keep only the blue lights on the trees at the back left in focus, and the trees to the right, including the orange trees across the path, are out of focus, adding to the slightly dreamy effect of the image. To increase the effect a little I opened the aperture to F5.0.
Other uses for TS-E lenses include being able to recompose the shot, such as it looks as though you were standing further to one side than you actually are. This is useful for example of taking a shot of an object with a shiny surface in which you might catch your reflection if you stand in front of it to take the shot. You can stand to the side slightly but then shift the lens so that it appears as though you are standing directly in front of the lens. You can also do this to create panorama shots. To do this, mount the camera on a tripod and take one shot shifted to the right, one in the center, then one to the right without moving the camera. The result is three shots that can be stitched together to make one wide panorama shot, but you won’t get the usual perspective distortion that you get by doing this by panning your camera with a normal lens. I’ve not used my lens for these last two uses, but it’s worth bearing them in mind if you have a TS-E lens.
Canon does three TS lenses for the EOS camera range. The one I have is the 24mm, and there is also a 45mm and 90mm lens, both with an aperture of f/2.8. Nikon also do a range of TS lenses, but I’m not sure about other manufacturers. If you are interested in a TS lens for your camera I’m sure a quick search on the Internet will turn up a supplier you can work with.
If you already have a TS lens and weren’t doing so already, I hope this will give you some ideas on how to get a little creative with it.
So, that’s about it for this week. Don’t forget that there are just two days left to the end of November, so if you want to be in with a chance of winning an original print at A3+ of the shot of your choice from my online gallery, all you have to do is make one post or more in the Forum at martinbaileyphotography.com. Registration is free if you are not already a member. See you there. Even if you don’t want an original print, your feedback is very welcome and can be done either in the forum, by private message from the forum, or via the Contact Form on the Podcasts page at my site.
Happy shooting! And I’ll see you next week.
Show Notes
The Music in the first 28 Podcasts is copyright of William Cushman © 2005, used with kind permission.
Audio
Subscribe in iTunes for Enhanced Podcasts delivered automatically to your computer.
Download this Podcast in MP3 format (Audio Only).




0 Comments