Visit Library for MBP Pro eBooks |
Still going stir-crazy here in Tokyo as the government swings between trying to keep the economy alive and trying to keep the population alive, I am watching the winter flush down the toilet, and having spent 20 hours straight on Monday trying to fix a broken website, I needed some therapeutic relief, and it needed to involve my camera and something pretty. My car battery has shuffled off its mortal coil too with me not driving it enough, so I took my trusty jump starter battery down to our car park, lifted the hood and started the car, then drove to my local garden center.
Somewhat disappointed that they only had a few bunches of flowers left, I reminded myself that it was already after 3 pm and bought two bunches then jumped back into my car before the brief charge the battery had received from the 10-minute drive was depleted, and drove back home to my studio. My Profoto strobe was already set up in a softbox, so I drew down my dark cloth background, placed the flowers on the table, and grabbed my macro lenses. I selected a Jazz album from trumpet player Ibrahim Mallouf to keep me company as I set about the task of driving myself sane with my camera and the newly acquired flowers.
I had two goals, which I’ll talk about in detail as we work through this today. The first was to shoot some soothing bokeh-filled abstract images which generally require a relatively shallow depth of field, and that isn’t difficult to achieve with macro photography, although the balance can be a bit tricky. The second goal was to finally figure out how to shoot another flower reflected in a water droplet. I’d tried this a number of times in the past but the technique had somehow escaped me until now, so I was determined to get this new arrow into my quiver. My plan was to spend the rest of my Thursday afternoon shooting and then create a Podcast about the experience on Friday. By the end of Thursday, I had my dreamy bokeh shots, but the droplet reflection required more time, so I picked up the process on Friday morning. I had a lot of fun and figured it all out, but as I sat down to prepare for this post it was already after 4 pm on Friday, so I had to finish and release this over the weekend.
We’ll start actually with this shot of my setup, as it’s important to understand how I got the look that I did in these images. As you know, I’ve switched to the Canon Mirrorless system and now using the EOS R5 as my main camera. I’ve replaced most of my EF lenses with RF lenses, but the Canon RF 85mm macro lens is not going to be a part of that. I don’t need a macro lens that can not shoot 1:1 or life-size images, and the 85mm only goes to 0.5 magnification, not 1:1, so it doesn’t really interest me.
Lifesize means that at the closest focus distance of the Macro lens, the subject on the sensor will be exactly the same size as it is in real life. So, for example, if I was to photograph a coin that measures say 20mm across, it will measure 20 mm on the sensor. A full-frame 35mm sensor is 24mm x 36mm, so that would leave 8mm on either side of the subject. I am still using my EF 100mm ƒ/2.8 Macro L lens, which takes me to life-size, or 1:1 magnification, and what’s even more fun, is that I still have my MP-E65mm ƒ/2.8 1-5X Macro lens, which is what you can see in this photo attached to my Canon EOS R5 via the EF to RF Control Ring Mount Adapter. I enjoy not having to use the adapter for my RF lenses, but for this work, I am happy to have the option to continue to use my old lenses.
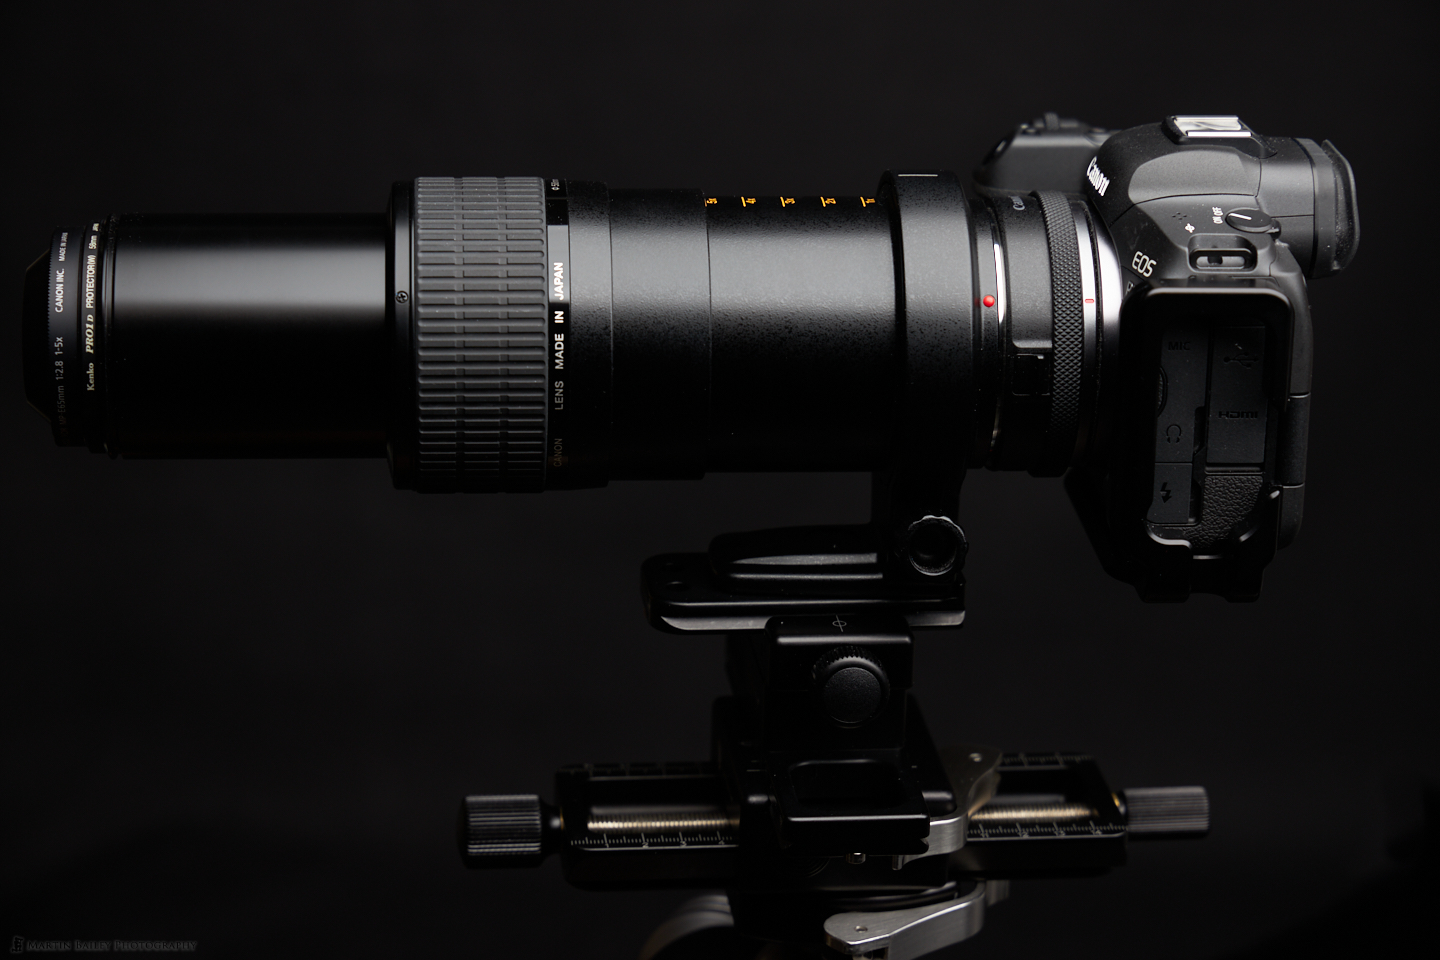
The 1-5X designation in the lens name actually indicates that this lens enables me to photograph subjects up to 5X life-size, and as you’ll see, that enables some pretty close macro work, almost in the microscopic range. In this photo, I have extended the lens to 5X magnification. You can see the five yellow markers on the top of the lens barrel, and note how the front of the lens protrudes out almost as far as the length of the main lens barrel. The other thing to note about this lens is that there is no focus mechanism as such. You move the lens back and forth until the subject is in focus, and you can actually use the magnification zoom to focus as well, but that, of course, also changes the magnification, so if you don’t want that to happen, you move the lens.
That’s where the Macro Rail that you see the lens mounted on also comes in useful. With that, you can fine-tune the distance of the lens from the subject with the screws at the front and back of the Macro Rail. I used this setup for most of the images that we’ll look at from the first day of shooting, but for the droplet shots that we’ll also look at, I was mostly hand-holding the lens. That is possible because I was using a studio flash in a softbox, as opposed to natural light, which would have required me to continue to use the tripod and Macro Rail.
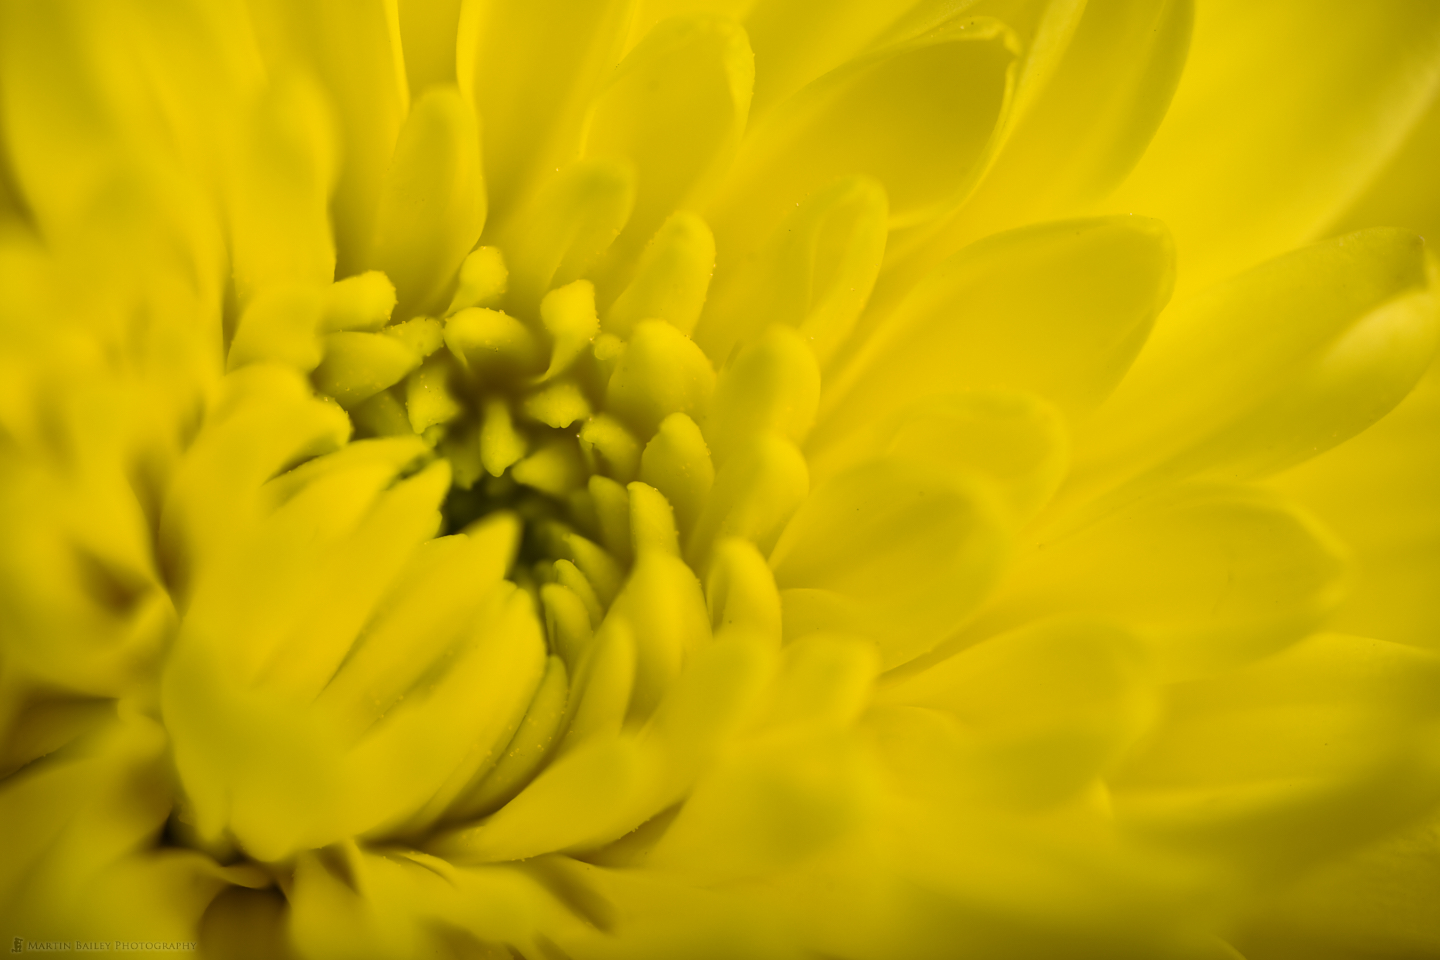
This first flower photo was shot with the lens set to 1X so this is exactly life-size, as in the flower is recorded on my sensor at exactly the same size that it is in real life. This shot is really to show you some detail before we dive into higher magnification. I left the aperture at ƒ/4, as I wanted to start to introduce some soft bokeh, but at this magnification, we still see a fair amount of detail. I enjoy how the tips of the petals are gradually reaching out of the bokeh though, and the top right and bottom center are starting to get a little bit dreamy too.
I’m not aware of any way to find out what magnification I was shooting at just from looking at the EXIF data in Capture One Pro. I’m using RawDigger to dive in find that information from deeper in the EXIF data than most image editing software will allow me to see. If I’m not mistaken, it was my friend Don Komarechka that originally put me on to RawDigger for this very reason.
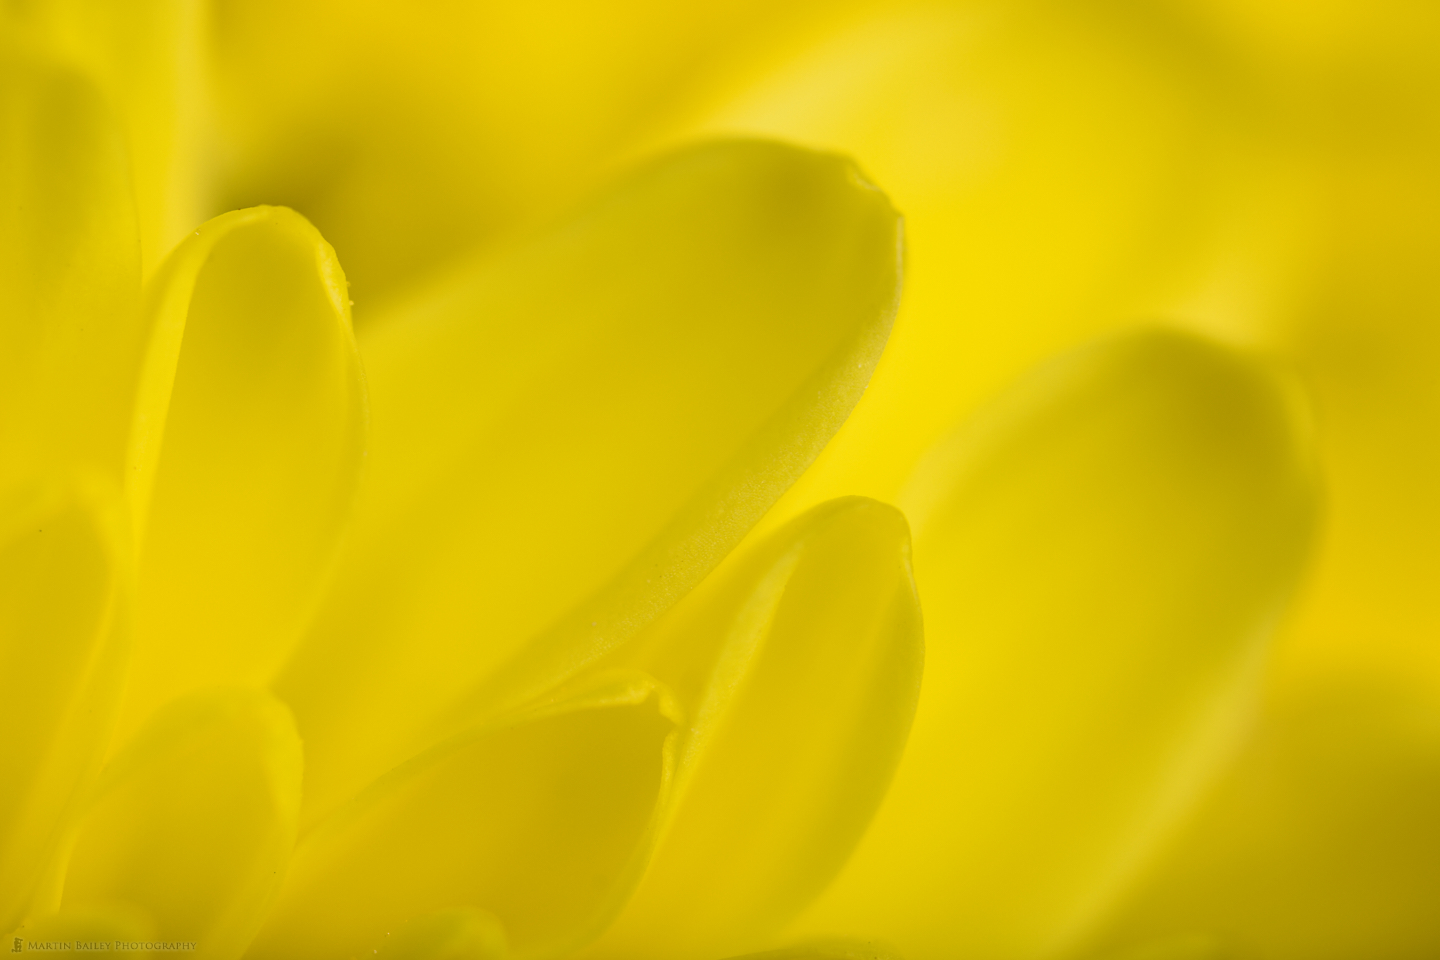
This next image is actually closer to what I wanted to achieve with my dreamy bokeh shots. This was at 2X magnification, and as you can see, just doubling the magnification makes a huge difference as you dive into the double life-size macro realm. Note that I have increased the Clarity a little and added a subtle Luma Tonecurve to these shots in Capture One Pro, just to increase the tonality a little. As dreamy as I want these to be, I feel they need a little bit of help to enable us to appreciate the detail.
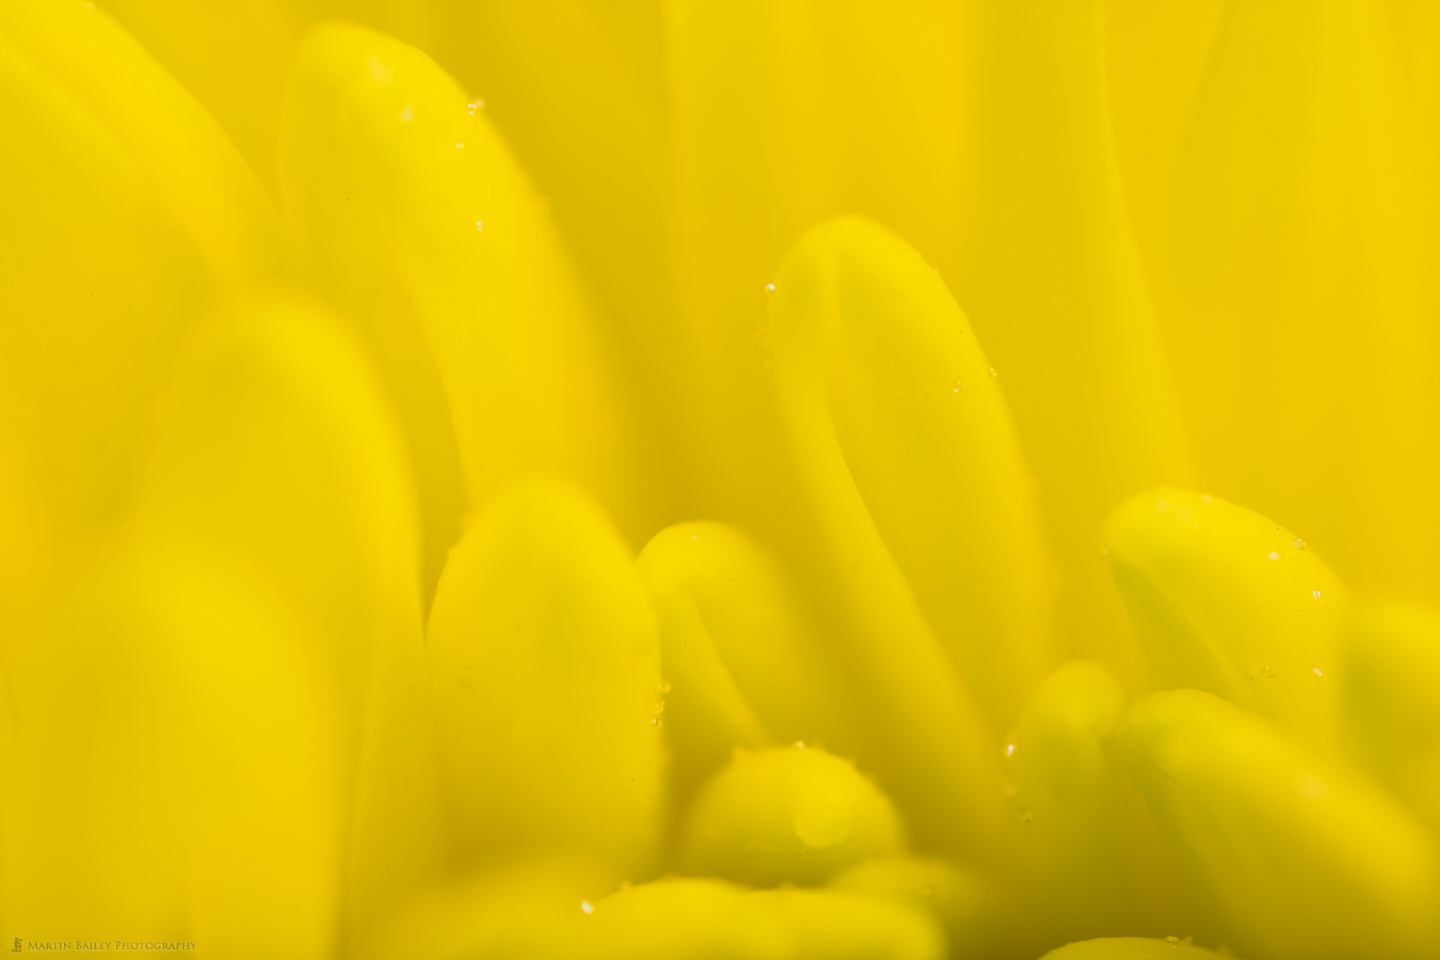
This next image was slightly more magnified at 2.4X life-size, and I have left my aperture at ƒ/4 to really start to emphasize the dreamy feel of the bokeh, achieving my goals still. I didn’t want too much detail in these images.
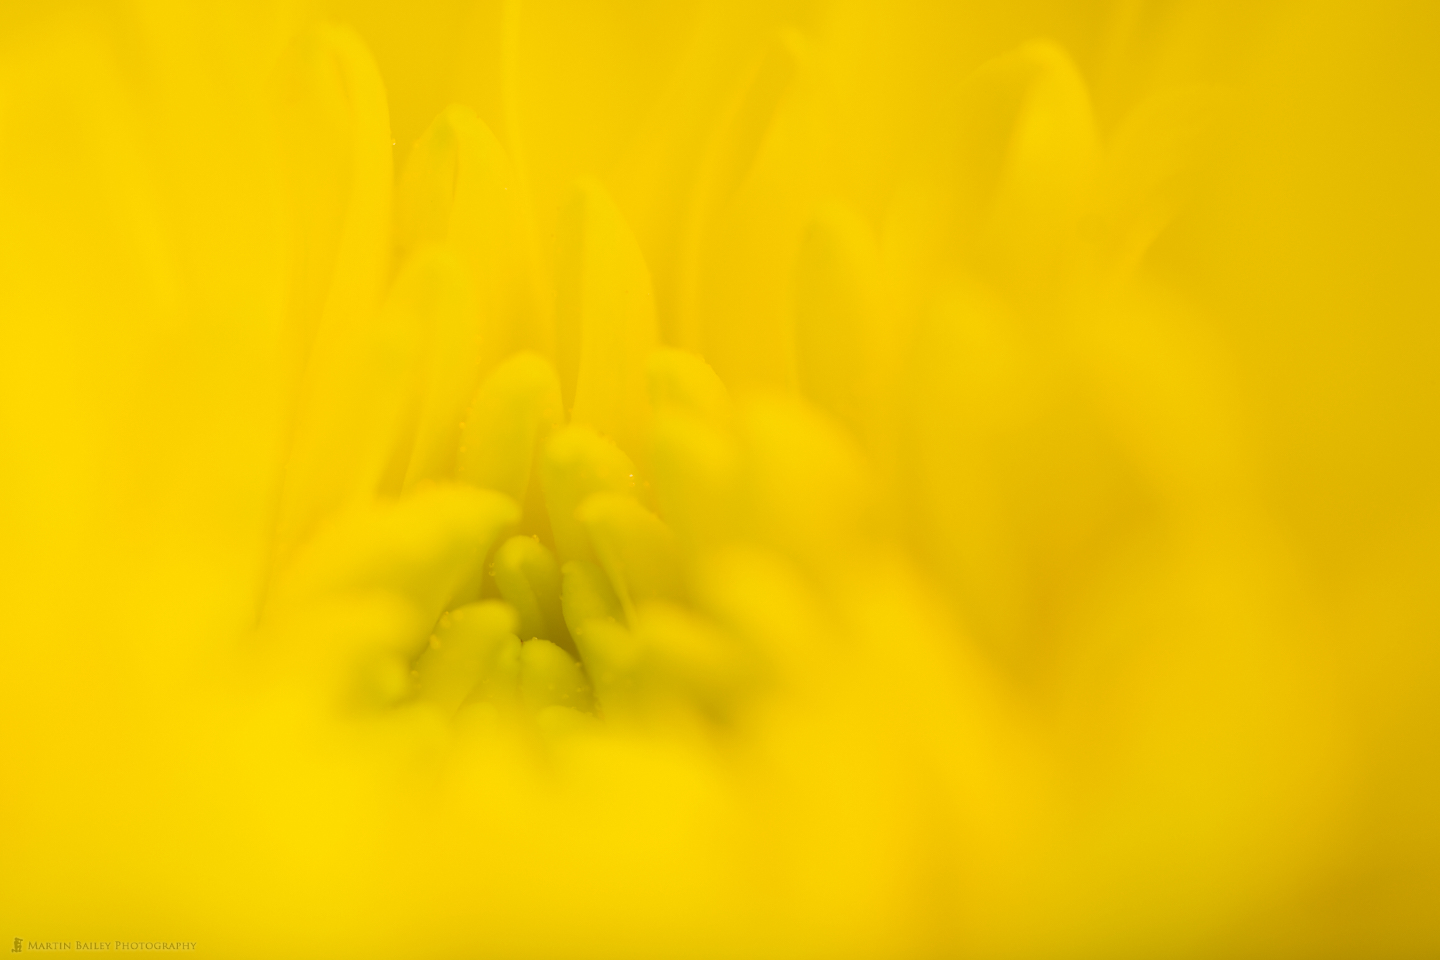
This next image was at 3X life-size now, still at ƒ/4 so the depth of field is now Razer-thin. I can learn from my Photographer’s Friend app that at 26 cm, which is the distance of the flower from the sensor, at 65mm with an aperture of ƒ/4 I had a depth of field of just 1mm. This look isn’t for everyone, I’m sure, but I really like this level of dreamy bokeh. I find this aesthetic really pleasing, and needless to say, I was having a lot of fun, chuckling to myself as I peered through the viewfinder and adjusted the Macro Rail and watched different parts of this flower come into, and go out, of focus.

For my next trick, we jump straight to 5X magnification, and I stopped down my aperture another stop to ƒ/5.6, which at the slightly longer distance of 30 cm gives me a depth of field of 2 mm.
OK, so I realize that I’m probably boring at least some of you now with these images being so similar, so let’s move on. I’d achieved my first goal of getting some dreamy bokeh shots. I continued on Thursday to try and get some flower reflected in water droplet shots, but the results weren’t great, and I was determined to figure this out for myself, rather than just going online and reading a tutorial, so I switched off my Profoto strobe and went downstairs for dinner.
Chrysanthemum Japonense
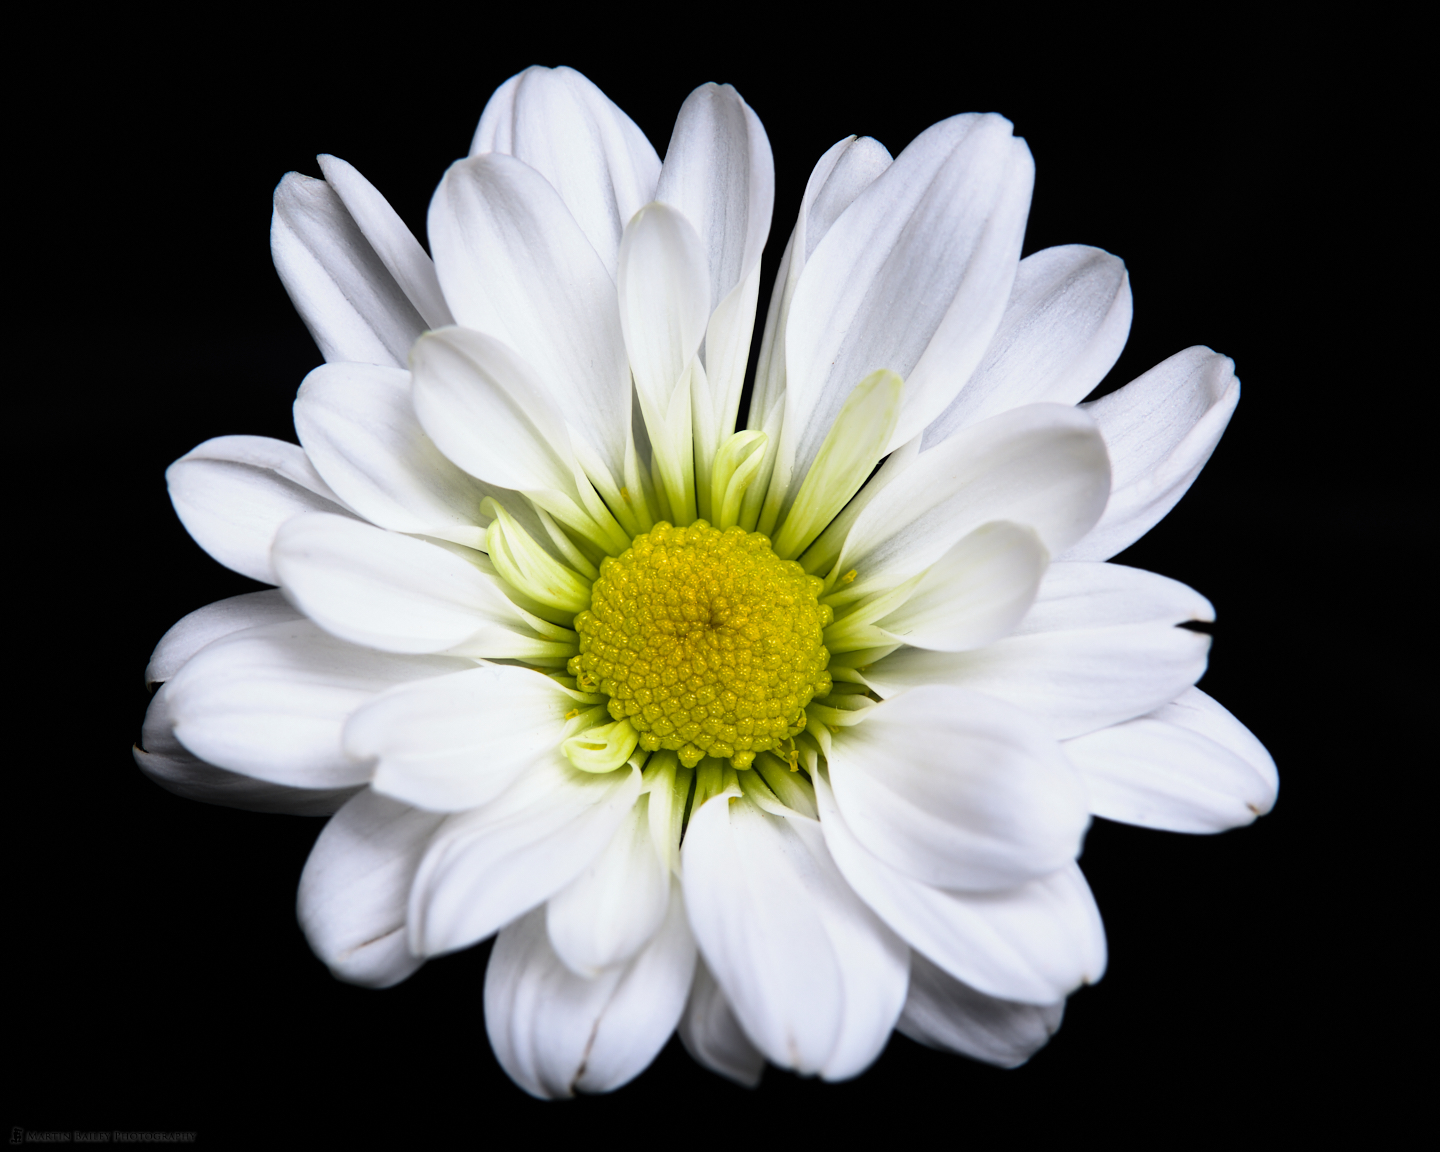
I started again on Friday morning with my EF 100mm f/2.8 L macro lens, as I wanted just a straight shot of one of the flowers, and you can see in this first photo from the morning. I like black and white flower shots as well as color, and I originally converted this first shot to black and white, but I wasn’t too happy about losing the yellow center. In the black and white shot, I’d used a tone curve on the entire image to increase contrast and used a Radial Mask to darken the tips of the petals a little to keep the eye in the middle of the image, so I decided to leave those in place and just go back to color, leaving me with the enhanced tones in the petals which I quite like. I stopped down to ƒ/10 for this shot to get a bit more depth of field, as I wanted more detail for this image.
If you are wondering how I get that black background in these images, I use a black cloth background that I have permanently set in my background pulley system along with a white background, but I also use a piece of black velvet with a slit cut into it, which I drape around the base the base of the flower, so that it’s completely encompassed by the black velvet. In fact, we’ll jump ahead and show you an iPhone photo that I was going to show you later, as this includes the background so that you can see what I’m talking about.
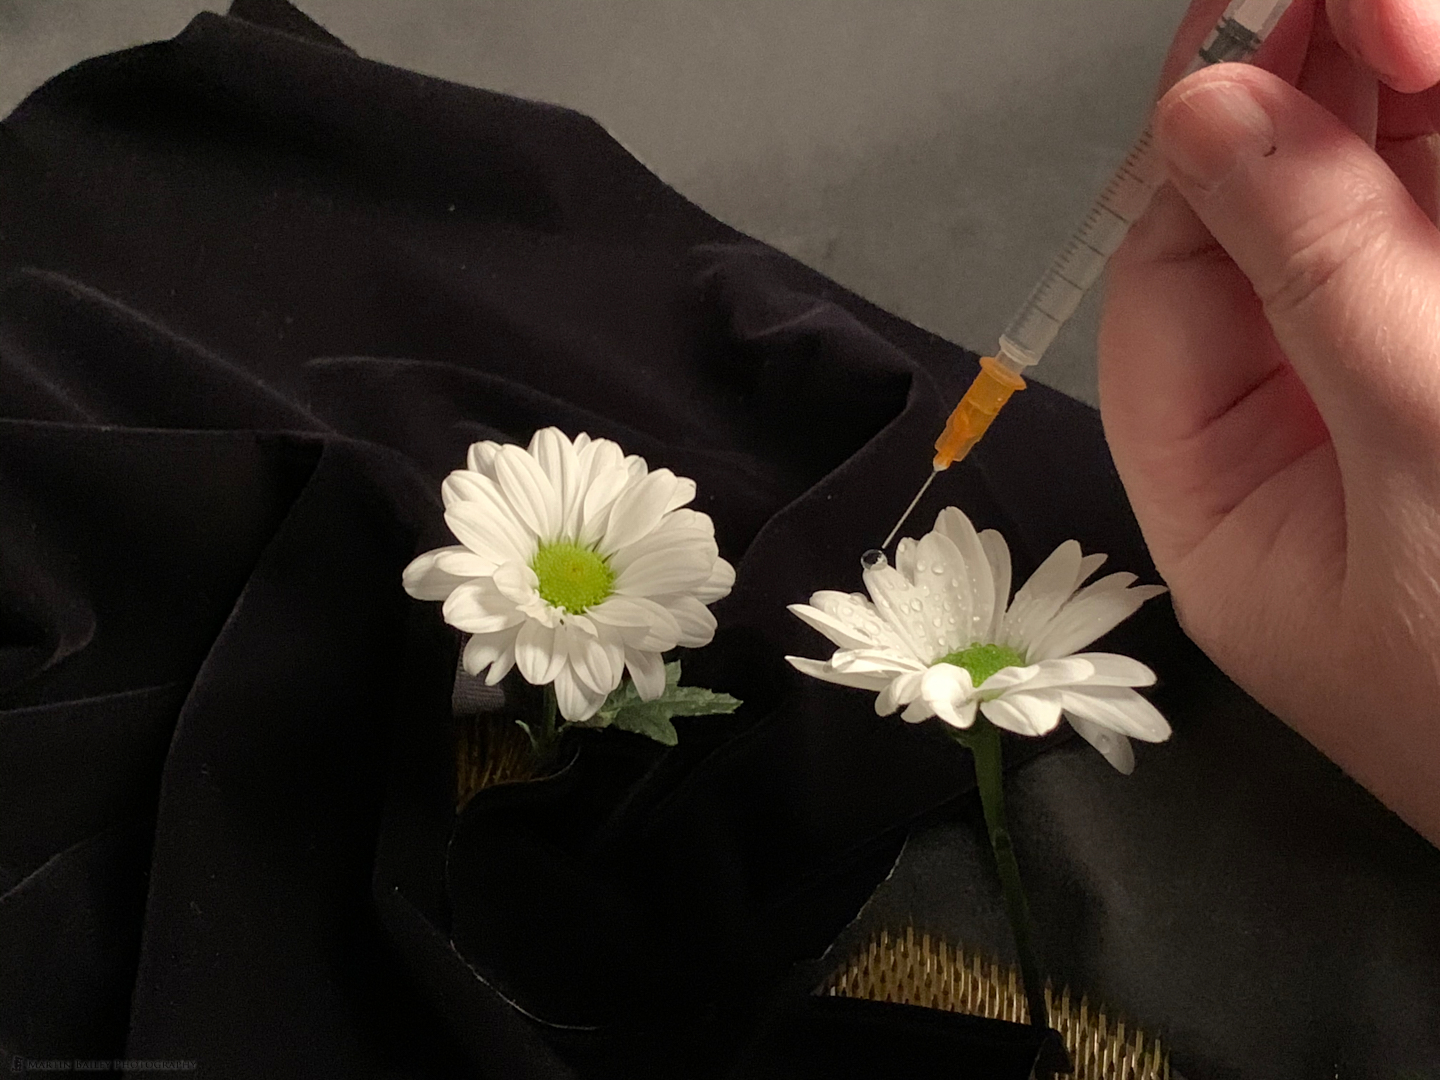
As you can see, the black cloth actually looks like a mid-grey in this shot, and the velvet appears much darker. When the bright light of the strobe in the soft-box hits the white of the flower, the contrast becomes so great that even the folds in the velvet pretty much disappear, leaving me with a clean black background. See here too that I used a syringe to place a droplet on the tip of a petal on the foreground flower and this is the actual positioning that I used for the following shot, in which you can see the results of my experimentation.
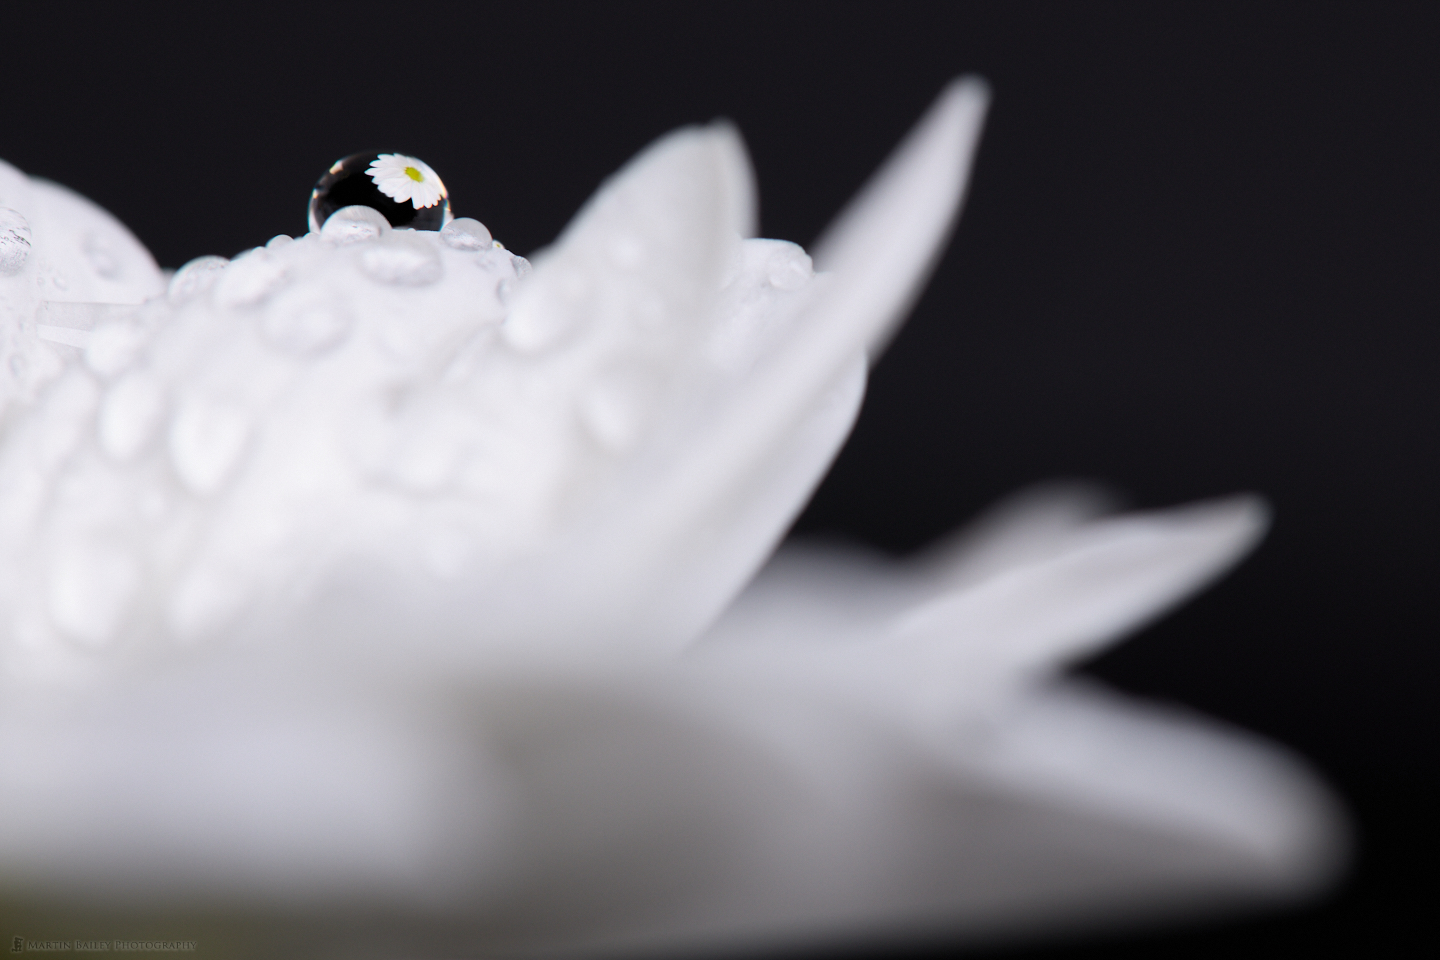
The syringe isn’t sharp. It has a dull needle, bought from the film development section of my local camera store. Its main purpose is measuring out small amounts of development chemicals, but I found it to be really good for placing a large droplet of water onto the petals of a flower for these droplet reflection shots. We’ll step back a few hours though, as I want to share one of the first images that I shot as I started to understand the technique. I shot this with my 100mm Macro lens and the aperture set to ƒ/14 for deeper depth of field. This is close to life-size magnification.
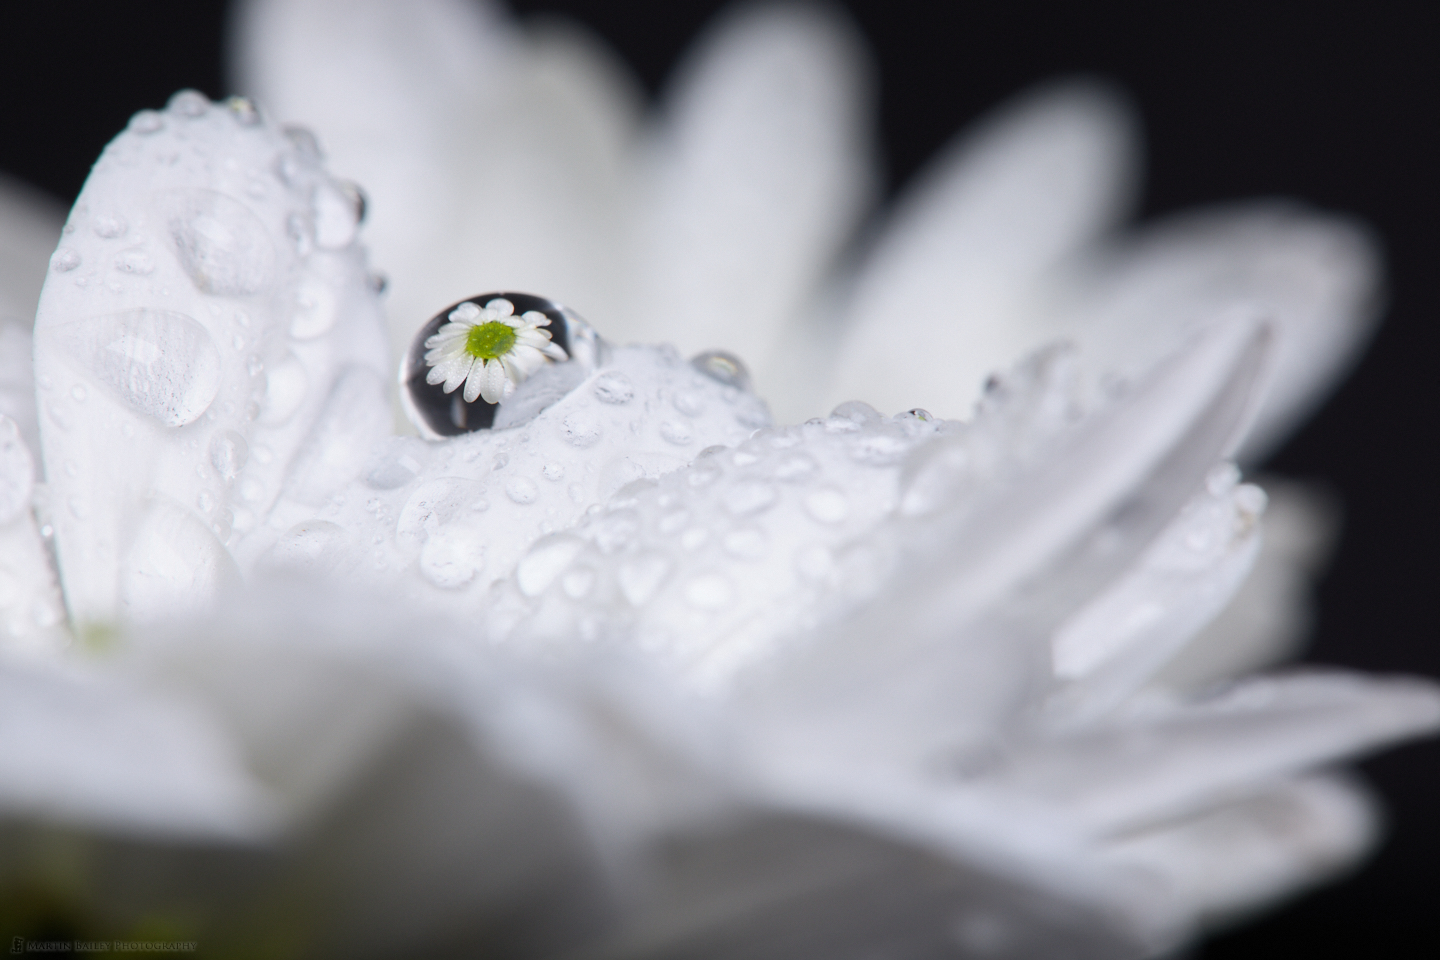
As you can see, the position of the two flowers is similar to the iPhone shot, and I was basically using the droplet like a little lens, through which the flower in the background was being focussed. I initially had the background flower much further away, and tried all sorts of positions, but this was the first time that I got a nicely shaped flower in the droplet, although I was also getting a reflection of parts of the nearby petals etc. and I really wanted to get a cleaner shot of the droplet with less distracting elements.
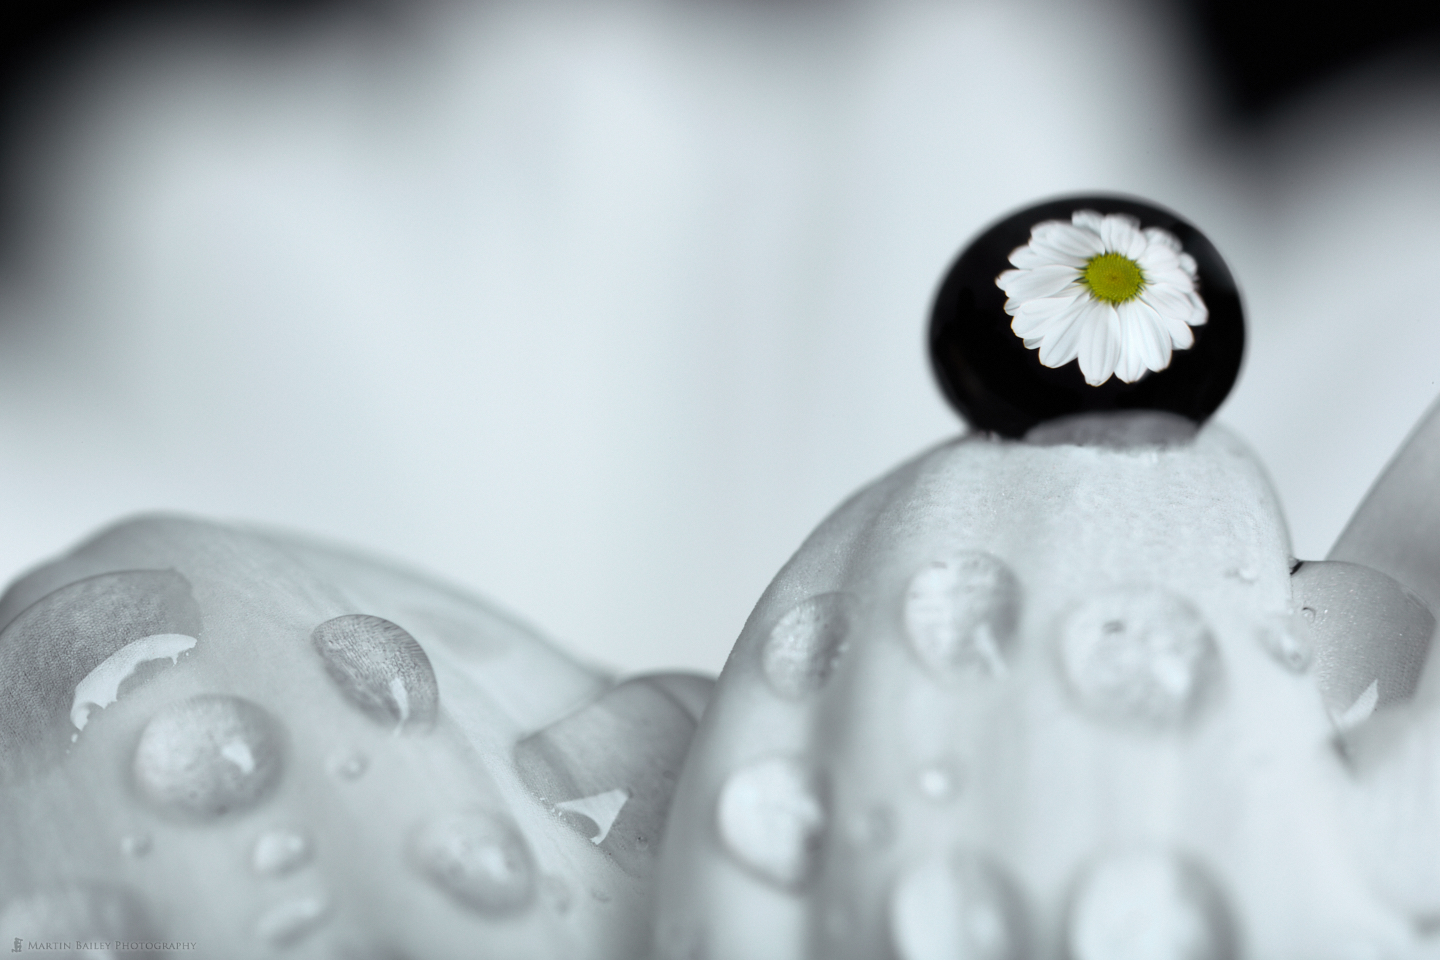
I found that I could move the background subject flower out of the frame if necessary, and still get a reflection, as you can see in this shot, but the reflected flower is facing downwards at a more acute angle, and I didn’t find that as pleasing to look at. I do like the overall composition though, with the out-of-focus petals on the foreground flower positioned nicely in the frame.
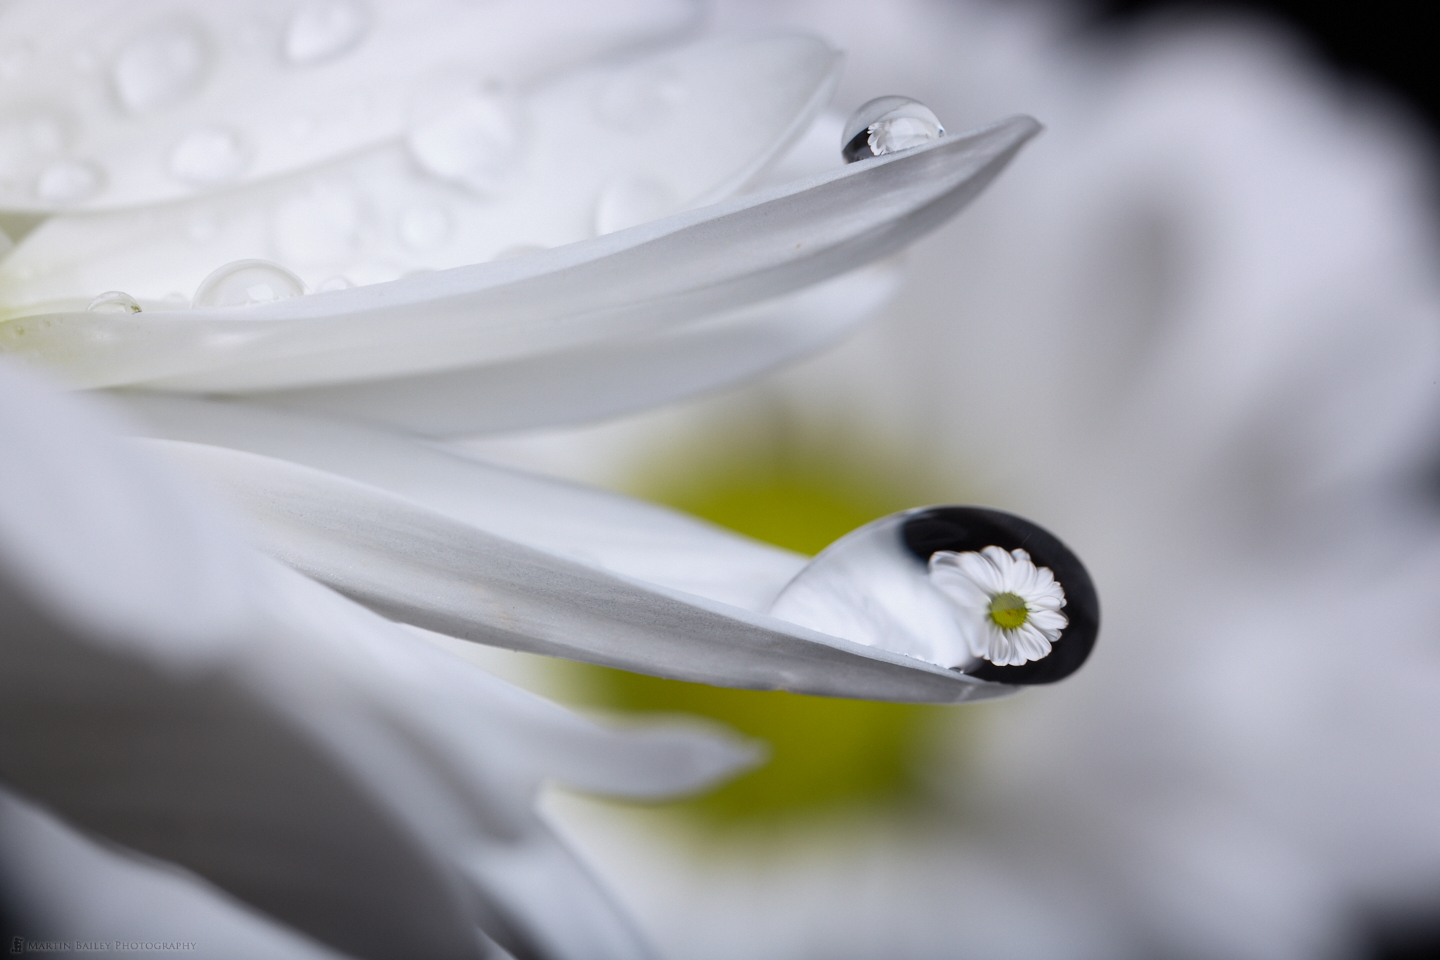
You might notice that I numbered my selects, and we’ll actually skip number three to save time, and that takes us to number four, which is the image that I shot shortly before getting my wife to photograph me putting the droplet on the flower which was the iPhone shot that I shared earlier. This was probably the first shot that I was really starting to feel happy with. The reflected flower was nice and clean, although I did have to clone out the reflection of my softbox, which crept into some of the droplets.
I continued to shoot and got a few more images that I like enough to add to my final selection. We’ll skip number five and take a look here at number six, in which I placed a huge droplet and learned that larger droplets tend to disfigure the reflected subject a little bit more as you place the subject away from the center of the droplet. This was shot at life-size, 1:1 magnification.
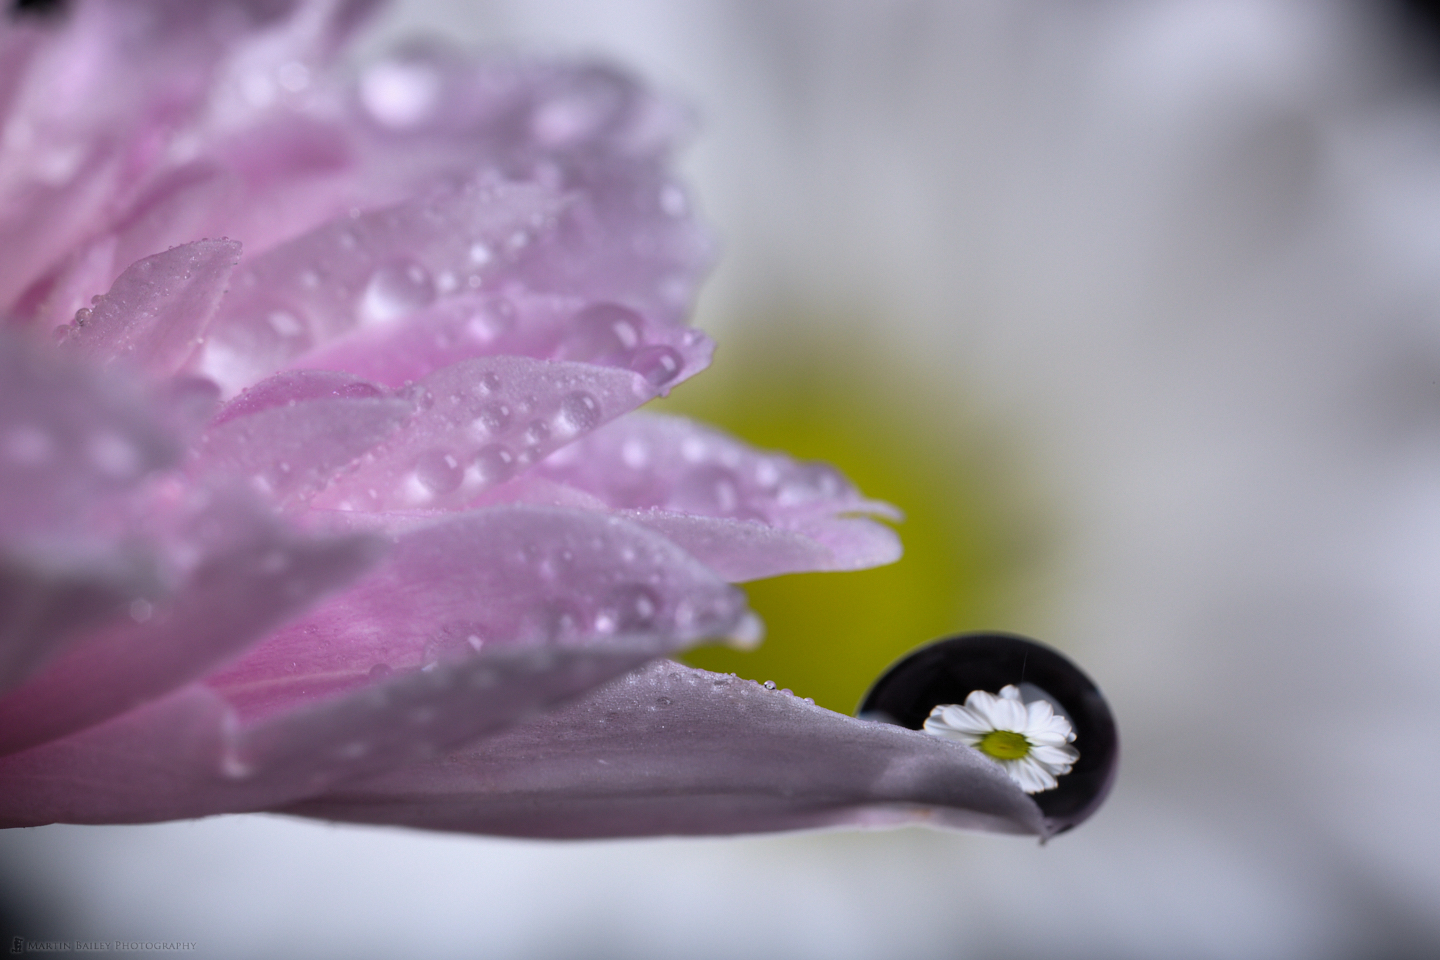
It’s fun to use the big droplets though, so I continued with this next shot, using a pink flower instead of white. I like the contrast in the colors in this shot, so although the reflected flower is cut off, I quite like the image overall. It was shot at 2X life-size with the 65mm macro lens.
Finally, I reached for one of the yellow flowers that I had and created a huge droplet on the tip of a petal to create this last image that I wanted to share. As you can also see, I had moved the flower that I was reflecting in the droplet completely out of the frame, so I was pleased that I was able to under the positioning enough to do this. You can actually see the reflected flower with the naked eye as you line these shots up, so once I’d figured out the optimal distance to place the flowers apart, the rest was really just a case of experimenting and shooting, and repeating the process.
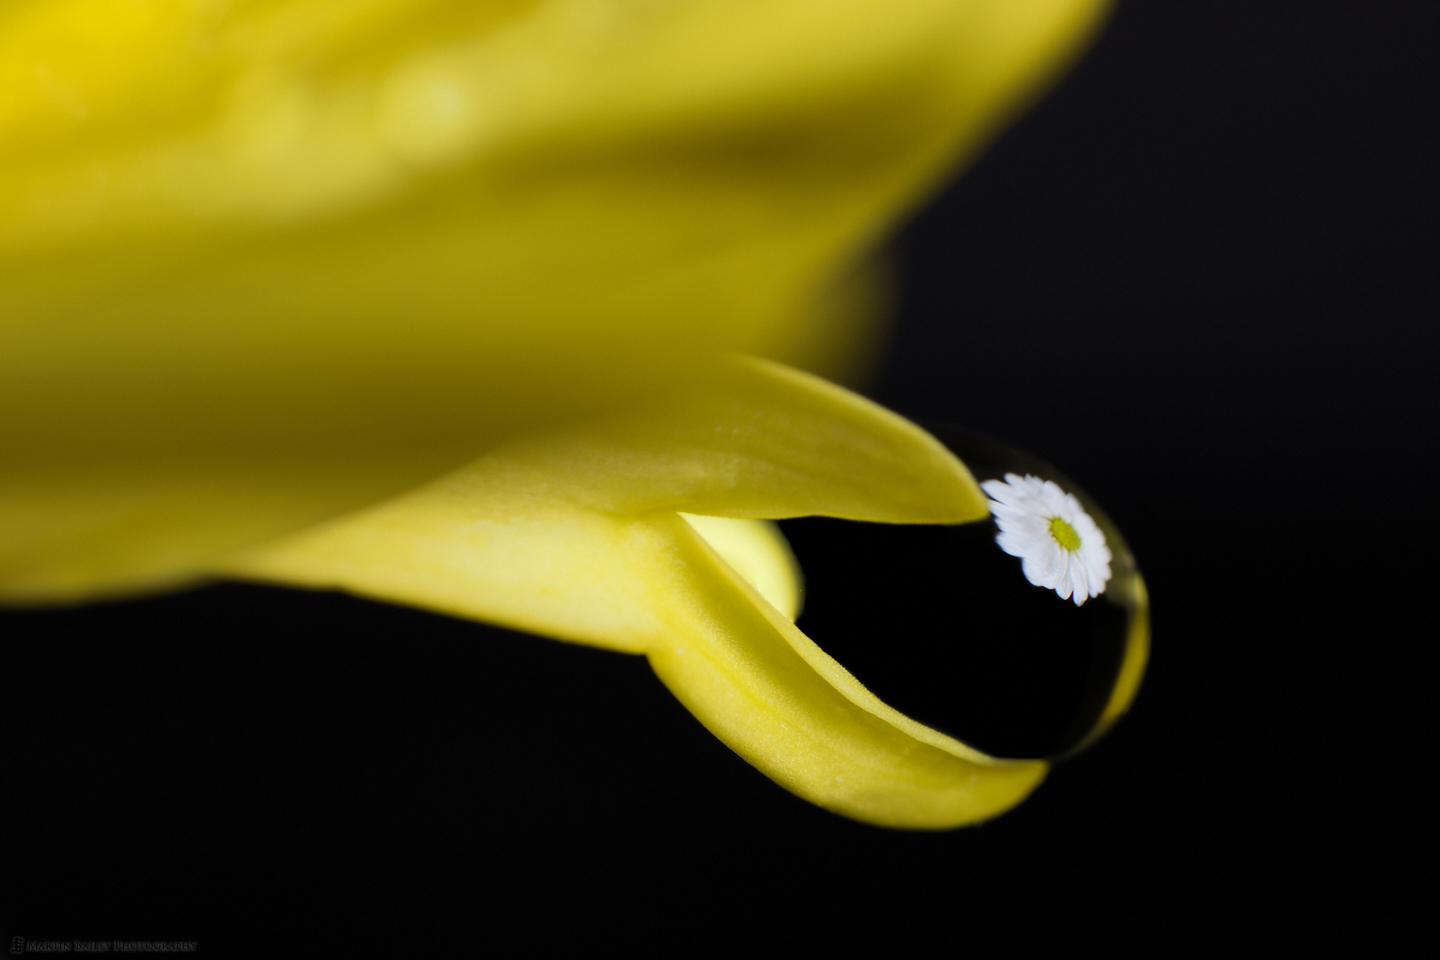
This was shot at 2.4X life-size with the 65mm lens again, and the aperture set to ƒ/11, for a deepish depth of field, but still plenty of dreamy bokeh, so this kind of wrapped up my day and a half of shooting with an image that realized both of my goals.
Of course, the bigger goal for the almost day and a half of shooting that I did, as I eluded to in the title of this post, was the therapeutic benefits of just having a camera in my hand. It’s been tough to watch the winter go by not being able to go out on tour with my guests that had booked on this year’s tours. I keep dreaming of being in the field with them, but things go wrong, and we can’t take photos, or can’t get to our destination etc. Almost every night my dreams remind me of where I’d rather be right now, and watching the Japanese government make one bad decision after another isn’t helping. There is a new minister in charge of getting the vaccinations done who I trust will do a better job, but with the government now prematurely lifting our state of emergency, I fear that things are going to get worse again before they get better.
Hopefully, I’ll be able to get some cherry blossom photos in our local park as we are allowed out again, and I’m pretty sure that next year’s winter tours will be fine, but it’s going to be a while before things are back to normal, and I really needed to just relax and enjoy some photography, so that was what I did, and I felt much better for it. If you are stuck indoors too, I hope that this might help to give you some ideas on how to relax with your camera. I’m a big believer in shooting what we love, and although flowers are low-hanging fruit, I generally enjoy photographing them, so all is good right now.
Show Notes
Get the MP-E65mm Macro Lens on B&H here: https://mbp.ac/mpe65mm
Here too is the 100mm Macro lens that I also used: https://mbp.ac/100mmMacro
Audio
Subscribe in iTunes to get Podcasts delivered automatically to your computer.
Download this Podcast as an MP3 with Chapters.
Visit this page for help on how to view the images in MP3 files.

Martin – Really enjoyed your work and explanation of what you were doing. I take lots of flower pictures. A lot of photographers view that with disdain. Flowers, however, offer an infinite number colors, variety and compositions. Your extreme closeup work is something I have never indulged in. I’ll have to give the 65mm mpe another try. It is a difficult lens to use. I am normally a non tripod kind of photographer and it doesn’t fit my style very well. You alluded to exploring the flower by moving back and forth on the focusing rail. Could you have focus stacked those images? Also, Your EOS R5 focus bracketing capability. Have you tried it with a lens like the 100mm macro? I ask because I’m trying to get photos of a couple of small native wild flowers here in Washington State (Tellima grandiflora, and Tolmiea menziesii) that I want mostly in sharp focus. They are both quite small – about bean size. I like the texture that I find on flowers of all sizes visually appealing. You have found a different kind of texture with your large out of focus areas. Something I had’t considered before. I’m pretty sure my patience would run out if I tried the water drop photos.
With respect to the canon 35mm near macro lens It near focusing distance is 0.17 meters. At it’s nearest focus the lens is only an inch or two from the subject. With it’s short focal length it should have a little greater depth feel when used at near macro distances. Giving it more than a 0.5 magnification probably isn’t realistic. I have purchased a Canon 250D achromatic closeup lens that I’ll use with it. My casual use wit the 35mm has been positive. As I explore it more I’m sure it will meet many of my expectations. You might explore the after market extension tubes available for the Canon RF mount.
Keep working on your mental health. We can all live a bit longer without an update of the Photographers Friend.
All the best – Rich
Hi Rich,
Sorry for the delayed reply. Thanks so much for your well-thought-out comment!
I like to shoot down to life-size macro handheld, but I find it easier to get good results at higher magnifications by using a tripod and focussing rail. Yes, you certainly can use the rail to create a stacked image set, but I personally prefer to play with the shallow depth of field, and of course, a stacked image has pan-focus, the complete opposite. I have done focus-stacking in the past, with both the 100mm macro and the 65mm lens.I’m just not a fan of the results, which is why I’ve not played with the focus bracketing of the R5.
I’m not an incredibly patient person either, and that’s probably why I hadn’t really figured out the water-droplet shot technique so far, but once I settled in to make this work it was a lot of fun. I guess timing is a big part of the accomplishment. I’ve got to be ready to get stuck into something before I can make it happen.
I still have a 12 and 24 mm extension tube for the EF mount, so that option is still there for my macro lenses, but I’d not thought to look for something specifically for the RF mount until you just mentioned it. I looked and found that Kenko have a 10 and 16 mm set and a company called Viltrox have a 12 and 24 mm set. I’ll pick some up at some point and give them a try. Thanks for the pointer!
Working too hard on the app has ultimately injured my neck, with a trapped nerve, so the last two weeks have been a bit low on the physical health side too, but I’m getting better again now. Thanks for your concern.
All the best!
Martin.