As many of you already know, for the last week in January, 2008, I held the first MBP Workshop in Hokkaido, and was joined by five fine gentlemen from four countries, namely the America, Australia, Canada and Norway. From today, probably for three weeks, we’re going to trace our steps together as I show you and talk about a bunch of images from the 5 days. So let’s get right into it.
So, I guess I need to say before we go any further, I probably should say that I’m going to be calling this a Photography Tour, rather than a Workshop. Although I planned to do a number of structured exercises and discussion sessions, I packed the week so full of amazing locations, that we really had very little time for discussion. My plan was always to prime the participants for the location on the bus while heading out, or the previous night. This I did and I believe it helped. I got most of the guys who weren’t already using it, shooting pretty comfortably in Manual mode within the first few days. I’ll explain why this was necessary as we work through the first few images, as it’s been a while since I covered this.
Also before we go on, I’d like to say a huge thank you to Yoshiaki Kobayashi. Kobayashi-sensei is one of the top photographer’s here in Japan, and I just want to say that this Tour would not have been possible without his help. Firstly, it is from visiting Hokkaido on Kobayashi sensei’s photography tours a number of times that allowed me to learn where many of the locations we’d shoot at over the week actually were. I’ve visited by myself a number of other times as well, and added a few other locations based on my own experience, but the majority is straight from Kobayashi sensei’s tours, so I already owe a lot for this. Secondly, it was at the same location that we shot the first five images we’ll look at today that Yoshiaki Kobayashi got me using manual mode for the first time a number of years ago. Until then I’d been scared of it, to some degree, but also had never really understood why I might even need it. I’ll go into details shortly, as I said, but this is one of the most radical changes to my photography over the years, and I’m very grateful for this too.
Finally, Kobayashi sensei had not only given me advice by mail over the last week or so of my planning, but he also came out to meet us on this first day, and even helped us out of a fix when we couldn’t find the last location we were aiming for. We made it with a little time and got some nice shots, but it was really close, and would have been a total loss without Kobayashi sensei, as the bus driver did not know the location, and this is the only place that I had added to the itinerary that I myself had also not visited. Anyway, Yoshiaki Kobayashi saved the day, and I am again eternally grateful. Thank you so much Kobayashi sensei, and it was great to see you again.
So, after arriving at the Kushiro Airport at 9:30AM, finding our bus driver, Ogasawara-san, we started to make our way over to the first location of the day, which was the Akan International Crane Center. We were going to stay here until mid-afternoon, and just shoot away. As I anticipated, the guys were excited with their first site of a field full of Red-Crowned Cranes. The numbers are increasing so much now though, that it has become pretty difficult to get a clean shot of just one or two cranes. There must have been a good couple of hundred cranes on the field in front of the trench at the edge made especially for photographer’s to set up their gear. I spent my first hour just wandering among the guys, seeing if they had any questions and helping out as necessary. As they all got settled down to shooting, and a few actually broke away to go into the next field next to the other building to shoot, everyone really just shot away for a number of hours. Happy that everyone else was happy, I got my two cameras out, and set up my 600mm F4 on a tripod, and through the 5D over my shoulder with the 300mm F2.8 lens on it. I also got the 70-200mm F2.8 out and put it in the stone bag between my tripod legs for quick access. I switched the bodies around a few times though, as time allowed, just basically trying to give myself the most pixels and frame rates with the lens more suited for the subject at hand.
Three minutes before noon, I shot the first image I want to look at today which is number 1682. This was shot with the 5D on the 600mm F4. This is similar to a shot that I made in December 2006 during my last visit, but this time I have a second crane nicely out of focus in the back right. I actually still like the first Preening shot better, but thought this one worked as well. Let’s start to explain about the need for manual here. So, you’ll notice with this shot that the majority of the frame is filled with bright white, with just a few patches of red and black. Now, any of you that have studied Exposure Compensation, probably all of you, will know that camera meters do not like predominantly white or bright coloured scenes, or predominantly black or very dark coloured scenes. The meter will always try to darken a light scene to make it a mid grey, or brighten a dark scene, again, to make it a mid grey.
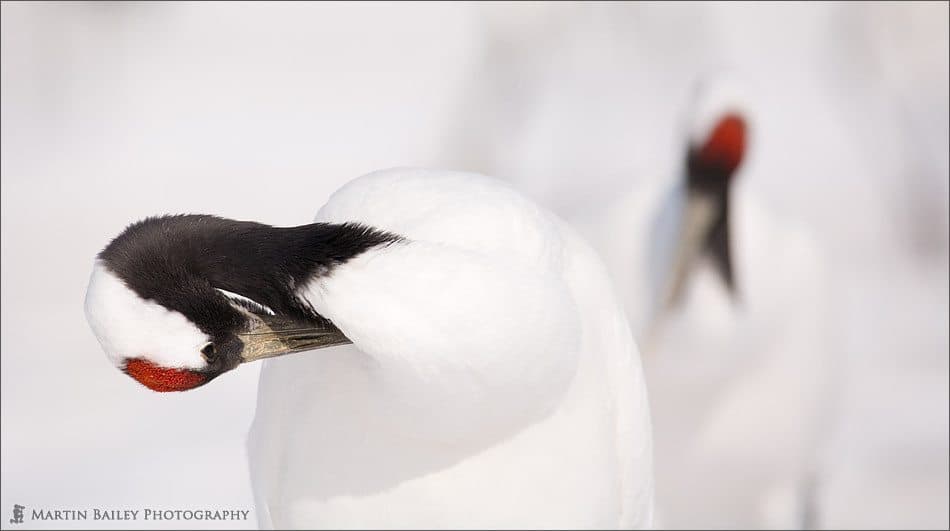
Preening 2008
If you know that you will always shoot under the same conditions, i.e. a totally white scene, like the one we are looking at now, then going to Aperture Priority mode and using exposure compensation will work fine for you. The problem with doing this when shooting wildlife though, is that the birds or animals move around. As we’ll see shortly, these cranes and other birds visiting the area can in a moment move from a pure white background, to a dark background which is the woods in the distance, and also above that to a mid toned blue sky. As soon as they move to the other backgrounds, if you were simply using Aperture Priority mode with Exposure compensation, when your camera tried to bright the image, because it now sees a lot of dark background, you would grossly over expose the white birds. Remember that if it is a choice between a badly exposed environment and a badly exposed main subject, of course, we should always go for getting the main subject correctly exposed. I personally don’t need to see all the detail in the shadows of the trees, but I do want to see the fine detail in the feathers of the cranes.
To set my exposure of bright snow manually, I simply select the aperture that I want to shoot at, to match my artistic aims, then fill the frame with snow, and adjust the shutter speed, while watching the caret move on the cameras meter scale in the viewfinder. In previous podcasts, I think I’ve always said that to set my exposure to plus 1 and 2/3s, but I need to update this. For years I have been using center weighted metering, which actually stops the camera from analysing the scene to some extent. Now though, I’ve switched to Multi-Segment Evaluative Metering. This does a lot more thinking than center weighted metering, and as the metering systems have probably gotten a lot better in the newer bodies, just because of the additional years of engineering that have gone into them, I thought I’d give Evaluative metering a try. Well, this means that when I started to set up in my usual way, I found that 1 and 2/3s over was way too much. You need to do this yourself too, but basically as I was setting up the exposure and shooting test shots, then looking at the histogram, I could see that it was hitting the right shoulder, showing that there were parts of the shot that were over exposed. This was confirmed by lots of areas of flashing black in the preview image too. So, I started to work back down, and found that the clipping, which is the histogram hitting the right shoulder, stopped at just two thirds over zero, or what the camera thought the exposure should be in Evaluative Metering mode. Anyway, that became the settings for the day, to ensure that the snow white cranes were exposed correctly, without worrying about the change in brightness of the background as they jumped around or took flight.
So, to quickly recap, now that I’m using Evaluative Metering, as most of you will be, to meter for a very bright white scene, go to manual mode, select the aperture that you want for your subject, then fill the frame with snow and adjust the shutter speed while watching the caret move up or down your exposure scale in the camera’s viewfinder, until it is two thirds above zero. You can of course go to spot metering and just put the center of your viewfinder on the white object and set the exposure in the same way, but like center weighted, this stops your camera from thinking to a degree, and just gives you the reading, so you’ll probably have to compensate a little more. Remember though, whichever way you choose, the histogram is your friend. As I’ve said before, in the digital age, most of the time you’ll want to expose for the highlights, so just do a few test shots at the offset, and check the histogram to make sure that the right side of the histogram is close to, but not touching the right shoulder. Also note that if the light changes, like on a clear day with some clouds, you’ll need to get a second reading for when clouds roll in, and switch between the direct sun, and cloudy time exposures as conditions change.
Anyway, sorry for those of you that have heard that before, or those that new about it anyway, but I know there are some people that will benefit from a fresh explanation of that, so thought I’d put it in. In the next shot, image number 1684, we can see 9 Whooper Swans that were took flight, having shared part of the field with the cranes for a few hours, and flew across a nice blue sky with some cloudy patches. You’ll notice if you check the EXIF data for this and the last shot, that I shot both of these with an aperture of F5.6 for 1/1250th of a second with ISO 100. Without a doubt though, had I been in aperture priority mode with exposure compensation, the swans would have been blown out. Instead, they’re a beautiful bright white, looking a little line a washing powder commercial.
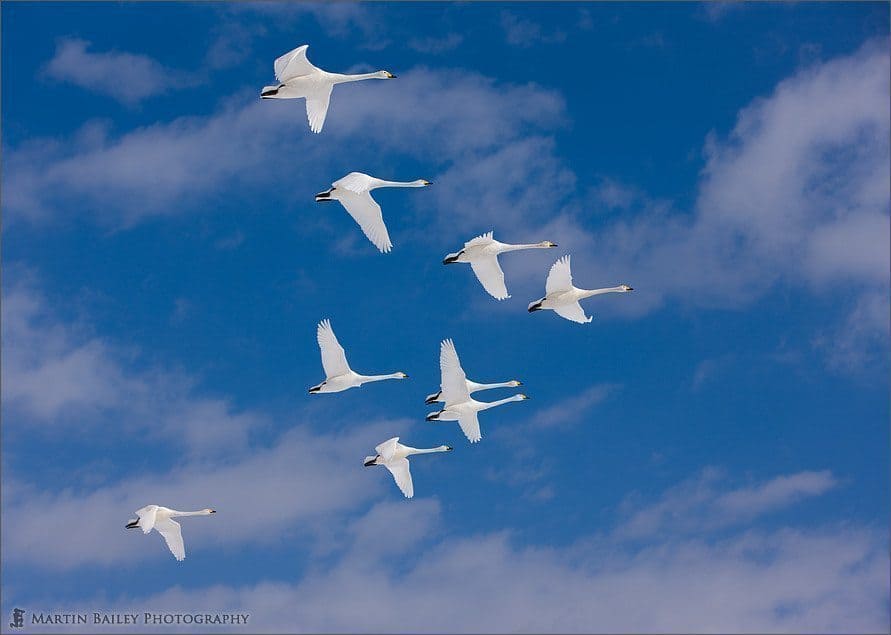
Nine Swans
To complete the example, let’s look at image number 1685, in which we see a single red-crowned crane, flying against the dark background of the woods. By no means a special shot, but I’m sure you can appreciate my point about shooting in Manual mode when we see that this shot too was also shot with the same settings. F5.6 for 1/1250th of a second, with ISO 100. That dark background would have definitely blown the crane out had I been using aperture priority, but here, we can see all the details in the white feathers, as well as plenty of texture in the black feathers. Much of the background is underexposed, but who cares? I’m shooting the crane not the woods.
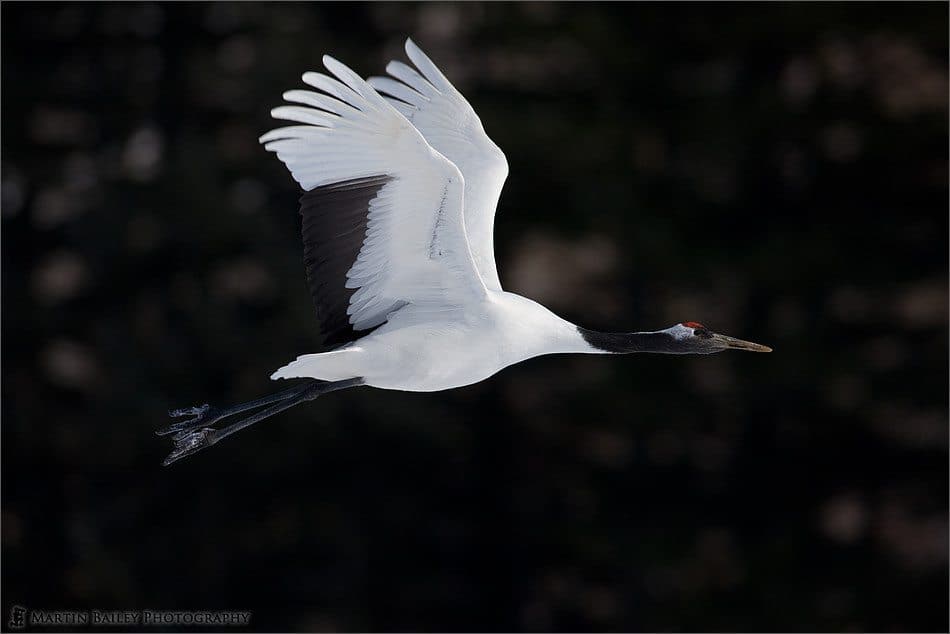
Tanchou
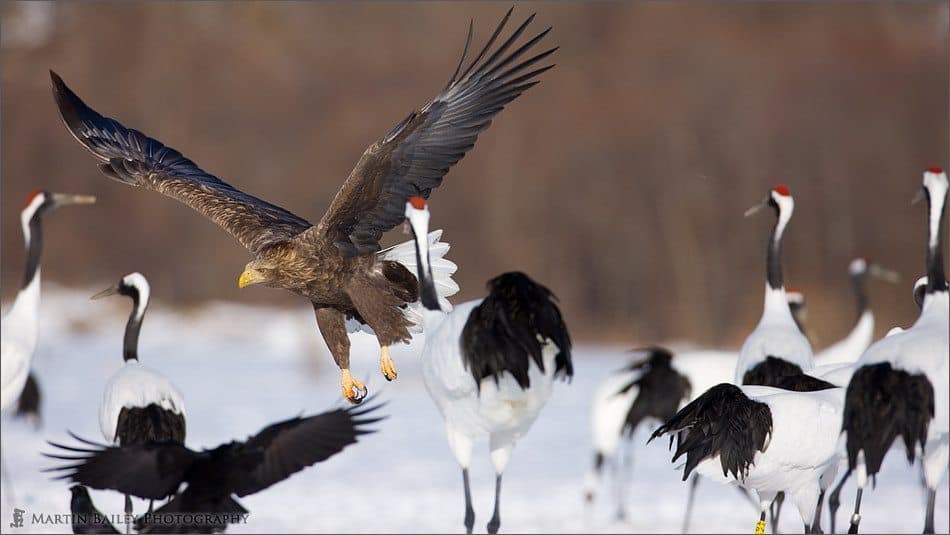
Anyway, having spent so much time going through the reasons behind and the benefits of shooting in Manual mode, let’s shifty through a bunch of photos and try to make some headroom. Next, let’s take a look at image number 1687. I’d actually adjusted the exposure now, shooting at 1/1000th of a second, still at F5.6 with ISO 100 as the light slowly changed. This is a bit of a documentary shot, but I nailed one the White Tailed Eagles that comes to the center at 2PM when they feed the cranes live fish. The cranes make a great spectacle as they swoop down and fight with the cranes for the fish. There are also sometimes Steller Sea Eagles that join in the raucous, and one had appeared on this day, but kept his distance. There were also some juvenile Steller Sea Eagles that look similar to White Tailed Eagles with a dappled brown and white tail. Anyway, I just thought I’d share this with you too, to show you how beautiful these eagles are as well.

White Tailed Eagle
In shot number 1688, we can see one of the White Tailed Eagles navigating a low flight through the cranes, many of which turn to keep their eye on the eagle as he makes his way through their turf. Andrew, one of the participants, made a comment about this image in my gallery, so I thought I’d go into a little bit of detail on how I focussed for this shot. Firstly, I should say that I set the custom function on my camera body to toggle between One Shot focusing, and AI Servo when I push the AF Stop button on my super-telephoto lenses. This is the small black rubber button near the front of the lens. In my arsenal only the 300mm F2.8 and the 600mm F4 have this button, so this advice will only be of limited help in itself, but basically what I did was held the button down, switching me to AI Servo while I was panning around with the eagle in the sky, as in the previous shot. Of course though, there is a good chance that the focus will be stolen by one of the cranes as I moved through the group here, so I released my finger from the button, which threw me back into One Shot focusing to prevent any unwanted searching, and allowed me to lock focus easily as I panned along with the eagle, getting just him perfectly sharp.
Brave Eagle
Now, there is something else that I got some of the guys on during the Workshop that I was actually put on to by Holly Sisson, one of the major contributors to the MBP community, and a great portrait photographer. Many of you will remember Holly from the second roundtable that we did last year even if you don’t get involved in the online community so much. Anyway, during some discussion about our new 1 series cameras last December, Holly got me onto using the back AF button on the 1Ds, and removing that functionality from the shutter button. Basically what this means is now when I press the camera’s shutter button, no focusing is done by the camera. Regardless of which shooting mode I’m in, One Shot or AI Servo, unless I push the AF button on the back of the camera, no focusing is done. If you aren’t familiar with this focussing style, it probably won’t be easy to get your head around, but basically what this allows you to do is simply take your finger off the button at any time, and be essentially in manual focus mode. That is, your lens just stops moving. It took a lot of getting used to, and to be honest, I wanted to give up after my first afternoon out shooting like this. However, the benefits seemed so huge that I really wanted to switch to this style of shooting, and so I kept at it. I made a lot of mistakes to begin with. I would be shooting away, as you can release the shutter even without having achieved focus with the camera set up like this, but then I’d realize that I did not have focus, and it would click that I had not hit the AF button. Even now, having shot like this for almost two months it’s still not 100% natural to me, but I simply can’t go back. To totally tell the truth about this shot of the Eagle flying through the cranes, I’d actually during the final pass simply released my finger from the AF button all together, so there was absolutely no worry about the camera’s focus jumping around without me wanting it to.
Anyway, I’ll go into more detail on this in a later Podcast if you want to hear more about it. For now, I just want to thank Holly for getting me on to this. I also want to apologise to Even, another participant on the Tour, as I got him onto this at the end of the second day, then on the morning of the third day, on the side of a freezing cold mountain at dawn, Even had thought that one of his lenses had frozen up and would not auto focus, when it was actually that he needed to hit the AF button and not the shutter button to focus. I did say that people should maybe just bear this in mind as something to try later, as I didn’t want to lose them any shots, so I don’t feel 100% responsible, but it could have been avoided. Still, it was a good lesson to learn, both for me as the teacher on this occasion, and Even.
Anyway, I’m not doing a very good job of zipping through the remaining shots. Let’s look at shot number 1690 now. Here is confirmation of how fearless the cranes are. As I was shooting the eagles swooping down and grabbing the fish put out for the cranes, one of the young cranes lost his temper with the eagle and decided to give him a good old stomp. I have to admit though, in the excitement of the moment, I fumbled the shot to a degree. I saw the crane stomp, and got a couple of shots of the actual stomp before this, but as I tried to figure out what was going on and react, I simply shook the lens around a bit, and the first two images were blurred. This one is tack sharp, on both the crane and the eagle’s heads, but as you can see, I didn’t have fast enough reflexes to recompose the shot to get the entire crane in. I actually didn’t recompose at all, and so the shot eagle was actually just above center, with lots of wasted space to the right and bottom of the image, which I have cropped away. Funnily enough, without paying any attention to this, I cropped away enough to leave me a 12.8 mega pixel image, which is almost exactly the same size as the 5D images without any cropping. This means of course that the 1Ds has allowed me to salvage a decent sized image, even after some pretty hefty cropping, which I am pretty happy about. For this shot too, I had actually lowered the shutter speed again, to 1/800th of a second at F5.6 still with ISO 100.
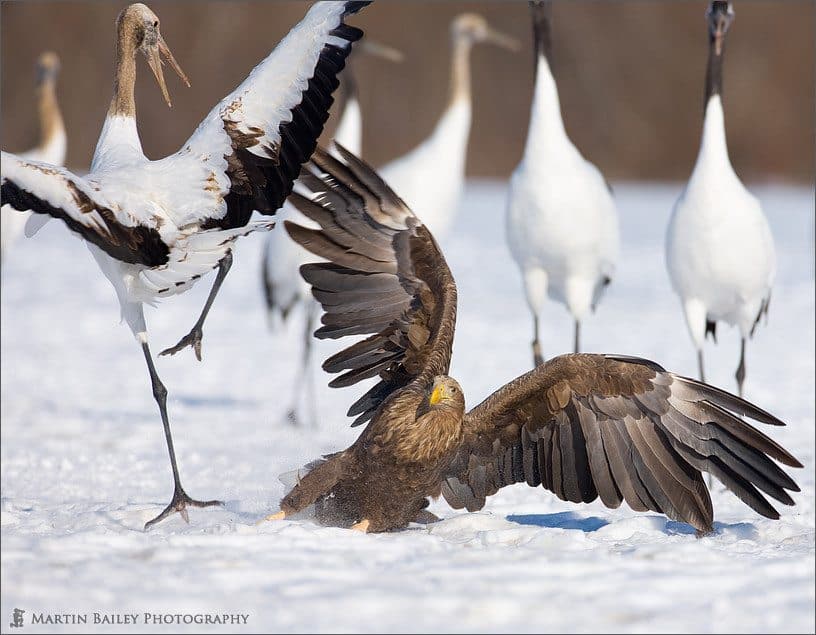
What the…!
There are a number of other shots from the Akan Crane Center in my gallery at martinbaileyphotography.com, but we won’t look at all of them. I’ll put a link into the show notes to display all 50 shots that I uploaded, if you are interested in taking a look. At around 3PM though, we decided to move to a different location to shoot the cranes as they fly in flocks to roost. This is when the first mishap of the week occurred. I’d heard of this place, but had not actually visited myself. This and the location where we would shoot owls later in the week were the only two locations that I did not have personal experience of. I did know where the next location was on a map, and in relation to the Itoh Crane Sanctuary that we’d also visit. It was literally just around the corner, but I made the mistake of leaving it to the bus driver to get us there. I’d checked that he knew where it was, and he had thought he did, but when we arrived at the place, it all seemed wrong. I’d been talking with the other participants, so not been checking how we got there. Anyway, I was sure it was wrong, and asked the driver to check, and he got new directions from his company. We set off again, but still he couldn’t find it, and I’d now lost my bearings. I had to resort to calling my friend, Yoshiaki Kobayashi again, as he’d said that he’d also be heading to the same location for the sunset crane shots. I really didn’t want to do this, but we were running out of daylight and getting these guys to the location was top priority. Anyway, not only did Kobayashi sensei help us with directions, his lady wife came out to an easy to find point in the road with their young baby strung around her neck, to make sure that we found the location without any further problems. I really can’t say how grateful I am to Kobayashi sensei and his wife for all of their help on this first day as well as all the other stuff I mentioned at the start of the Podcast.
So we did get there in time to get a few shots of the cranes. I was not able to capitalize on one of the larger flocks of cranes that flew overhead, but let’s take a look at shot number 1691, in which we can see four cranes that headed across the sky against the sky as the sun had dropped below the skyline. Here I was basically trying to get an almost silhouette, with some colour in the sky. To achieve this I selected a shutter speed of 1/160th of a second, and to get more depth of field to get the trees in focus to a certain extent too, I used an aperture of F8. I selected ISO 400 to give me a fast enough shutter speed to pan with the 300mm F2.8 without losing too many shots to camera shake. This shot is one where it all came together OK, but there were a number of blurred shots in the series too. This helps to enforce the advice of shooting in bursts when taking chances with shutter speeds and hand holding etc. It really increases your chances of capturing something that you can use.
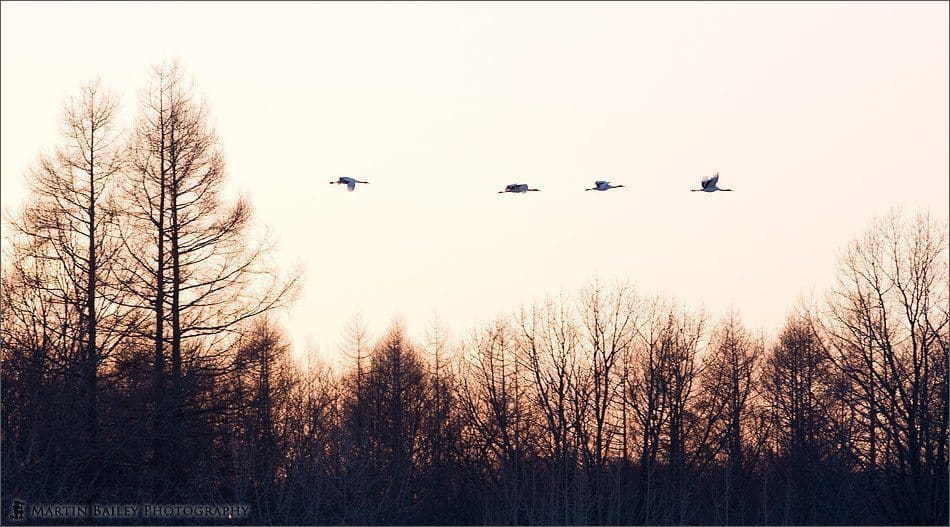
Evening Cranes
As the light died though, I switched my tactics, to get some slower panning shots. I attached the 1.4X extender to the 300mm F2.8 to give me a focal length of 420mm, and selected 1/30th of a second at F5.6. 1/30th of a second might give me some movement in the cranes wings, if the timing was right, and also would allow the background to blur some to emphasise the panning action. Unfortunately, in shot number 1692, the cranes wings were almost all totally stationary, but I like the blurred trees in the background, so I got two out of three of the effects that I was hoping for here, which is sharp main subjects, with a blurred background. If I’d got some nice swooping movement in the wings here, I would have been even happier. I did get another shot shortly after this with some really nice movement in the wings, but the overall composition had been lost as I panned through the shot, so I didn’t upload it to my gallery.
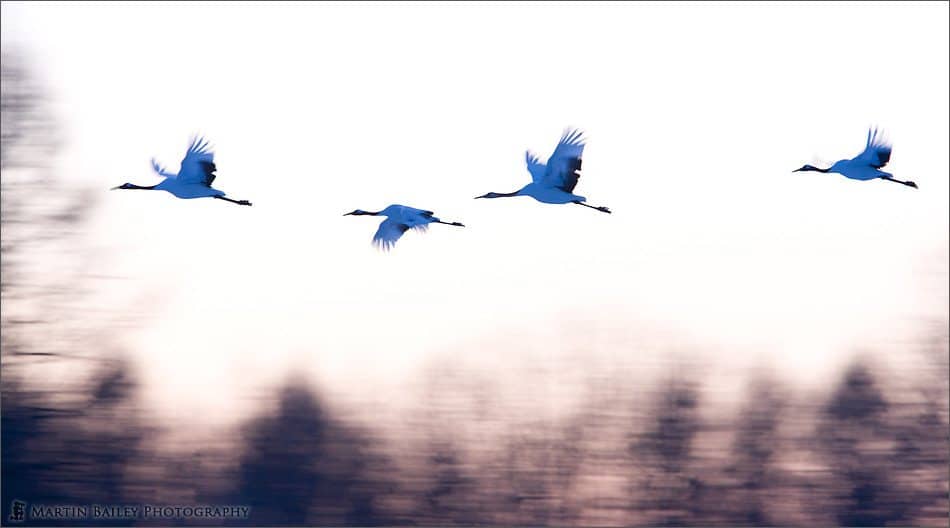
Going to Roost
Anyway, with this ended the first very long day. We went over to the hotel where we were going to spend our first night. This hotel is actually owned and run by another professional photographer, Masahiro Wada, who spends all his time when not running the hotel out photographing the wildlife in the area. After everyone enjoyed a nice communal bath in the hotels outside stone tub, called a rotenburo, we all ate dinner together, and for a short time, I primed the guys on what we would photograph the following morning. After dinner, we went up to Wada-san’s den, where some of the guys were treated to a preview of what we might be in store for us the following morning, if the temperature dropped below -15 degrees Celsius. For those that listened to Podcasts 71 to 74, when I visited this area for four day at the end of 2006, you’ll probably remember that I’d been hoping for mist on the river that you overlook from a special footpath, built especially for photographer, along side the Otowa bridge. In December 2006, there had been some beautiful mist the day before I arrived, but unfortunately all four mornings that I visited the bridge at dawn, there was no mist. I came away with another great reason to go back. We heard from Wada-san that the mist had been great recently, but had not appeared on the day we arrived. My heart sunk as I thought that our one day visiting during this trip might not be fruitful. Listen to next week’s Podcast, or take a sneak preview of my uploaded images, to see how we faired.
So, that’s it for this week. I hope you enjoyed joining us for the first day. We’ll continue the trip next week. There’s not really any housekeeping for this week, so I thought I’d take a couple of minutes to thank all those that have contacted me with thanks and encouragement for the Podcast recently. I always really do appreciate your kind words and feedback. I would also like to ask, as I haven’t said this for a while, but if you have any friends, family or colleagues that are interested in photography and you haven’t already told them about this Podcast please take a moment to spread the word. Maybe even drop a link to the site and give the podcast a mention in any other forums that you might be active in. It really helps me when trying to find a sponsor for the Podcast if I can show some healthy listener figures, and although they do continue to grow steadily, it would be great if we could get an influx of new listeners. Not just for the listener numbers of course. It’s always great to welcome on board new listener’s and to see new faces and get new perspectives and opinions on issues when discussed in the forum at martinbaileyphotography.com. Anyway, as I say, if you can think of anyone that might be interested, please do drop them a line and tell them about our great community and Podcast. So with that, all that remains to be said is thanks for listening, and you have a great week, whatever you’re doing — Bye-bye.
Show Notes
Music from Music Alley: www.musicalley.com/
Subscribe in iTunes for Enhanced Podcasts delivered automatically to your computer.
Download this Podcast in MP3 format (Audio Only).
Download this Podcast in Enhanced Podcast M4A format. This requires Apple iTunes or Quicktime to view/listen.

0 Comments