I bought a new lens recently, namely the EF85mm F1.2L II USM from Canon, and when I paid the guy in the shop said you can bring it back for up to two weeks if you find anything wrong with it. So I thought I’d do a few tests to make sure it lives up to my expectations and indeed to make sure there’s nothing wrong with it while it would be much easier to change. Today I’m going to share some details of the tests I did to make sure all was fine before the grace period to take it back runs out. Before we go on, a quick word to say a huge thank you to all of you that mailed or posted in the forum congratulating me on the 100th episode last week. Also, a totally humongous thanks to all of you that posted images with congratulations into the members’ galleries. I was totally blown away by this and really quite moved by all the trouble you went to, to either photograph or manipulate an image is some way to include a message and often thanks for the Podcast. You guys really are the best. Thanks very much. And thanks to Robin Kelly too, as I hear it was you that sparked this wonderful idea. Thanks a million mate.
A few weeks ago I mentioned that I’d made the mistake of picking up a Canon EF50mm F1.2L lens in a store, and was really taken back by it’s wonderful bokeh, which is the out of focus area of the image. Well, I started to check around and see if this lens really was as good as it seemed to be just by looking at the images on the LCD. It turns out that in general, everyone that has bought this lens is very happy with it, there are a few issues. I don’t have first hand information on this, but I read many reports that it has pretty bad fringing and chromatic aberration when shooting wide open, and when shooting closer than three feet or so, there are also some focusing issues. I’m not going to go into detail, as I say, because I haven’t check this myself, but the comments were enough to put me off the lens. Especially because one of the main reasons I want a lens with this wide an aperture is so that I can shoot objects close to the minimum focusing distance, with a really shallow depth of field. You guys know how I like that dreamy effect when shots have oodles of background and often foreground bokeh.
So, I rekindled the interest that I’ve had for the 85mm F1.2 II that was released from Canon last year, as an update to their most popular portrait and fashion photography lens. I’d had an opportunity to play with one of these for a short while, and it had really blown me away. Anyway, I decided to take the plunge, and picked one up last Friday. As I said in the intro, the guy in the camera store said as I paid for the lens, that I could take it back for anything up to two weeks if there was anything wrong with the lens. In the past, I generally just buy lenses and then take them straight into the field and use them to see if there are any issues, but I figured with this lens having such a shallow depth of field when used wide open, I’d do test to see make sure that it was focusing as expected. I’d not done this in any real structured way before, but I did a search on the Web and found a document published by a guy called Tim Jackson, and he’s basically put together a Back and Front Focusing Test Chart. As one of the problems with the 50mm F1.2 was back focusing when shooting up close, I figured this would be a good test to put my mind at rest that I’d not got a duff lens. I’ll put a link to the page where you can download the document into the show notes, in case you are interested in trying this out yourself.
Now, before we go on, I have to say that it seems that the version of the test I used is now outdated. In the one I used, the last few pages of the document are a page that makes a base and has the measurements for the test, and another page from which you have to cut out a focus target. The new test that I found while preparing to talk about this and the one I’ll link to in the show notes is just a single page that you can just lay down on a flat surface and shoot from an angle of 45 degrees.
I didn’t bother to redo my tests, as the results were good with the old test, and I’d already shot a number of images with the lens, and I was relatively confident that everything was OK anyway. I’ll definitely use the new test for any future lens testing though. The one problem I did find with the test I used is that having printed the chart out on relatively flimsy A4 paper it sagged pretty badly as I was using blue-tack to stick it onto a closet door, so it took some stretching and messing around to get good results. I was going to suggest you use stiffer paper for your tests, but really, the new test looks more reliable so I’d just download the latest and use that. With this new test just being a single page too, I’d be more inclined to print it out on high quality gloss paper, to get some really crisp black lines, because I can just file the paper away and reuse it for future tests. With the test I used yesterday, it basically is going to get damaged pretty easily and takes up more space, so I just crumpled it up after the test and threw it away. I knew this was going to be the case, and this is another reason I didn’t really want to use good quality paper.
Anyway, the test was relatively easy to do. I’m not going to upload my resulting images to my gallery so that we can search for them by number, but I will put them into the audio files, and into a forum post that I’ll also link to in the show notes. You can see in the image that once you’ve cut out the focus target and pasted it together, then pasted it to exactly the right place on the base page, you have a target that sticks out from the base at 45 degrees, and you have to stick the whole thing horizontally to a door. You should also be able to make out that there is a blurred black line in line with the black line at the top of the focus target. Aligning these two lines was how you made sure you are at 45 degrees, but again, that’s not necessary in the new test. You then set your lenses aperture to the widest possible, because this allows you to see the effects the easiest, and then focus using only the center focus point and shoot your test shot. What I’ll do is link a resized version of my test shot to the post, but then I’ll link that image to the full sized version, so you can open it up on your own computer and look at it at 100% to see the details yourself. I found that the focus was pretty much spot on. There are some areas where the lines either side of the one that is supposed to be in sharpest focus are actually a little sharper, but this is due to the sagging paper, and I think I might have been looking down on the chart very slightly, as the focus runs out a little at the top and bottom of the image. Because this is the same amount at the top and bottom, I wasn’t too worried about correcting this. On the whole, the results show that my lens is not front or back focusing, so I’m happy enough with the results.
I read on Tim’s Web site that there have been a lot of people that have panned this test as being unreliable etc. And Tim has a number of explanations as to why these claims are unfounded. I personally don’t care to join in this kind of discussion. The test seems good enough for me, and the new version probably much better. I’m not trying to do rocket science here, just give myself some piece of mind that that expensive glass I’ve just bought is performing as it should, and I’ve done that. So, I doubt he’s listening, but thanks to Tim anyway for going to the trouble to think of a way to test this and for maintaining and updating the test. It all takes effort, and I thank you for your generosity.
So, after that, I decided while I was at it, I’d test the resolution and contrast of my lens by shooting a test card head on. For this, I used an old video test chart called the EIA1956. I don’t know if this 1956 is the year the chart was made, but it wouldn’t surprise me at all if it was. I’m sure there are other great charts out there, and if anyone knows of any, please do post a link in the forum post that I’ll create in the MBP Podcast forum at martinbaileyphotography.com. I use this chart because I already have a nice high quality printout of one on great quality gloss paper, so I just have to whip it out and stick it to the wall and shoot my test shots. Also, as I said, I’m not really that worried about my lenses that I want to turn all of this into rocket science. If I can prove to myself that things are how I expect them to be, that’s enough for me. Anyway, I’ll drop a link to the EIA 1956 chart into the show notes and the forum post, so you can grab your own copy if you want to try this too.
For some reason, when I print this out from a PDF using my Pictorico Hi-Gloss paper and the necessary profile, it comes out like an olive green colour. Again, I’m not too worried about this, because it serves its purpose, but I do find that a little strange. Anyway, what I was trying to do here was to see just how sharp the lens is when used wide open. You may have heard me say how much I love my Canon EF50mm F1.4 lens in the past, but I have to say, that this lens is really just too soft at F1.4 to be able to use it at that aperture, unless of course you’re after the whole image being soft, and not just the beautiful bokeh it creates. Well, the main reason I was really interested in the 85mm F1.2 is that Canon claims it is sharp wide open. I also saw some similar claims from people that had posted comments around the internet, and this is why I had decided to take the plunge. I was not disappointed, as we’ll see.
To shoot the test card I basically once again just blue-tacked it to a closet door, then made sure my camera was directly in front of the card. It doesn’t need to be absolutely perfect, but try and get it as square as possible. To check the height, I used a tape measure this time to ensure that the center of my lens was exactly the same height from the floor that the bulls-eye type circles at the center of the chart was. I should note too that to focus on this chart I selected all of my focus points, not just the center one. I just find that the focus works better with this chart if you give the camera’s focusing system more to latch onto than that psychedelic bulls-eye. So that you can see what I’m talking about with the chart, I’m going to add one resized image to the audio files, but you are not going to be able to view the detail in these images without looking at them full size, so there’s no point in putting them all in. What I will do though is I’ll put at least the image shot with the aperture wide open, and the full sized version into the forum post, and I’ll also put a zip file with all the full sized images in that post too, so you can download it, and take a look at all the files I shot. The first thing you’ll notice is that the shots are a little dark. I use center weighted metering and had basically metered from the center of the image which is mainly white. Again, not rocket science, so I didn’t bother to compensate here.
The interesting thing that I found was that as you move quickly through the images, it’s surprising how much vignetting we see with the lens from F1.2 to F2. A good way for you to see this would be for you to download the zip file, and just flick through the images in series. In fact, for this purpose, I’ll probably make an animated gif file for the post, or I’ll post another zip file with all the resized images. Leave that one with me and I’ll choose which one I go with later. Either way it will be in the post. I’m not worried about the vignetting as it’s very smooth and will be almost unnoticeable unless comparing shots like we are here, but at F1.2 and F1.4 all but the very center of the image gets considerably darker than the other shots, and at F2 it’s still quite noticeable. It not vignetting in the sense that the edges have totally black lines, like when you have too many filters on, but it’s more like a general darkening, and may well even be quite pleasing actually. I’ve included F1.2 and then all full aperture stops from F1.4 up to F16, the smallest aperture for this lens. So that’s F1.2, F1.4, F2, F2.8, F5.6, F8, F11 and F16. You’ll see that from F2.8 upwards the shadowing is not there.
Anyway, on to the thing that I really want to look at, and that is just how sharp this lens is at F1.2. I have to tell you, I knew this was going to be good, but it far surpassed my expectations. Even wide open at F1.2 the image is incredibly sharp. If anything, there’s perhaps a little bit of chromatic aberration up to F2.8, which we can see by the slight pink colour of the finest lines on the F1.2 to 2.8 images. This is very minor though again, and probably not even noticeable in most shots. The pink fringing on the narrowest lines is pretty much gone from F4, but sharpness is there pretty much through the entire range. If anything, the smaller apertures, from F5.6 and smaller, do seem to tighten up just slightly, but I have no complaints across the board. So, take a look at the F1.2 full size image that I’ll link to the post if you don’t believe me or if you do believe me but want to see for yourself anyway. Also download the zip file with the full sized images if you’re interested and see how this lens has measured up in this simple test.
Yuji #1
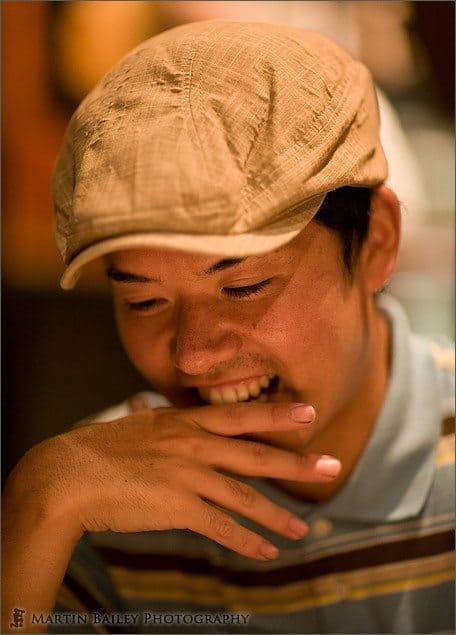
So you’re probably wondering how it fairs in real world use, so let’s take a look at a couple of shots from last Friday night. The first one is number 1518 in my online gallery. Remember you can see these images in iTunes or on my Podcasts page or you can jump straight to this image by punching the number into the field that you’ll find in the Podcasts pull-down menu at martinbaileyphotography.com and then hitting the button or enter on your keyboard. Although I’ll be using this lens in my usual nature photography, you can’t buy a lens this suited to portrait work and not shoot portraits with it, so here we can see Yuji. This is actually my other half’s nephew, who was in Tokyo last weekend and stopped over with us on Friday night. Here we were in a very dark pub having something to eat and some drinks, and I asked him if I could photograph him and he obviously obliged. As it was so dark, I upped the ISO to 800, opened the aperture to F1.4, set the shutter speed to 1/40th of a second and shot a handful of images. A 40th of a second is pretty fast for how dark it was, obviously because this lens was allowing what light there was to just poor in. I’m pretty pleased with the results. I had of course focussed on the eyes, and the detail is incredible. Just very slightly grainy because of the high ISO but totally acceptable, and that’s why I decided to upload this and the next shot to my Portrait Gallery.
The second image is 1519, and this time we can see Yuji’s eyes, with a nice catch-light, and again, very sharp. This was shot with exactly the same settings as the last, so the Depth-of-field is very shallow because of the F1.4 aperture. I’ve focused on his left eye, or the right eye as we look at the shot. When viewed at 100% even with the slight grain of the high ISO, again it really just blew me away. Yuji was moving around while I was shooting him though, and I had had a few beers myself, so I imagine the sharpness could be even better with a lower ISO and a steadier hand. Notice too that the background is pretty much totally out of focus. This is exactly where this lens comes into its own. We can make out shapes pretty easily as there was an open kitchen door behind him, but it is blurred enough to not really detract from the main subject very much at all. In general I’m very, very happy with this lens and can’t wait to really start and use it in the field.

Yuji #2
Just to recap, my main reason for doing these tests was to ensure that I didn’t have a duff lens. The other thing is this is the first F1.2 lens I’ve bought, and I really wanted to see if it was as sharp wide open as I’d expected. I don’t think I would have been able to take it back if it wasn’t mind. It would really have had to have been back or front focusing, or just plain faulty in some way, but I would have been able to prove if it was by taking my test shots to the store to make my point. Out of all the lenses I’ve bought over the years, I have not had a single duff lens from Canon, but I have heard of people that have, and so I figured, triggered by the comment about the two weeks grace period from the guy in the store, that I’d do the tests to put my mind at rest right now, before it’s too late. From now on, I reckon I’ll continue to do this with any new additions to my arsenal of lenses, and I’d definitely use the new version of Tim Jackson’s Front and Back Focusing Test when I do, as well as the EIA 1956 test chart, or anything else more suitable if someone points us to one in the forum. It will probably be a good idea to check forum thread that will probably follow this podcast before you do start any similar testing yourself.
If you do decide to do tests for lenses that you buy or already own, remember that if it is a zoom lens, you need to perform the tests at various focal lengths. I just did mine at 85mm obviously because this is a prime lens, but if you have say a 70-200mm lens, I’d probably do the test in three or five stages. One at 70 and one at 200 of course, but then I’d probably like to see one at around 135mm, which is of course the middle of the focal length range, and then if your patience holds out, another one at say 100, and one at 175mm too. This would allow you to see just how sharp your lens is pretty much throughout the range.
So as I said, I’m not really doing rocket science here. It’s all just to make sure that things are how I expect them to be. Using your lens in the field is always going to show up deficiencies too, so trying to get out into the real world with a new lens as soon as possible will also help. Remember that the new Assignment is now on, and the theme is Documentary/Photojournalism, so it’s going to be a tough one for me. Take a listen to Episode 100 from last week or check out the assignment forum at martinbaileyphotography.com for more details.
Also, as I mentioned a month or so ago, if you interested in coming to Hokkaido, Japan next winter for an amazing wildlife and winter landscape workshop, then please drop me a line. The workshop will probably be from January 28th, which is a Monday, so you’ll have the weekend to actually get here, and will run through to February the 1st or 2nd, which is a Friday or Saturday respectively. You will see Steller Eagles and White Tailed Eagles and of course Japanese Red-Crowned Cranes. There’ll be wild deer and the possibility of other wildlife too. Hokkaido is a beautiful place in the winter, and although extremely cold, makes for some incredible winter landscape shots too, so we’ll definitely work time in for that too. I’ll be providing interactive tuition throughout to make sure this is not just the photographic chance of a lifetime, but also a real chance to improve on your photography, no matter what your level. Right now I’ve heard from 7 people that are interested, and to be honest, just 7 is not going to be enough, as we have to hire a bus for the duration to take us around the island. With just 7 attendees the cost would be way too expensive. I’d say we need at least 12, but around 15 would be ideal, so if you’re thinking you’d like to go, but waiting for more details, please just drop me a line to let me know you are interested. Without a realistic chance of the trip actually happening, I’m not going to be able to assign the time to plan this much more either, so it’s really important that you mail me. If we do go ahead with this, I’ll provide full details of what you can expect weather wise and what type of clothing and equipment you’ll need to protect both you and your gear from the extreme weather conditions we’ll be shooting in.
So with that, all that remains to be said is thanks for listening, and you have a great week, whatever you’re doing — Bye-bye.
Show Notes
Get Tim Jackson’s Back/Front Focus Test Chart here: http://www.focustestchart.com/chart.html
You can get the EIA1956 chart here: http://www.bealecorner.com/trv900/respat/#EIA1956
The music in this episode is from the PodShow Podsafe Music Network at http://music.podshow.com/
Subscribe in iTunes for Enhanced Podcasts delivered automatically to your computer.
Download this Podcast in MP3 format (Audio Only).
Download this Podcast in Enhanced Podcast M4A format. This requires Apple iTunes or Quicktime to view/listen.

0 Comments