This is the second part of what is going to be a continuous series in which I’ll show-case multiple individual or smaller groups of shots that would not in themselves make a full episode, and provide my thinking behind the image along with any relevant tips and techniques I might have. Today we’ll look at six more images and that will be it for a while, but as I add more individual shots to my online gallery I’ll build a list for part 3, and keep on going like that. If you have any shots from my gallery that you’d like to know more about, and that I haven’t covered in other Podcasts, please do drop me a line by Private Message from the forum or the Contact Us form, both at martinbaileyphotography.com. Also remember that it’s always nice to actually hear you too, so if you want to record an audio message or question that I will include in a future show, you can do so with the MobaTalk message service on the top page of my Web site.
The images this week are all much newer than the pretty old ones we looked at last week. All shot within the last year, with my Canon EOS 5D, which is a full sized sensor digital SLR camera. The first image that I wanted to look at is number 1159. This was shot on the banks of the Kawaguchi Lake in the Yamanashi Prefecture, which is where I go to shoot Mount Fuji every so often. I’d visited with a friend over from the UK, and had spent a little time shooting Mount Fuji, and as I was doing so, the ladies we can see in this image were tending the flower beds on the bank of the lake. When I finished and turned to head for the car, I noticed the ladies all sitting eating lunch like this. I said hello and we started chatting. They asked if we wanted to sit down and share their snacks and have a cup of tea. I of course thanked them for the kind offer, but said that my other half was waiting in the car, and so we should get back. Actually, at this point they asked if my missus was Japanese and I replied yes. They then asked if we have any kids, and I replied with my usual response which is “no, we’re still practicing”. Usually this just gets a laugh and then the conversation ends, but these earthy ladies didn’t let it stop there. When the laughter had died down one of them asked how long we’d been together. When I told them 16 years, she said that this is an incredibly long time to be practicing without results, so I must be crap at it. I laughed, and could do no more than agree with her. Having broke the ice in this way, I felt very relaxed about asking if I could take their photo, and they kindly agreed and adjusted their hats etc for the shot. Unfortunately I still had the camera on the tripod, so I couldn’t easily get any lower than this, but I shot a frame, thanked them again, and went on my way.
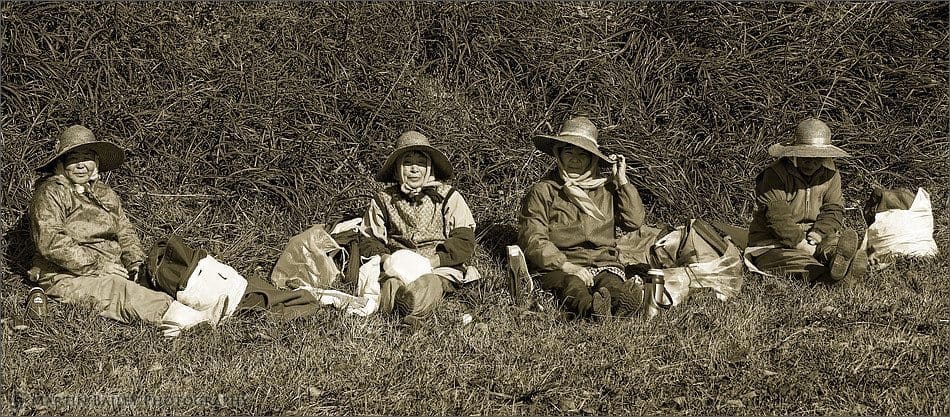
Gardeners
I was relatively pleased with the results, and I decided as you can see to convert this to a sepia coloured image. I did this really to remove some of the distracting colours in the bags and clothes, and to really age the image, as the relatively traditional working clothes of the ladies seemed to lend itself to that. I obviously have also cropped the top and bottom of the image, as they added nothing to the scene. There are some quite harsh shadows across the face of the ladies though because of the hats and the angle of the sun, which was quite high in the sky by this time, which was just after 10AM. I didn’t really have time to think about my settings with the impromptu nature of the shot. I was still at f8, with and ISO of 100, and shutter speed of 1/250th of a second. I wish I’d thought to open up the aperture a little to say around f4 so that I could have softened the background and foreground a little. As it is, I think there’s too much detail in the grass, but I guess it can’t be helped now. Still, this shot has nice memories of human interaction and kindness, which is worth a lot to me.

Autumn Fuji
A few hours later on the same day I shot image number 1161. This is a pretty standard landscape shot, with the iconic Mount Fuji taking up most of the background. I like this shot because of the clouds that form as the breeze blows across the semi-snow covered mountain, which really contrasts nicely against that blue autumnal sky. The other autumnal elements such as the browning grasses and trees, with the pampas in the centre of the frame there all just build up a nice classic landscape scene. What I wanted to talk about here more than anything is that all is not what it seems here. My intention with the image is to portray this classic landscape scene as I have, but in reality, there’s a relatively busy road running between that pampas grass and the line of trees in the middle of the image. I actually had to shoot about 6 or 7 frames here to get one without a car in it. This is cheating in some ways, but all photography is about what we leave out of the shot, right? We choose telephoto lenses for example to get us close to our subject, but we’re not really getting any closer. What we’re really doing is just enabling ourselves to remove more of the world around the subject than we’d be able to do with a wider lens. Similarly here, choosing the right moment to release the shutter is allowing me to remove a car or two that would have given the image a totally different feel, which I thought was worth a mention.
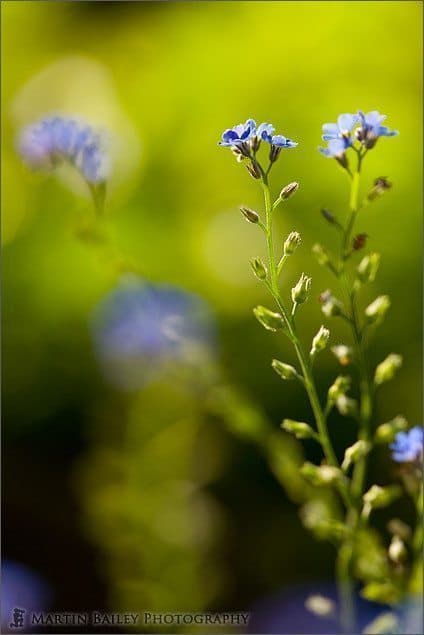
Frailty
In image number 1426, we can see one of those dreamy flower shots that I like to make. I keep an eye out always for flowers situated with a nice bright background that I can use for this kind of bokeh. These flowers were very low to the ground in a border either side of a line of trees in a formal garden in a park in Tokyo. See how I’ve placed the two almost vertical stalks along the right side of the frame, and then allowed the diagonal flower to create some nice bokeh breaking up the scene. I places a number of blue blotches along the bottom of the frame to anchor it down some, along with the darker patch below the bright green, again adding weight to the bottom, improving the balance of the image. I was shooting with my 100mm macro lens, with the aperture set to f3.2 for a nice shallow depth-of-field. It was a little breezy on this day, so these frail flowers were blowing around quite a bit, so I set the ISO to 200, which gave me a nice fast shutter speed of 1/500th of a second.
In addition to talking about the image itself, I wanted to touch on something that I’ve been doing for so long from habit, that I realized when shooting this image has been a pretty stupid thing to do. This is so obvious, that I reckon most of you are already doing this, but just in case you’re as stupid as me, here we go with an explanation. When I need to get really low to the ground, lower than the tripod will allow me by opening the legs out as wide as possible but keeping the camera in the normal position on top of the tripod, I usually set my camera up hanging upside down under the tripod, with the centre pole inserted from beneath. The stupid thing I’ve always done though is that because I’m trying to get as low as possible, I have been extending the legs just enough to get the camera to the necessary position. What this means though is the space between the legs is relatively limited and I end up having a hard time really getting my eye into position to look down into the angle finder. On this occasion, quite by chance, the concrete blocks either side of the flower border were spaced out at such a distance that I extended my tripod legs much further than usually so that I could place them on the concrete and not damage the other plants in the soil of the border. This meant of course that I had to extend the centre pole much further down than usually to get to the necessary low position, but then when I started shooting the tripod was set so high that it was pretty much totally out of the way, which allowed me much freer access to the camera to see into the angle finder. Most of you will probably be thinking, yep, you were being pretty stupid until now, but hopefully at least some of you will have been doing the same thing, and will find this useful. From now on, I’m going to be inserting the pole is leaving it dangling down as far as possible from the centre of the tripod and then extending the legs as high as necessary to get me to the required height. I can imagine that this will make the camera slightly less stable, and I may need to watch that on windy days, but as the weight of the camera is hanging down, under the support, this is not going to be as big an issue as it extending the centre pole up a long way when using the camera the normal way around, with the camera mounted on top.

Gingko Leaves
Next let’s look at image number 1461. I had a brief exchange with Wayne about this shot using the comments feature of the gallery. Wayne is a long time member and major contributor to the MBP community, so this is actually a great time to say thanks Wayne for your comments here and for all your excellent contributions in the forum and the members’ gallery. So Wayne noticed that I’d shot this in manual mode and asked how I controlled the highlights, stopping them from blowing out. He asked had I used spot metering or if I’d adjusted the highlights Lightroom. Wayne also asked how many exposures I made to get the exposure right. So I thought I’d share my answers here, in the hope that it might be of some use. This was shot in my local park during an afternoon walk, and the subject is a cascade of backlit Gingko leaves. I had to act quickly, as the light hitting the leaves would be moving pretty fast as it poured through a small gap in the trees.
I used Manual Mode because the very bright leaves against the dark background were going to fool the cameras light meter, and as Wayne pointed out, had I not taken the appropriate steps to overcome this, the leaves would have been totally blown out. Because I keep my eye on the exposure indicator in the viewfinder, I can get a pretty good idea of how close the exposure is going to be. I can’t remember exactly, but I knew that I need to under expose quite a way to stop the leaves from blowing out, so I set the shutter speed such that it I could see the caret way under zero. I then shot a test, and checked the histogram, and could see that I was still clipping slightly, so I made the shutter speed 2/3rds of a stop faster to compensate further. Now knowing that I would not be clipping the highlights, I shot about 10 frames, with slightly different compositions. I was trying to keep the edge of a tree in the background from creeping into the frame breaking up that total black along the right side. I was also set on getting the very top right leaf in, and the very bottom leaf into the shot, as that beautiful gradation on the leaves was what really drew me to the scene in the first place. I’m relatively pleased with the shot. I love the greens and the dark background, and actually can’t wait to do a bit of printing and see what this one looks like large on good quality paper.
Next, let’s look at image number 1462, which was shot shortly after the last image during the same walk. You can see why my other half gets frustrated. I can’t even go for an afternoon stroll without stopping every five minutes to shoot photographs. Here again, I’d spotted a flower in the shade but with a patch of brightly lit other flowers in the background. It’s that same low sun that was pouring through the trees in the last shot, so again, I was going to have to work quickly, as the patch of brightly lit flowers that I wanted to use for the background would not be lit for very long. I had to stand on tip-toes so position those patches of bright bokeh in just the right position behind these beautiful shaded hydrangea flowers. The shading has actually caused the leaves of the hydrangea to become almost blue, as I was shooting with the Daylight White Balance preset. I don’t want to correct this White Balance, as that would throw out the colour of the bokeh, and the purple of the hydrangea flowers. Plus, I really just like the overall tone of the image as it is. One tip that I wanted to pass on that I recalled when looking at this shot is something that I’ve not actually tried myself yet, despite having carried the piece of kit around to do this for more than a year now. I always carry around an A4 peice of semi-transparent almost white plastic, with the idea that under the right circumstances, I could hold it above a flower, to darken it, by cutting out half the light hitting the flower, and that would allow me to brighten the background by comparison. This would mean that I could create a similar scene to the one we’re looking at here, but in full sunlight. I wouldn’t have to actually look out for these scenes happening by coincidence, just when I’m ready to take the photo. I prefer to shoot things as they are though, and have never really kept my eye out for the right situation to use my piece of plastic. The other reason I carry it by the way is for the opposite reason to this. There may be a time where there is naturally too much contrast between the main subject and the background, and I could use this to level out the contrast of the scene. I’ll get to both of these techniques someday though, and I’ll be sure to show you the results if it works the way I’m expecting.
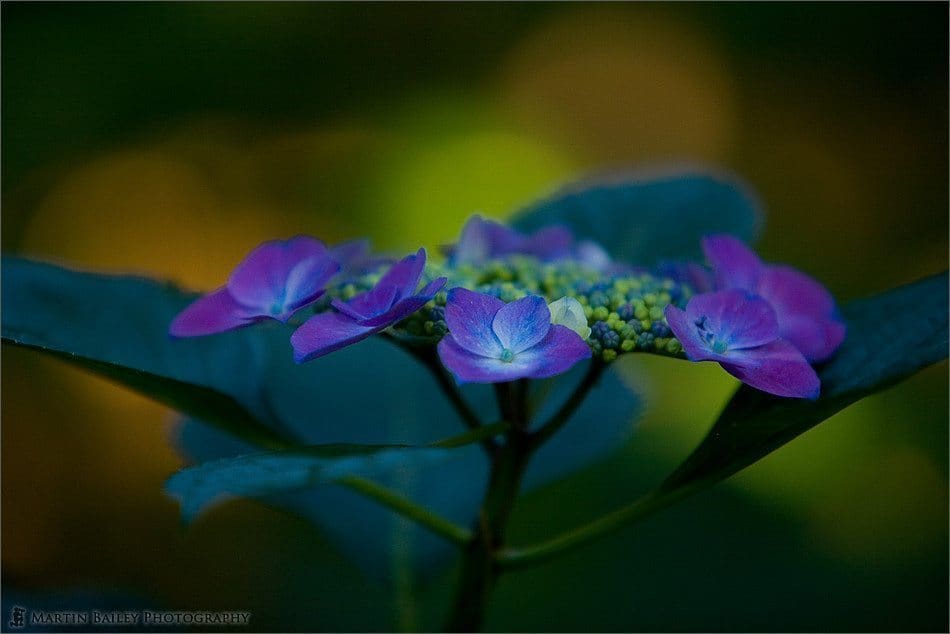
Purple Hydrangea
So, the last shot for today is number 1466. When I’m out and about, say for a shopping trip or something where I don’t go fully kitted out for photography, I often take just my camera with one lens fitted in my Lowepro Toploader bag, with a little pouch of goodies like my blower and spirit level, spare batteries and a few filters etc. attached to the side of the bag. In that pouch I often also have a LensBaby 2.0, which I will sometimes drop onto my camera to shoot some shots just for fun. The thing is the LensBaby will actually allow you to take some pretty good shots, even though it’s really cheap and easy to use. In this shot we can see what I think is the flowers of the pomegranate tree. The fruit is actually already quite large behind these flowers so I think I’m IDing this correctly.

Pomegranate Flowers
For those of you that have never used a LensBaby, they’re really fun to play around with, and one of the things that I find really fun is how you change the aperture. Basically the lens comes with a little case that contains a number of rings and a tool for pulling the ring already in place out from the front of the lens, and then you just drop the next ring in, and it is held in place by a bunch of magnets. Actually, thinking about it, I’m not sure without checking which is magnetized. There are a number of shiny silver studs in the front of the lens, but the ring itself, although pretty flexible, actually looks more like magnetic material than the studs. Either way, magnetism holds the rings in place. For this shot, I had placed the f2.8 ring in the front of the lens. This gives you just about enough aperture to shoot a sharp image, but really still allows you to play with that LensBaby look, where everything else in the scene seems to be just flowing away from the sharp area. You focus LensBabies by pushing in or pushing the front of the lens away from the camera body, and you move the sweet spot, the part of the lens that is in focus around, by simply moving the front of the lens around. You get instant feedback from in the viewfinder, so it’s easy enough to do, but I do find that focusing can be a little bit hit and miss, especially when using the f2.8 aperture ring or no ring at all, which makes the lens f2.0. You also need to bear in mind that the more you bend the LensBaby, the less accurate your camera’s meter will function, so you have to be pretty careful with exposure, either using exposure compensation or go to Manual mode. As long as you’re shooting digital, you’ll be fine though, as you can just keep checking your histogram and adjust exposure as necessary to keep things sweet.
That’s it for this week. I hope you’ve enjoyed these first two single exposures episodes. Before we finish I’d like to say a huge thank you to all of you that nominated this Podcast in the Podcast Awards. As usual I was totally unaware that this was coming up and started calling for nominations from the 12th of July, when there was actually just three days of voting left, so we may well have missed the boat there, but still, it was great to see you guys rallying around trying to drum up nominations. Thanks again for all of your support.
Remember that the Movement assignment is underway. All entries should be shot after Monday the 25th of June, up until the end of the Assignment on August the 5th, 2007. You’ll be able to upload your entries to the assignment album on mbpgalleries.com until the end of Sunday the 5th anywhere in the world, so no need to worry about time-zones. For more details, take a listen to episode 92.
So that’s it. Thanks for listening, and we’ll speak again next week. Bye-bye.
Show Notes
The music in this episode is from the PodShow Podsafe Music Network at http://music.podshow.com/
Subscribe in iTunes for Enhanced Podcasts delivered automatically to your computer.
Download this Podcast in MP3 format (Audio Only).
Download this Podcast in Enhanced Podcast M4A format. This requires Apple iTunes or Quicktime to view/listen.

0 Comments