This week we’ll complete taking a brief look at each episode to date, with a mention of what was discussed and one or two of the main points of that Podcast. As with the last three summaries, I won’t be covering all the tips and techniques of course, as it would take as long as just listening to all the original episodes. These summaries will though give you the gist of what I’ve covered so far. There are many more pearls of advice hiding in the old episodes though, so hopefully this will give you some pointers as to what episodes you want to go back and listen to fully. Let’s start this week from episode 36, and run through to number 49, the last episode before we started the summary. Also, the voting is now complete for the last MBP Photography Assignment, so listen out at the end of the show for the winner and two runners up.

Sugatami Pond
In episode 36, we discussed filters. There are some filters that I continue to use very much even having jumped to digital, and others, that I am shying away from a little more now, as I find it easier, and often better to create that effect in Photoshop, with a little preparation in the field. Firstly, I’d say the polarizer is still the filter I use the most. The main use for a polarizer is to make a blue sky, bluer. It won’t perform miracles. If you are under a very hazy sky or in humid conditions, it won’t simply transform that sky to a bright blue, but if you have a blue sky to begin with, even pale blue, it will intensify the colour, depending on the angle you are shooting from the sun. A polarizer is most effective at 90 degrees to the sun, with the effect getting weaker the further you move away from that point. The effect of a polarizer on a sky cannot really be emulated in Photoshop without a lot of selection and changing the colours of the sky, and even then, it would probably look false. Plus, I really don’t want to spend that much time in Photoshop. The other physical filters that I still can’t do without are neutral density filters. To obtain a slow shutter speed, say to make the water of a waterfall look like its flowing, I often use a circular neutral density filter. Until recently, I used to use a gradual neutral density filter quite a lot too, to balance bright and dark parts of a scene, but now I generally shoot two versions of the same scene, one exposing for the highlights and one exposing for the shadows, and I merge them in Photoshop. We can see an example of this technique in image number 1079, but you can hopefully see that it is important to make your exposures in quick succession or for example the clouds in the sky will move and you’ll loose registration of the elements in the scene.
In episode 37 we looked at shooting in inclement weather. By staying indoors on rainy days you are depriving yourself of some great photographic opportunities. Not only are there certain images that can only be made in the rain, overcast conditions often provide very nice diffused light and when trees for example are wet, the saturation of the colour is much better than when under the harsh sunlight of a clear sky.
Misty Morning
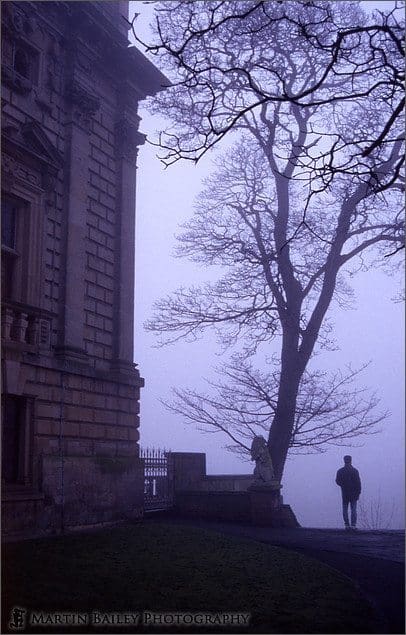
In episode 38 we looked at creating mood or atmosphere in your images. Mood is often an intangible thing, and on looking through a number of my images for examples for episode 38, I came to the conclusion that I had captured mood in two types of ways. One being visual mood, caused by say having mist, or some other visual element that invokes the feeling of mood or atmosphere, and the other I’ll term implied mood. To make my point about the visual mood, I showed you shot number 8 from my gallery, which is called “Misty Morning” and was shot way back in 1992, in Nottingham, near my home town in England. Here we can see that a thick fog is enshrouding the scene, making various shades of contrast in the bows and branches of the tree and also making the man looking out into the background with his back to us almost a total silhouette. We start to think of what he might be thinking. Is he sad, or is he contemplating jumping? This I guess is also implied mood, but is enforced I think by the visual element of the fog. I am not an expert in lighting, lighting also has a huge effect on the mood of a shot. Lighting from the side, especially when leaving shadows on one side of the face, seems to give a totally different mood than say evenly lighting the face would. The other type of mood I mentioned, implied mood, is really something that we capture as a fleeting moment, such as the expression on our subjects faces in a candid portrait.
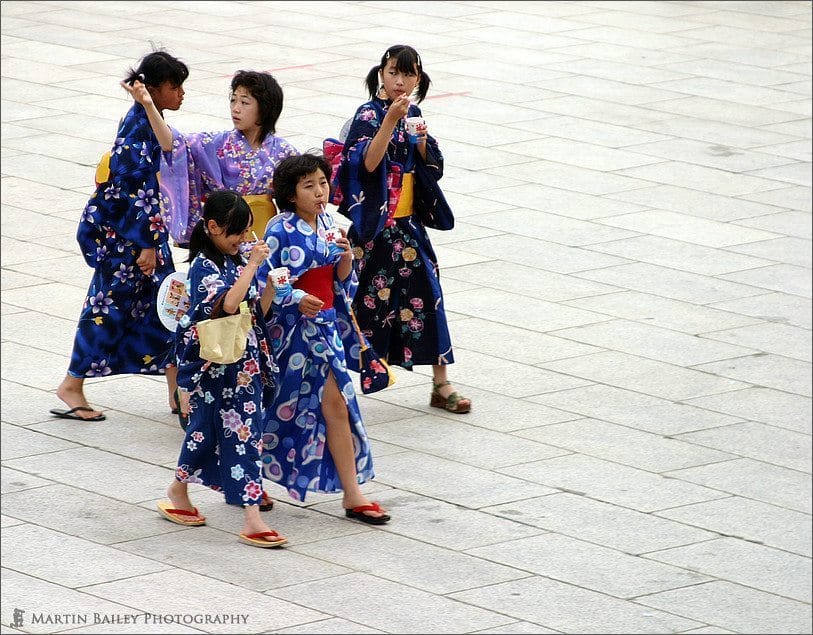
In fact, in Episode 39 I followed up on the first episode on mood and the first image we looked at was number 109 of five girls crossing the forecourt of a temple. It’s customary in Japan to throw a few coins in a box at the main doors of the temple, sometimes you’ll clap your hands to attract the attention of the gods, and then pray. These girls were about to do that, but walking along in the heat of the day in their “Yukata”, a kind of summer kimono, and drinking their crushed ice drinks, I can imagine they didn’t have a care in the world. This was more than three years ago now, and these five young ladies will be older, and getting closer to the pressures of adulthood, but at this point in their lives, I get the impression that they were really just enjoying the day, enjoying each others’ company, and probably making the sort of laid back summer memories that will stay with them forever. This is kind of what I was trying to get across by saying implied mood. All of these feelings are coming more from the look on their faces than from the weather or lighting.
Summer of ’03 – Gion Matsuri #8
In episode 40 and 41 we took a trip to a very culturally important and incredibly photographic place in Japan, called Nikko, in the Tochigi prefecture a few hours drive north of Tokyo. In image number 1006 I made the point that fine weather is not always going to give the best results by comparing it to an image made the previous week on a fine spring day. The rainy day shot has much more saturated colours because of the diffused light from the overcast sky and the leaves themselves are also physically saturated with water, bringing out their lush green colouring. I also mentioned again targeting sites at certain times of year, as I did with this shot to get not only the young fresh green leaves, but also the splashes of red that are azalea flowers that are only visible in this scene for a week or so each year. We looked more at the cultural aspects of Nikko and a bit of a history lesson in episode 41.
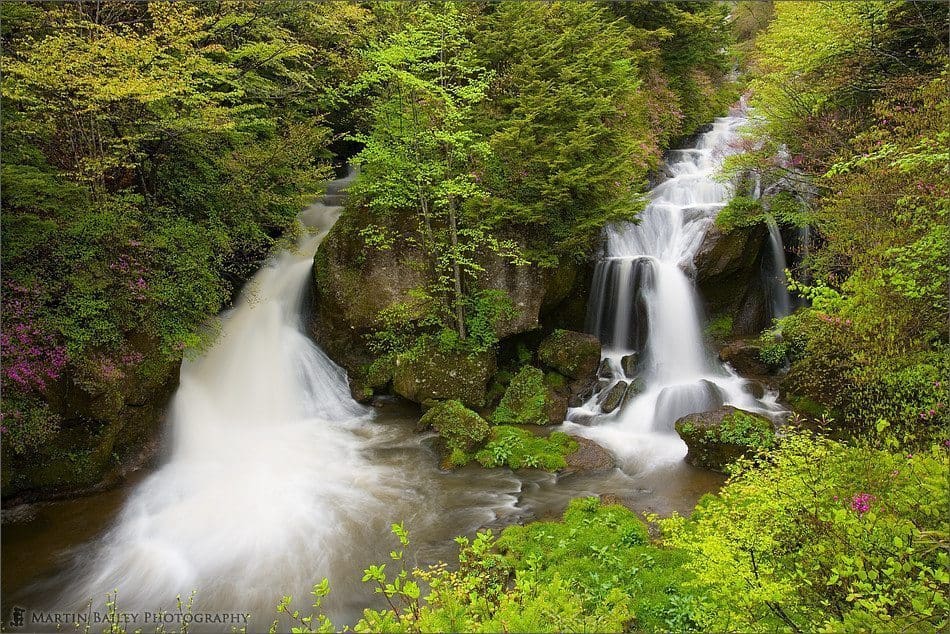
Ryuuzu Falls with Azalea
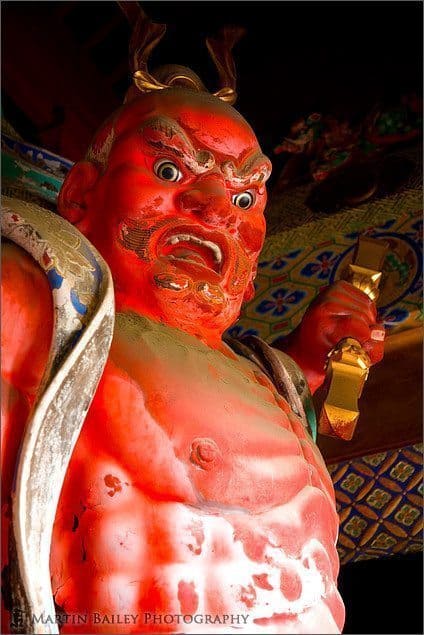
Nioh Statue
To me the photograph of a Nioh statue guarding the gates of the Toushougu Temple that we can see in image number 1012 sums up a lot of what Nikko is about. Red is believed to ward off evil, and this guy looks like he will definitely be accomplishing his purpose. I won’t go into detail about the history of the site again. It would be better to listen to episode 41 for that, but if you are ever in Japan and have a few days to spare, this place is definitely worth a visit, and taking your time to take in the culture and not just wiz around photographing as much as possible to enjoy when you get home.
In episode 42, 3 and 4 we took an in-depth look at Macro Photography. Macro Photography is one of my passions, and I started it really just to widen my scope with regards to finding subjects to shoot. When you limit yourself to shooting with normal lenses, there is a whole new world, a macrocosm that you deny yourself to ability to explore. I explain some terminology, such as what 1:1 or life-size macro photography means. That is, when you shoot at life size, the subject is recorded on the film or sensor at the same size that it is in the real world. So if I shoot a grain of rice say that is 7mm across, it will be exactly the same 7mm on a piece of 35mm film or a full size sensor. I also discussed about magnifications larger than life-size as we went through the series, and discussed my 65mm 1-5X Macro lens, which, at 5 times, would record that same 7mm grain of rice at 35mm almost filling the 36mm wide piece of film. There are numerous problems to overcome when working at life-size or higher magnification, including camera shake and even just focusing with the incredibly shallow depth of field at these magnifications. To overcome these we talked about the importance of a good tripod, flash units specifically for macro photography and focusing rails, for accurate focusing among other things. I also mentioned the importance of paralleling your shots when you have multiple subjects in the shot. Probably one of my favourite images from this series is image number 1025 of a bug walking on a fiery yellow and orange leaf. This was shot at close to life-size with a 100mm macro lens and my Macro Twin-Lite MT-24EX flash unit. One of the great things about doing macro work with a flash unit like this is that you can simply set the camera to manual, set your aperture for the desired depth-of-field, and then select a shutter to something fast enough to freeze your subject, and the flash unit will throw out as much light as necessary to light the subject. I do usually find that I use minus flash exposure compensation because the light can often be too harsh, but once you get a feel for this it’s really easy.
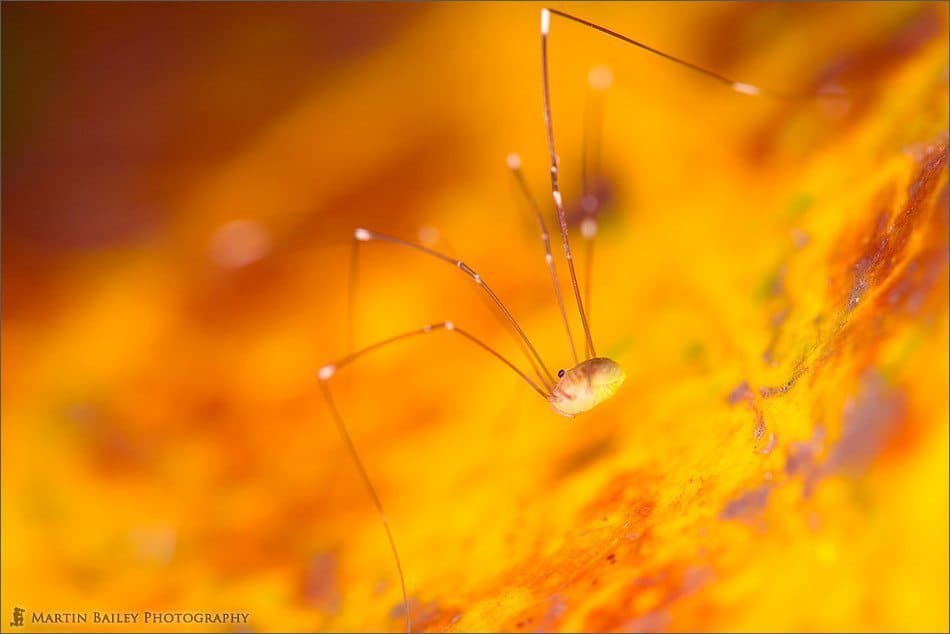
Walking on the Sun
OK, so we really are just a few episode from being totally up to date now, so let’s fly threw the last few before going on to the winners of the Depicting Culture assignment, for which we set the stage in the next episode, number 45. Cultural differences between people of different countries and also between different groups of people within the same country can be a great source of photographs. The first image I talked about in this episode is image number 182. I captured this airport employee bowing at a plane as it taxied towards the runway. I found this to be very Japanese and had until this point not really noticed this before, though it didn’t surprise me very much. I called this image “Only in Japan!” as I think this really depicts the politeness that the Japanese often show, especially to customers, as are the passengers in the plane, but I also feel that there is a small prayer that the plane arrives at its destination safely in that deep bow too. I basically went on to discuss seven more images that to me well depict the Japanese culture, and I also mentioned how I feel it is easier to notice a culture, including your own native culture, when you are lucky enough to step outside of your own culture, as I have done in coming to Japan.
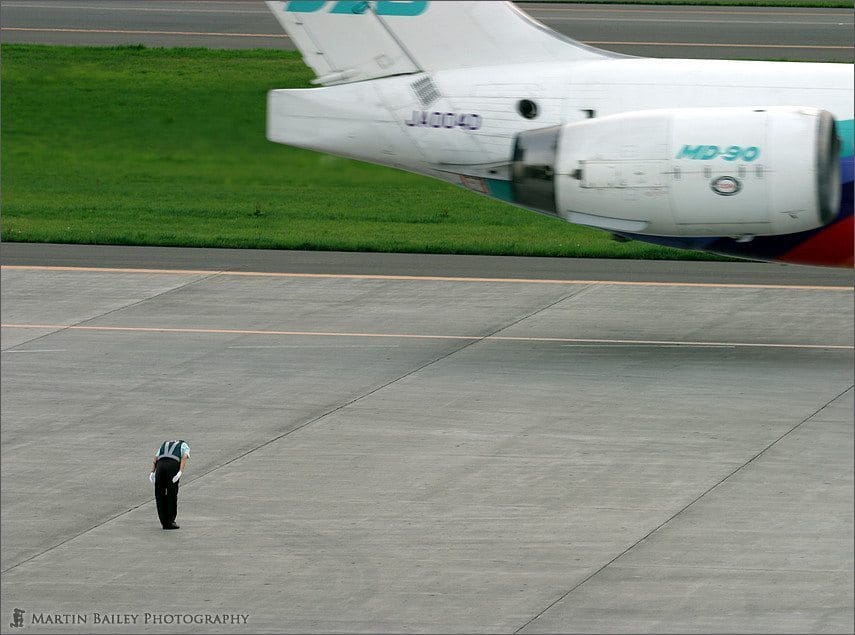
Only in Japan!
In episode 46 we took a look at a number of shots from the beautiful Oirase area in the Aomori Prefecture. The northern most prefecture before making the crossing to Hokkaido, which we took a further three weeks to cover in episode 47, 48 and 49, which brings us to the start of these summaries. These again are more like travelogues with technical and artistic tips and techniques interwoven into them. I touched on for example once again how I now tend to use Photoshop to stitch together two images rather than using a gradual neutral density filter, that I also mentioned earlier. In fact the example that we look at first today was from this trip. To close, let’s take a look at one of the last images from this series and indeed of my trip to Hokkaido in July 2006, which is image number 1101. With this image I made a point about the importance of sticking with a subject until you get the image you want. I’d visited this location on multiple occasions over the last few years, and I even extended this trip by one day to because that line of red poppies was not quite in full bloom when I got here 10 days before this shot. I then talked about the importance of trying something different to set your images apart from the rest, as I did here by using a slow shutter speed to add movement to the barley as it sways in the breeze. This, couple with the beautiful radiating cloud formation makes for a great image and I really felt that all the time, effort and not to ignore, money, that I spent to get to this point really paid off.
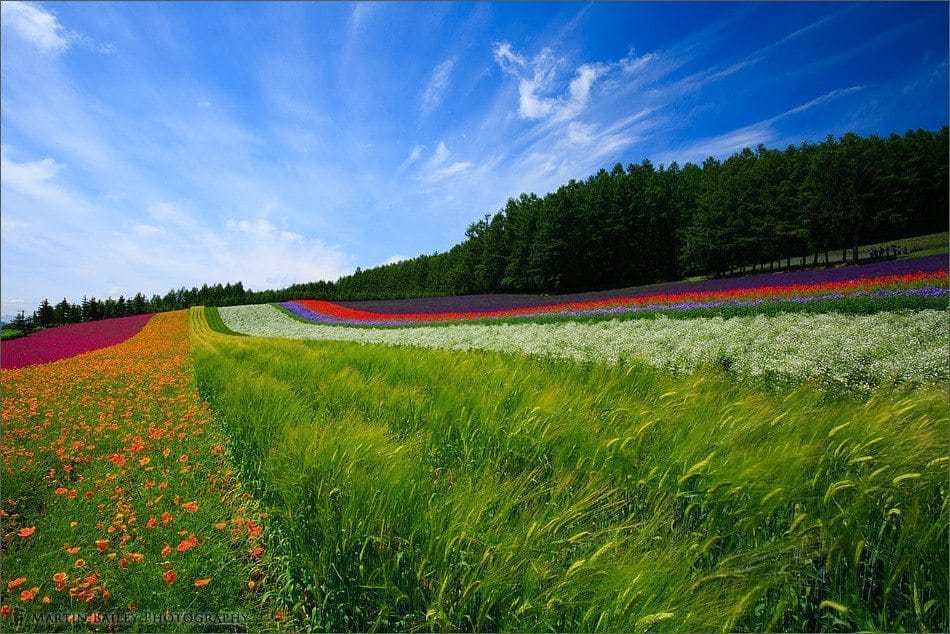
Emanation
OK, so that’s it for the summaries, and a few brief updates on the information here and there. I hope that it has been of some use. Now let’s move on to the announcement of the Depicting Cultures assignment.
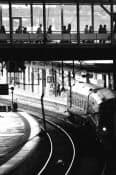 In reverse order, in third place, getting a placing for the second time is Orchid, with Commuter Culture. This is image number m2130. That’s an “m” for member and 2130 if you are entering the image number in the field on the top page or the Podcast page at martinbaileyphotography.com. Orchid tells us this is a scene from the Leeds Central Station. Converting to black and white added a great deal to the overall mood of this shot. I personally like the way the train is only half visible along the right side as it curves along the tracks that lead the eye into the shot from the bottom and through to the centre left. We learn some about the culture too I guess from the scene with the odd person on the platform and the people crossing the overhead walkway placed nicely across the top third of the frame. Great shot again Orchid and congratulations on third place.
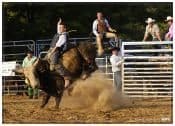 In second place we have pstraat, that’s pstraat, with the image “Kickin up Dust”, in which we can see a bull rider struggling to stay on this huge bull for, we are told, eight seconds. This is image m1897. I love the brightness of this image. The quality of light is just beautiful. The expressions on the onlookers faces adds so much to the image too, as they all seem to be mentally supporting the rider in his struggle to stay on the bull. The bull’s head too turned to face the photographer with those big patches around the eyes and big horns adds a nice touch. Not really looking mean, rather a little dopy in some way, but I wouldn’t say that to his face if he was standing in front of me. I like the positioning of the animal too, nicely in the left of the frame with the rider right on the left third line. Then of course there’s the timing, with the bull’s hind legs raised high, kicking up the dust mentioned in the title. Very, very nice image. We can see from the copy right that the Photographer’s name is Paul Straatmann, so congratulations Paul on an second place with this excellent image.
Now, the winning image this month just blew me, and obviously a lot of other people away. I was struggling with my own decision to vote for this image because of the Japanese connection, as I didn’t want to choose it just because of my love for Japan and everything Japanese. However, although there were so many great images again for this assignment, and I was considering a number of others for a while, the winning image is just so stunning, that I too could not help but to cast my vote for it. Hqsbud, or Forrest Tanaka’s “Obachan no Kimono” is the winner of the Depicting Culture assignment. This is image m2203. Forrest has gone to the trouble to dress his young subject in her aunty or possibly grandma’s kimono, and posed her with her right arm out in front of her holding the decorated folding fan. Despite there probably being a wealth of colour in this image, Forrest has decided to convert to black and white, another great move, and the crop is exquisite. I’d say this is probably Forrest’s daughter, forgive me Forrest if I’m wrong, but the way she is looking down, not at the fan, but to a point probably somewhere on the floor, left of her outstretched arm, really to me just adds the final touches to a classic image. So Forrest, please select another print from my gallery, and I’ll get the print of your choice out to you as soon as possible. You really have earned it with this excellent image. Congratulations.

Remember that you can see the results of this and previous assignments on the Scores page found in the bottom of the Gallery menu at my site, and I’ll also put a link in the show notes. And with that, we are just about finished for today. I will be announcing the theme for the next assignment next week, as I wanted to finish the summary this week and it didn’t leave enough time to go into a new assignment. Note also that I will be publishing a graph shortly to show the accumulated points from the last three assignments for all images with more than 1 vote. I was hoping to publish this today, but I’m having some problems with the graph on my server, and so need to work on it a little more first. A reminder with that is that I will be awarding a prize to the member with the most accumulated points at some point later this year, probably around the time that we have been running the assignment for one year. It will not be a print, but rather something else photography related that I personally will buy if I can’t find a sponsor.
So thanks very much to everyone for listening. Have a great week, what ever you do. Bye bye.
Subscribe in iTunes for Enhanced Podcasts delivered automatically to your computer.
Download this Podcast in MP3 format (Audio Only).

0 Comments