Hello and welcome to episode ten. First, I want to announce the winner of October’s prize for members active in the forum. Congratulations to Marisa Firpi. An original print of the photograph you chose, which was “Distant Tokachi Mountain”, is in the post on its way to you. This is photo number 663 if anyone would like to take a look. The print was creating with an Epson PM-4000PX printer, which I believe is the Stylus Photo 2200 in the US. This printer uses pigment or archival ink, and I am using compatible paper, so you can expect your print to last longer than a standard photograph under the same conditions.
So, on to this week’s main topic… Today I’m going to talk about Exposure, Exposure Compensation and the times that I switch to Manual mode when shooting. There’s a lot to take in, so you might need to concentrate a little if you are not entirely confident in these areas.
Typically I use Aperture priority mode, but under certain condition I switch to manual mode and set the aperture and priority myself. I’ll explain more about that in a moment, but first, let me explain briefly about the relationship between the aperture size, the shutter speed and the ISO settings. For some of you this will just be a recap, but I’m sure some listeners will benefit from a brief recap.
When we talk about the aperture size, we often use the term f-stop. The f here stands for factorable. Basically, your camera will have a series of aperture values which you can set. The smallest number such as F1.4, F2.8 or F4 etc represents the largest aperture size, and the largest numbers, such as F22 or F32 represent the smallest aperture size. I know it’s weird to have the smallest number equaling the largest aperture and visa versa, but it would make this Podcast too long to go into the reasons why. Let’s just remember it this way.
The key aperture settings are F1, F1.4, F2, F2.8, F4, F5.6, F8, F11, F16, F22 and F32. Some lenses will go smaller than F32 to F45 or even F64, but they are not so common. With each stop, counting down from the smallest number, or largest aperture, we are effectively halving the size of the hole that lets light into your camera. Depending on your camera, you may also have half or third stops, but the numbers I just gave are the primary stop values, so let’s concentrate on them, and if you can, it will help you greatly when shooting in manual mode to memorize them.
Now, to help us to change these settings while shooting with some simple mental arithmetic, we should remember that there is a direct relationship between the Aperture values and the shutter speed and the ISO. To illustrate this, if you have your camera available you could try it right now, if not, just keep on listening. This will work on a digital camera or a film camera that allows manual setting of the ISO and see the aperture and shutter speed settings. First set your camera to aperture mode. Next set your ISO to 100 and aim your camera at a scene that you know will have constant light for a while, then half press the shutter button to have the camera meter the scene and show you the aperture and shutter speeds. Make a note of the aperture and shutter speeds. For the sake of this example, let’s say that you have set your aperture to F8, and the camera is giving you a shutter speed of one 250th of a second. If you then change the ISO to 200, you will now see that the shutter speed changes to a 500th of a second. Change the ISO again 400 and you’ll see that the shutter speed changes to one 1000th of a second. So we see that changing the ISO is doubling the sensitivity and therefore halving the time needed to make the same image exposure.
Now, let’s return the camera’s ISO settings to ISO 100, and you’ll be back to F8 at 250th of a second. This time, let’s change the camera’s aperture setting. Remember that F5.6 is one f-stop larger than F8, so obviously, when we change the aperture from F8 to F5.6, we’ll be letting in twice as much light. So what’s going to happen to the shutter speed? That’s right! It will be halved to one 500th of a second. This is the same as changing the ISO from 100 to 200, and doubling the sensitivity of the film or sensor. To make the point, let’s make the aperture smaller by stopping down to F11. Now you’ll see that the shutter speed changes from one 500th of a second at F5.6 through the original 250th of a second at F8 to 125th of a second at F11. If you stop down further to F16 you’ll again halve 125th of a second to on 60th. I know that half of 125 is actually 62.5, but your camera will display one 60th. Again, let’s just remember this as it is.
Of course, if you were to set your camera to shutter priority, you could do a similar thing by setting the shutter speed to 1/250th of a second, and the camera would select F8 for you. If you change the shutter speed to 1/60th of a second it would change the aperture to F11 for you. It’s all relational.
If by the way you are getting inconsistent reading while trying this, maybe you could try this at night under artificial lighting, such as the light bulb in your living room. You might also want to put your camera on the table or even on a tripod to keep it steady during the operation, so that the readings will be constant.
If you own a hand-held light meter, you can also play around with that in a similar way to get an idea of the relationship between these three settings.
Anyway, I think you get the picture. By changing any combination of the aperture, shutter speed or ISO we can change the amount of light that hits the film or digital sensor and change the exposure. Now that we know that a properly exposed image can be obtained by any combination, let’s talk briefly about EV or Exposure Value. Exposure Value is a unit used to describe the amount of light for any given exposure. For example, the starting point for the example given earlier, which is F8 for 1/250 of a second at ISO 100, has an Exposure Value, or EV of 14. And so do F16 at 1/60 of a second and F5.6 at 1/500 of a second and F2.8 for 1/2000 of a second. All of these settings will give us the same exposure as the same amount of light will hit the film or sensor. It may be easier to understand the relationship between the EV values and the shutter speed and aperture settings by look at a table I posted in my forum some time ago. I’ll include a link to this post in this episode’s notes.
Obviously being able to obtain the same exposure using different combinations of aperture and shutter speed, gives us the ability to make artistic decisions about the resulting image. That is because the size of the aperture will affect the depth of field. If we want the whole scene in focus, what we call pan-focus, we must select a small aperture such as F16 or F22 or smaller, though this also depends on the focal length of the lens and the distance from your camera to the subject on which you focus. Talking about this today though would make this Podcast a little too long, so we’ll leave that for another day. Anyway, pan-focus is often something that we want to achieve in Landscape photography to ensure that the whole scene is sharp for our eyes to explore.
If however, we want a very shallow depth of field, say for a portrait or wildlife shot in which a sharp background would detract from the main subject, we would need to select a wider aperture. So we may decide to go for an F2.8, F4 or even F5.6 aperture with longer focal length lenses.
Now, before we move on to some real-world examples, let’s talk briefly about exposure compensation. As I mentioned in last week’s Podcast, your camera will almost always try to render your scene in neutral brightness, similar to that of an 18% gray card. Now if the scene is actually very dark, say it contains a lot of black objects, or such as some of the images attached to last week’s episode, the camera will try to brighten them up and over-expose your image, so you have to under-expose to ensure that the scene is recorded accurately. Likewise, in daylight, if the scene is very bright, the camera will try to make it a neutral brightness, and therefore will under-expose the shot. So you have to over expose it to make it accurate. This practice is called Exposure-Compensation and most cameras except for the basic, fully automatic models will have the ability to compensate exposure quite easily. It’s usually as simple as turning a dial. You also need to know by how much to turn the dial of course, which I have some practical advice on.
So let’s talk about a practical application, now that we can do these exposure calculations easily in our heads. This will also illustrate the reasons why we might want to go to manual mode on occasion.
In February 2004 I went to Hokkaido, the northern-most island of Japan, to shoot wildlife. Hokkaido in February means snow, and lots of it. Snow will generally fool your camera’s meter into under exposing by around 1 to 1 and 1/3 of a stop in overcast conditions, or up to two stops in bright conditions. If you were to rely on your camera’s meter you would end up with gray snow, which I’m sure you’ll agree would not look very nice.
To make snow look white, you can compensate by moving your exposure compensation dial to plus one and 1/3, one and a half or more in brighter conditions. If the entire scene is going to be snow with no darker patches you need not worry about switching to manual mode, as the metering will be constant, so the amount of exposure compensation needed will also be constant. However, if the scene will be made up of very light patches, such as snow or light coloured sand, and dark patches, such as wet rocks or trees, depending of the metering mode you are using and where your main subject is in the frame, you camera can make all sorts of mistakes. It is under this kind of conditions that I would switch to manual mode and set both the aperture and shutter speeds myself.
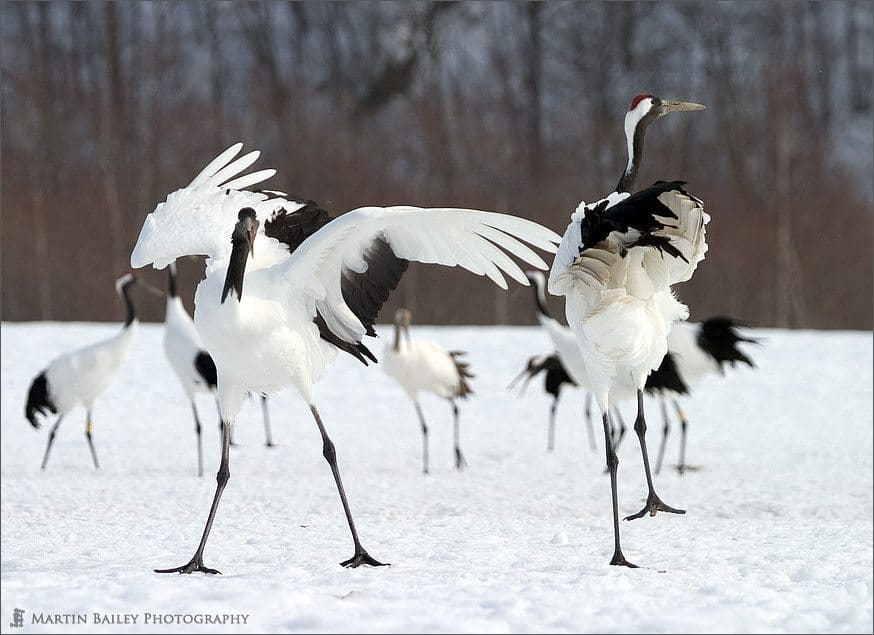
Wassup!! – Japanese Crane
Let’s take a look at the first photo on today’s Podcast. This is number 287, which was shot at F5.6 at 1/800 of a second. You can view the photos in iTunes or on my Podcast page which is linked to the top page of martinbaileyphotography.com. You’ll see a number of Japanese Red-Crowned Cranes on a field of snow and a dark forest in the background. I had l metered from the snow which although I don’t recall exactly, was probably giving me a reading of around 1/2500 of a second at F5.6. The camera was remember trying to give me a nice medium gray coloured snow, so this was far too fast a shutter speed. It was a hazy sunshine on that day, not full sunlight, so I didn’t need to compensate by a two full stops. To find the correct exposure, I first took a shot of the snow, with nothing else in the frame, then compensated by adding around 1 and 2/3 of a stop.
To calculate this, you can either count up two thirds from plus one stop, or down from plus two stops. To count up from one stop, start with 1/2500 and then double the shutter speed to 1/1250 of a second. Then click twice more on your shutter adjustment to go past 1/1000 of a second to 1/800. To drop back by a third from two full stops, double the speed first to 1/1250 as before, then double it again, which will give you 1/640 of a second, which is two stops. Then click back one to 1/800. You don’t have to do the mental arithmetic to find out exactly what a third is, as you know that there are three clicks per stop. Your camera will help with the finer adjustments. In actual fact, if you don’t want to remember all this about doubling the times you can just think that 1 and 2/3 is actually 5/3, so you can just click five times after what the camera is initially telling you.
If you have your camera set to use half stops and not thirds you will have just one click between stops. You will probably also have different numbers to play with to start from. This makes the example a little confusing, but I can’t go back to February 2004 and take my shots again, so I’ll just quickly mention that when I set my Canon EOS 5D to use 1/5 stops, in manual mode I have the options of 1/750, 1/1000, 1/1500, 1/2000 and 1/3000 etc. If you are using a similar scale you need to set the shutter speed to 1/750, which would be one and a half stops more than what your meter reading gave you, which would probably have been around 1/2000 of a second.
One important additional piece of advice here is that if you are using a digital SLR, it is very important to check that you are not blowing out your whites. Take another practice shot and check the histogram. If you have a spike on the far right hand side it means there are areas of your shot that are too bright. With a very white scene you should see the peak of the histogram weighted to the right side, but not right up against it. Some digital SLRs also have a flashing warning when the white is close to or actually blown out. If you see either of these warning signs, drop down by a 1/3 or 1/2 a stop and take another practice shot. Repeat this until the histogram looks good or there are no or very little areas of the image flashing the over-exposure warning. This way you should be able to ensure that your whites are white, but not blown out.
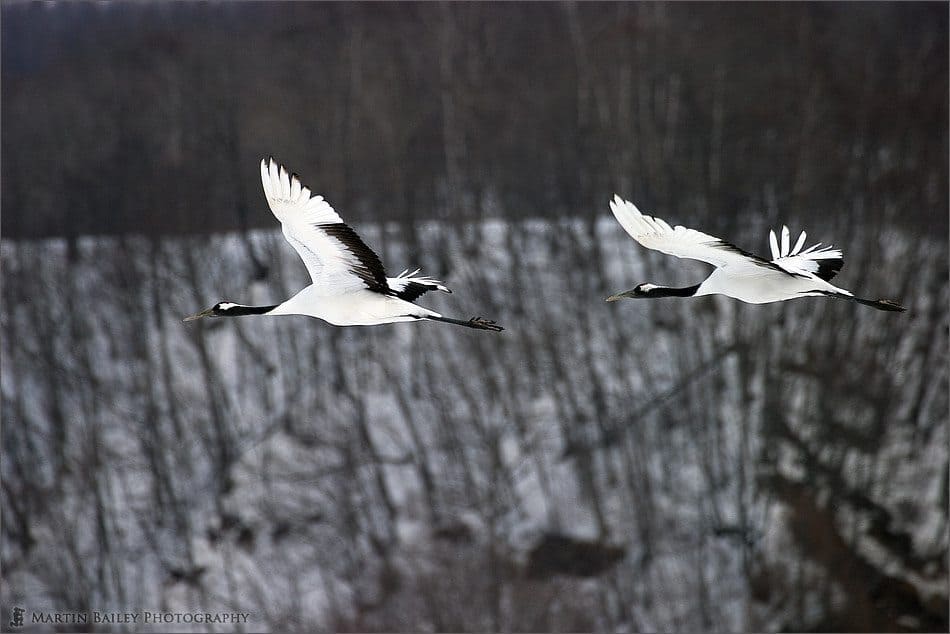
Japanese Crane
Let’s also take a look at the second shot attached to this episode, which is number 297. This time the white cranes, which are obviously the same colour and luminosity and when they are standing on the snow, are now flying against a totally dark background. I shot them in manual mode at exactly the same settings, F5.6 at 1/800 of a second. Had I left this to my camera’s meter, it would have over-exposed to brighten the dark background, and the birds would have been so blown out that there would have been absolutely no detail in the white what so ever. The shot would have been useless. Instead, you can make out detail of the feathers and the background is dark as it actually was. Another interesting thing is that even when the birds were shot flying overhead at the same F5.6 at 1/800 of a second, as in shot 280, they were still perfectly exposed. This is another scene that would have fooled the camera’s meter and again ruined the shot.
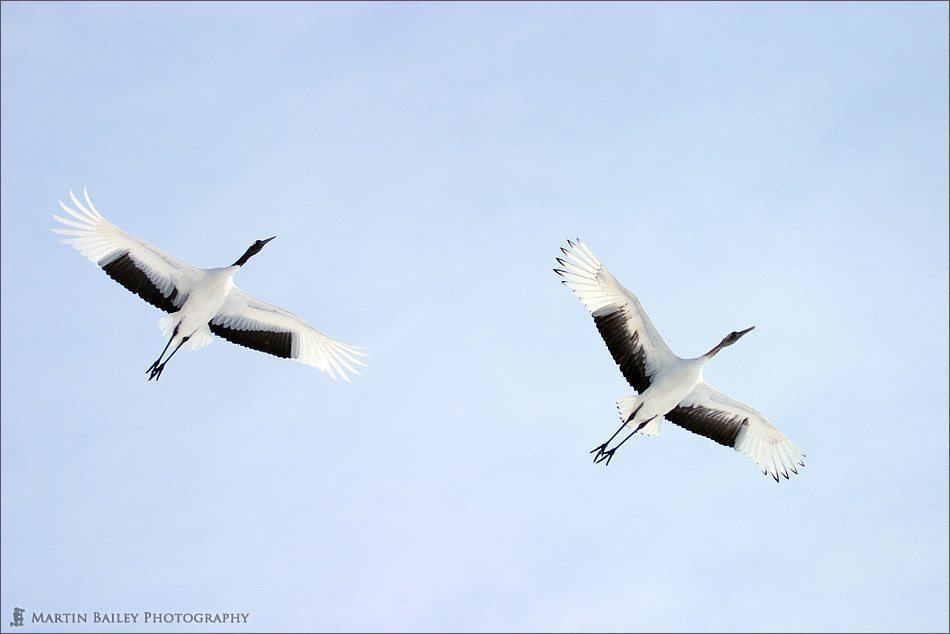
Japanese Crane
Of course there are numerous ways to ensure good exposure in high contrast scenes, such as using spot metering on your camera and using hand-held light meters etc. but getting into this right now would make this Podcast way too long, and I still have some weekend left to enjoy, so let’s leave it there for now.
For some examples of when you might want to do some negative exposure compensation to ensure a dark scene stays dark, take a listen to episode nine and look at the examples. I introduced a number of dark shots from a trip to India.
This Podcast was a little heavy going, but if you are not familiar with Exposure Values, F-stops and exposure compensation, you might want to listen to it a few times until you come to grips with this theory and the practical applications. If you have any questions, I’ll try to answer them in the forum at martinbaileyphotography.com and if I can’t, I’m sure someone will be able to.
Show Notes
The Music in the first 28 Podcasts is copyright of William Cushman © 2005, used with kind permission.
Subscribe in iTunes for Enhanced Podcasts delivered automatically to your computer.
Download this Podcast in MP3 format (Audio Only).

0 Comments